|
|
|
|
|
INDOOR SEASON IS HERE! – PART 3: LAYING A FINISH
INDOOR SEASON IS HERE! – LAYING A FINISH ON YOUR BIRD
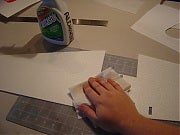
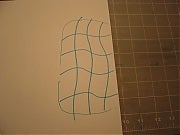
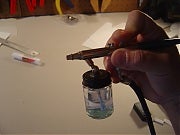
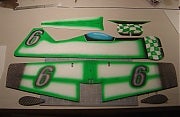
In the past installments, you got all your materials together and cut out all the parts. In effect, you made yourself a kit. Now its time to make sure that it will look good! Solid white foamies are simply boring. They are also difficult to get orientation on while in flight. There are lots of methods available for finishing your foamy, each with it’s own benefits and negatives. Which you chose is truly a personal decision. Below is a summary of some of the more popular methods. Airbrushing – Cleanest and most lasting finishing method, but requires sometimes expensive equipment and supplies, Some paints also prevent good adhesion of hinging tape. Rattlecan Paint – Inexpensive method with cheap supplies, but somewhat messier, heavier and not as precise Sharpie Markers – Lightest method with very inexpensive supplies, but tends to look messy and colors fade over time. Sharpie ink is also affected badly by CA glues and accelerators. BlowPens – A cross between Airbrushing and Sharpie Markers, this is an extremely light finish with a generally nice finish, but difficult to get good consistent coverage and colors fade over time. For the finish on the Juka, I’m going to use a combination of airbrushing and Sharpie markers. I’m going to use some simple methods that anyone can duplicate with virtually any airbrush and make it look good. There are also some great airbrushing threads I’ll list at the end of this section which will help showcase some other people’s methods, hints and tips. To start, I use a double action airbrush fed by my shop compressor. I use a digital regulator to keep the pressure even. My airbrush is a Badger 150 which I picked up at a flea market for about $35, nothing terribly fancy, but I keep it clean and it works. For paint, I prefer to use Createx paints. I purchase this paint at a local arts and crafts store for about $3 a bottle. There are several other paints out there, but I’d highly suggest a test on scrap material first to see how the paint performs. Some things to consider are paint adhesion, compatibility with the depron foam and paint aging. Some paints just don’t work that well with depron, and some solvent based paints actually melt depron! I used Tamiya model paints for a while from my LHS, but I found later that as the paint ages, it shrinks and causes the depron structures to warp. Other paints prevent hinge tape from adhering correctly. For brush cleaning and paint reducer, I use a one to one mixture of water and Fantastik spray cleaner. I keep an adapter bottle of the mixture to spray through the brush after each color to help clean out the brush, and I keep a small bottle of the mixture on the bench to thin paint correctly for spraying. For masking, there are many ways to go. Frisket Film is a thin adhesive film which is available from art stores just for masking paint work. It works well, but is expensive and can be somewhat difficult to work with. Next up is using scrap depron material as masking(Credit for this idea goes to Craig Koerner : ). This is a very effective way to mask and is very repeatable since the depron can be used again and again. It does not always yield the crispest lines, but it is very effective. Small weights or nuts can be used to hold down the shapes on the piece to be painted, but this method does not work great with an upright painting piece on an easel like I use. The final method uses scrap paper and manila folder for templates. I prefer this method and use it most often. The downside is that the paper will absorb the paint moisture and wrinkle, so you have to shoot quickly and be ready to remove the paper when necessary. I use the 3M Restickable Gluestick to hold the templates in place when shooting. For your most permanent templates, mylar .010" plastic (available from fabric shops) is an excellent pattern material, but relatively difficult to cut. I save that for my the patterns I plan to use very frequently. For this design, I’m going to put a canopy and some other graphics on. I’ll first lay out my design on the manilla folder or computer paper. Then I’ll cut it out with a sharp hobby blade. For those designs that have a left and right, I draw the design once, then I leave the folder intact or stack two sheets of paper and cut through both sides to quickly create a left and right pattern. Don’t forget to use your straight edge to guide your cut on all straight line cuts. I’ll use the shapes I cut out for the canopy and the numbers to mask the parts while I shoot a base color of green. This will help keep it light. When possible, don’t ever shoot paint over paint- that just adds weight. Checkerboards can be relatively easy to create. Start by drawing in a checkerboard pattern on a piece of scrap paper(excuse my pitiful drawing). Then coat the back of the drawing with Restickable adhesive. Finish the pattern by sticking it to your cutting board and cutting the pattern with a sharp knife. Next, transfer the checkers to your project. I transfer all of them, I then ‘weed’ out the areas to be painted. Numbering the checkers (every other one) helps to keep them in order and ensure you weed out the right ones. Spray the paint over the patterns and let it dry. Highlight the checkers with a faint spot of white paint to give them more depth and feel. Any good freestyle airplane would not be any good without some carbon fiber on it right? I do faux carbon fiber with a couple simple steps. I first paint the part with a base of black Createx and let it dry. Then I pull out a section of Sears Craftsman Toolbox mat. This stuff is soft foam with a pattern of holes in it. One roll will last forever. The pattern is perfect for creating that carbon fiber effect. I spray silver createx through the mat to get the pattern right. Its important to lift the mat directly off the painted part to keep from smearing the paint. Voila- instant faux carbon fiber – This thing is kinda feelin like a tuner car now isn’t it! The canopy and number colors on the wings and fuse are done with the ‘negative’ paper templates. I used Powerpoint to draw the numbers and printed them on computer paper. When I cut them out on the cutting board, I was careful to save both the number and the paper it came from. I was able to then use both parts to mask the project as I shot the paint. Same process was used for the canopy. I used a silver Sharpie marker to highlight the canopy edges. Some white highlights on both the numbers and the canopy make them stand out more. Some other helpful hints – Alchohol will take Createx paint right off of depron before it has dried. I keep my spray bottle of alchohol right next to me while I work to take off any overspray or mistakes. Scrap foam husks from Giantscale foam wings make a pretty good easel when taped together edge to edge. Stick a couple of scrap balsa sticks in them to support the parts to be painted. Careful use of a black Sharpie marker can hide fuzzy edges and highlight the color all at once. Spray your lightest colors first and finish with black. This keeps color contamination in the airbrush to a minimum. If you are using a double action airbrush, don’t forget to use the right tip for the painting task. This saves time and makes the paint job look more consistent. Masters like Donatas and others can make some incredible paint jobs, but for those of us without artistic ability, simple schemes using good contrast and simple Crayola 8 box colors often look best. Don’t forget to add some graphics to the bottom of the airplane to differentiate the sides! After airbrushing my airframes, I like to let the parts sit for at least one day. This gives the paint a chance to gas out which ensures that there will be no problem with the hinge tape sticking! Next up is framing the airplane. Time to get your carbon fiber and foam safe CA out…. For additional Foamy Painting Ideas, go check out Craig Koerner's awesome thread below: https://www.flyinggiants.com/forums/...ng-thread.html For those who missed earlier installments, https://www.flyinggiants.com/forums/...ld-series.html and https://www.flyinggiants.com/forums/...ing-parts.html |
|
|
|
|
|
|
|
Re: INDOOR SEASON IS HERE! – PART 3: LAYING A FINISH
...
|
|
|
|
|
|
Re: INDOOR SEASON IS HERE! – PART 3: LAYING A FINISH
looks awesome!
|
|
|
|
|
|
Re: INDOOR SEASON IS HERE! – PART 3: LAYING A FINISH
This is soo sweet every question I had about foamy cutting, milling, masking and painting has been answered by Matchless over the last few days! THANKS!!!!
|
|
|
|
|
|
Re: INDOOR SEASON IS HERE! – PART 3: LAYING A FINISH
Poring, the 6 is bold italic Impact font.
As for doing such a clean job, I have definitely seen better, but I also know that using these methods and a very little practice, you could do just as good of a job! : ) 3Dcrazy, keep your eyes peeled, there's more to come and I hope it will be as helpful |
|
|
|
|
|
Re: INDOOR SEASON IS HERE! – PART 3: LAYING A FINISH
matchless, you are doing the hobby a great favor!! as 3d said, in the past few days, you have answered many questions we have all had. I have made the milling attachment for my dremel and it is definitely hard to do free hand! I think the next one will be done with templates!!
 also, thanks for posting the files for the juka, I'm all for free file sharing! Keep up the good work and great advice, as always it's much appreciated! also, thanks for posting the files for the juka, I'm all for free file sharing! Keep up the good work and great advice, as always it's much appreciated!
|
|
|
|
|
|
Re: INDOOR SEASON IS HERE! – PART 3: LAYING A FINISH
can you paint my xcalibur ..... like the false carbon look!
mike |
|
|
|
|
SWEDEN
Joined Aug 2007
289 Posts
|
Re: INDOOR SEASON IS HERE! – PART 3: LAYING A FINISH
Hi I like to paint my models to but there is other ways to get a finish.
Here is a link to our YAK 55L http://www.rcgroups.com/forums/showthread.php?t=649222 // Lennart SWEDEN |
«
Previous Thread
|
Next Thread
»
| Currently Active Users Viewing This Thread: 1 (0 members and 1 guests) | |
| Thread Tools | |


