Pilot R/C Columbia 400 -150"
The ARF market has grown by leaps and bounds over the past decade especially in the area of readily available giant scale models. While the market has primarily advanced in the area of giant scale aerobats, more recently, there has been a growth in demand for giant scale models that follow the lines of either military aircraft or civilian/GA aircraft. To this point we have seen primarily some giant scale GA Aircraft like Cubs and Citabrias along with a few military applications like the P51 Mustang.
Pilot RC decided to change the game a bit and go outside the box with its first try at a scale-outlined model of a very popular GA Aircraft and develop something that no one (to my knowledge) has never produced in giant scale ARF form. That said, Pilot RC has brought to us the 35%, 150" Span Columbia 400.
The Columbia 400 is designed around100cc engines with a full functional oleo-strut steerable nose gear assembly, functional flaps, cockpit, antennas, lightening wires, as well as fully functional and pre-installed light system with Nav and landing lights! Pilot RC paid close attention during the design process of this aircraft and keep the lines consistent with the full scale aircraft and gave the end assembler the ability to add as much, or as little detail as they wanted when finishing their aircraft.

|
Introduction
|
||||||||||
Out of the Box: 


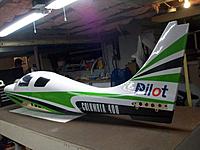
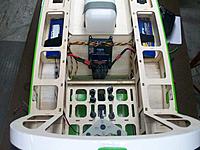
My Columbia 400 arrived directly from China in a gigantic box that housed all of the parts and accessories needed to assemble to aircraft. The airplane was packed into a molded foam rectangle that was well thought out with different molded areas that custom fit the many different parts of the Columbia. The foam box was then sleeved with light plywood and then the entire thing was sheathed with cardboard as the last layer of protection. Despite coming all the way from China via airmail and what looked like DHL's best attempt to destroy it, my airplane arrived to me free of damage with all the respective parts in their proper places within the shipping crate. I have no doubt had Pilot not thought out their process and packaging around their shipping process, I imagine the aircraft would have showed up at my door as a box of kindling, and not a soon to be functional ARF aircraft. Within the crate, the major sub assemblies were all present as well as a full hardware package including ball links, turnbuckles, fiber double control horns, wheels, bolts, extension safety clips, axels, etc. Also, the fuel tank came pre-installed in the aircraft with fuel lines and a fuel DOT that could be mounted wherever the owner so chose to mount it (there were several locations in the fuse that were designed to mount the fuel dot as well). Also within the crate were the long carbon fiber main gear legs that were painted to match the covering scheme, the aluminum nose gear assembly complete with functioning strut, a chrome-painted carbon fiber spinner that was pre-cut for a two blade 27/28" prop, wheel paints, and wheel fairings to dress out the model. Upon first inspection of the airframe, the design is very well thought out and organized. Tony and the Pilot RC team anticipated the use of Canister mufflers within the airframe and created the necessary pipe tunnel, and even went as fire as to create their own cans and headers that were intended to be used with the model and a DLE 111 power plant. All glue joints appeared to be well done and neat along with several designed platforms that were all laser cut to utilize straps and other mounting methods for batteries, receivers, and other in flight avionics. Pilot also included several ready-made servo mounts to assist in mounting you throttle servo depending on the power source that you chose for the airframe, giving you full flexibility. On top of that, Pilot supplies the aircraft with an un-mounted firewall so that the end owner can measure, cut, and mount the firewall with the supplied hardware to give a custom installation no matter what engine or power plant you chose to run. Pilot also installed the pull-pull cables as well as pull-through strings to assist in installing your aileron and flap servo extensions. Lastly, Pilot also included a full carbon fiber stab tube, and due to the dihedral in the wing, the typical wing tube has been replaced with a composite laminate blade-spar. Product Specifications Wingspan: 150 in(3.81M) Wing Area: 2836 sq in(18300 sq cm) Fuselage length: 95 in(2.41M) Weight: 36.6 lbs(16.5kg) Engine: 100~120CC
Assembly: Pilot included an assembly manual with the aircraft, but I used it more as a reference if I had any questions rather than a step by step construction guide. The aircraft is laid out and designed so well that if you have assembled a couple of giant scale ARF aircraft in the past, you will have ZERO issues with getting this bird in the air without ANY assistance of the manual.
After unpacking and organizing all of the various parts and accessories included with the Columbia 400, I decided to first start assembly of the wings. Each panel has several access hatches in the bottom of the wings that are designed to have the aileron and flap servos mounted to. Because of the various servo options that the end owner has the ability to choose from, Pilot included in the kit all of the necessary hardwood mounting blocks for mounting the servos but did not pre-mount them to the hatches. As I chose to run Futaba 9155 and 9156 servos, I simply spaced the blocks accordingly for the mounting tabs on the servos ensuring that the Airwild servo arms that I chose to use exited the holes in the hatch in the proper location allowing for full movement. Pilot RC included a full set of fiber servo arms that could be used with the factory arms, but having the AIrwild aluminum arms on hand, I decided to go with them instead. Once satisfied with the alignment, I glued the hardwood mounting blocks to the back side of the hatches locking them down permanently. One the glue had set, I then drilled and mounted the servos with #2 socket head servo screws from MicroFastners. One quick trick I forgot to mention is that I opened the slots on the hatches (and all covering areas that needed to be removed on the airframe) with a fine-tipped soldering iron. I find that not only does the soldering iron make quick work of removing the covering, but it also seals the edges of the covering to prevent from it pulling up in the future when exposed to the wind and various elements. Once the servos were mounted, I removed the covering around the mounting holes for the control horns and mounted them using 15-minute epoxy. Once cured, I installed the supplied turnbuckles and ball links to finalize the wing completion while centering the servos and setting the alignment with an electronic servo centering tool. Once these few steps were complete, the wings were done all except for the final scale details and ready for install when the rest of the airplane is complete. 


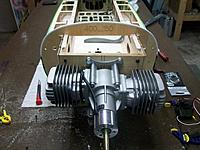
After the wings, I moved on to the stabs which were extremely simple. The servos for the stabs are dropped into the stabs from the root and installed with four servo screws. Once again, I removed the covering around the slots for the servo arms with a soldering iron, and made sure to install the servo arms and tighten the set screw down with Loctite. The control horn installation was the same as the wings as well as the turnbuckle linkage install. The elevators came pre-hinged and pre-pinned from the factory, but being the worrywart that I can be, I made sure to give the elevators a good tug to ensure that they were mounted securely from the factory, and they were! Upon completing the stabs, I moved on to the final, and most major area of assembly on the Columbia 400… the Fuselage! I begin the assembly of the fuselage with the installation of the firewall assembly. The cowl comes pre-mounted from the factory so any adjustments to engine spacing will need to be done via the firewall to ensure a good, tight, and professional looking fit. I chose to go with the DLE 111 power plant and to achieve the correct spacing. I had to cut back the motor box sides from factory length prior to gluing on the firewall. The motorbox sides are marked with the correct right and down thrust that is essential to not only make the airplane fly correctly, but also to ensure that the crankshaft exists the cowling in the correct location. Once satisfied with my measurements and cuts, I glued the firewall in place with 30 minute epoxy, utilizing tri-stock for additional support top and bottom. Once the glue had cured, I drilled and mounted the bolts that tied the supplied aluminum angle to the motorbox sides and the firewall as further security to ensure a solid and permanent firewall mount. The firewall also came pre-marked for mounting lug drill holes for the DLE 111 and the ever-popular DA 100 and 120cc series engines. A quick run through with a 1/4" drill bit ensured that my motor would mount up exactly where it should. I finished the motor installation with 1/4-20 socket head cap screws with washers, lock-washers, and locknuts. Once the motor was installed, I move on to getting the Columbia 400 onto its feet! The front landing gear assembly was simple and straight forward. Pilot took the time to think out the design and the loads that a nose wheel on an airplane this size would undergo. That said, in the front of the fuselage near bulkhead F1, Pilot has installed a series of aluminum angle brackets that the front strut bolts to, that spreads the load across the front of the airframe. Utilizing the supplied socket head cap screws and lock nuts, I bolted the front gear to the airplane and move onto the mains. Pilot also put a lot of thought into how the main gear attach, and are supported within the fuselage. 
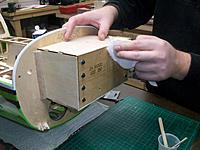

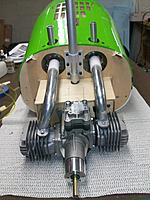
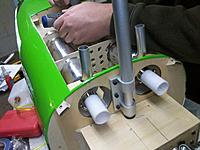
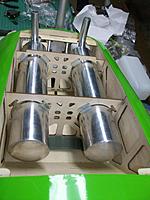
The gear system is comprised of two long painted carbon fiber mains as well as an aluminum cross mounting plate. The main gear slide up into the fuse and mount with a couple of socket head cap screws. Once the legs are in, the aluminum support/cross plate bolts in between the two sets of mains locking them together which spreads the torsional load of the vertically mounted mains. Looking at the well thought and durable design, I firmly believe that it has the ability to withstand the roughest of landings in the event that the pilot thinks flaring prior to touch down is optional! Once I had the landing gear and main nose gear installed, I was able to dry fit in the canister mufflers (provided by Pilot) with the included canister mounts as well as the provided headers. The bottom of the fuselage is already prepped for canister installation and has a pre-installed hatch with vents. I once again used a soldering iron to remove the covering from the vent holes and rather than open the entire pattern on the hatch, I chose to clear enough vents to provide adequate cooling, yet give it a bit of design on the bottom. I also mounted the two provided can-mounts on the canisters and slide them into position. Because of the design and layout of the aircraft, you cannot install the headers and canisters as one-piece units. You must install the cans in the mounts, the mounts into the fuse, and then slide the headers into the couplers from the front. Knowing this, I locked the couplers onto the cannisters with the provided clamps (after mocking everything up to ensure a good fit) as well as installed a set-screw to ensure that there was no chance of them slipped off of the couplers down the road. I then slid the can and can mount assembly into the tunnel and slid the headers into the couplers to ensure a good fit prior to final install. Once satisfied that I had the alignment perfect, I tacked the canister mounts into the tunnel with CA, followed up with some 5 minute epoxy to ensure that would not come loose in the future. At this point, I mounted the headers and tightened them down to the motor as well as the couplers; once again using a set-screw to eliminate the possibility for them to come loose. After the motor and exhaust install, I used the supplied servo mounts to get the throttle servo mounted in a good location on the motorbox, mounted the ignition battery and switches, and finished up the front end of the aircraft. Once complete, I mounted the rudder utilizing the supplied hinges, the Futaba 9156 rudder servo and pre-installed cables, as well as the steering servo setup using the a Futaba 9155 servo and all of the supplied linkages. From this point the final assembly and setup were completed which included minor items like installing the wheels, final fitting the cowl, and plugging in the provided light system to operate the already installed navigation and landing lights. Once buttoned up, she was ready to go! 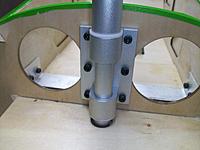
At the Field: I was surprised with some amazing weather here in CT in mid February so I loaded up the Columbia 400, got some fresh fuel, and headed to the field! Once completing some final checks, I fueled the Columbia and got the DLE 111 for its first run. I checked the initial needle settings to ensure they were at "factory," closed the choke, turned the ignition on and flipped the prop. The DLE 111 drew fuel quickly and fired off after only a few flips. After the initial pop, I turned off the choke and continued to flip the engine an additional 3 or 4 flips until it fired. Once it was running, I decided to make a few initial needle changes to run appropriately at my attitude and climate. For propeller selection, I chose to go with a PT Models 25x12 3 Blade which gave the Columbia more of a scale look, not to mention was very quiet. The DLE 111 ran great and idled well after a few changes so it was time to hit the skies!
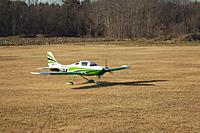
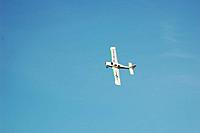
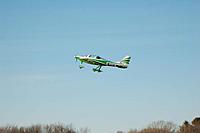
After taxing out on to the runway, I advanced the throttle and the Columbia picked up speed quickly. The airplane tracked straight down the runway and was airborne! Once in the air, the Colmubia required no aileron or rudder trim adjustment, and only a few clicks of down elevator to neutralize its flight path. The airplane immediately felt rock solid and stable in the air. The DLE 111 on the front end in combination with the 25x12 3-blade prop not only gave the Columbia a great look, but also pulled the airplane with authority! After a couple of gentle laps around the field it was time to pour the coals to the motor and knock out some high speed "show-passes." In the full-scale world, the Columbia and its predecessor Lancair were known as extremely clean and quick aircraft. Under full power, the Columbia 400 tracked extremely well and had no bad tendencies. I had expected it to want to change trim at high speed due to the semi-symmetrical airfoil used on the wing but there was no change! Pilot RC had properly done their research and development and got the thrust angles on the firewall correct, as no trim change was noted at any variation in speed. As for speed, as large as the Columbia 400 is, it looks and is actually going fast! At full power and flat out, the Columbia eats up real-estate quick just as the full scale! 


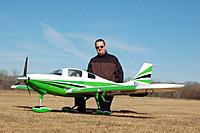


 Being such a "clean" design, one concern I had with the Columbia and the 3-blade prop combination that I used was whether or not the aircraft would want to slow down on final approach and not touch down at warp-speed. That said, I climbed up and got some altitude and proceeded to complete so stall and slow speed maneuverability tests with both the flaps on, and the flaps off. Surprisingly, the Columbia 400 had no problems slowing down, even with zero flaps dialed in. I attributed this to the large wingspan and the thickness of the airfoil at the leading edge. When stalling, even with full elevator deployed, the Columbia's stall broke straight ahead and was more of a "mush" than an actual stall, which was great to see. When I went to the tests with the flaps on, the Columbia was even more impressive. I had setup my flaps for 3 positions, 0, 20, and 40 degrees for initial testing. At both the 20 and 40 degree settings, the aircraft was extremely stable, showed almost zero signs of stalling, and was completely maneuverable even at the very edge of a complete stall. I attempted to get the aircraft to break during a stall either direction but attempting departure stalls with high amounts of rudder input, but the Columbia simply mushed and continued to fly. This was great to see as I knew landings would be completely uneventful. Once the slow speed tests were completed, I knocked out a couple more "show-passes" to ensure I got some good shots with the camera as well as a few basic aeroabatic maneuvers like loops, rolls, and hammer-heads. The Columbia 400 isn't an aerobatic airplane nor is it designed to be. But it is definitely capable of more aerobatics than its full scale counterpart, and is sure to keep the sport style flying that it is designed for fun! Once the initial "shakedown" flight was complete on the Columbia 400, I pulled the power back, dialed in 40 degrees of flaps and lined up on final for landing. The airplane tracked completely straight and seemed to just float in effortlessly in nice shallow glide angle. Once in ground effect the aircraft settled in for the softest of 3-point landings. The Columbia is capable of such slow speed flight that even on successive landings when I tried to force a nose-high main gear landing, the aircraft just kept flying! Truly impressive for an aircraft of this size, weight, and scale realism! Overall flight determination, total success and truly impressive as its size, speed, and detail are definitely a show-stopper at the field!!! 




DLE 111 The construction and flights with the Columbia 400 was also my first experience with the DLE series of engines. Out of the box, the DLE surprised me on how well it appeared to be constructed and inclusion of the accessories such as mufflers, throttle linkage, etc. During the construction of the aircraft, I chose to go with the Pilot RC supplied canisters and headers, which worked out great with the DLE 111. On the first trip to the field, I checked the factory needle settings to make sure they had been set, fueled the system with fresh 32:1 Pennsoil mix, and proceeded to start the motor. With the ignition on and the choke on, it took only a few flips to get the DLE 111 to pop. Once it did, I pulled the choke off and in 3-4 flips the engine was running. I allowed the 111 to warm up a bit before advancing the throttle to test my needle settings. In the end, I opted to lean down the low and high needle settings just slightly from factory to ensure consistent idle, transition, and high speed running.
Once in the air, the DLE 111 and the 25x12 3-blade prop pulled the Columbia 400 with authority. I was pleasantly surprised to see that even being brand new, and on a 3-blade prop, the DLE 111 was capable of pulling the Columbia 400 with unlimited vertical! Very impressive! In successive flights during the initial maiden day, the motor started consistently every time and ran flawlessly. As with any brand new motor, you could noticeably see the increase in power as the motor just started to break in. All in all, I ran almost a gallon of fuel through the DLE 111 the first day of flying with zero issues or hiccups. My first impressions are great and I am honestly impressed with this motor so far. DLE appears to have a solid winner with the 111! 


Conclusion Pilot R/C's introduction of the Columbia 400-150 is a welcome edition to its line of sport-scale aircraft. Joining the ranks of its already successful Decathlon, Pilot R/C has proven that they once again have another winning design! Tony and the Pilot Team took the time to design a well thought out and well engineered platform that made this aircraft not only extremely easy to assemble but a complete pleasure to fly. From the innovative front strut design to the main gear leg supports, canister mounts, lighting system, and interior layout design, Tony and team definitely took the end modeler into account when building this aircraft. Everything is intuitive and laid out in a complete "common sense" manner. I am positive that a modeler with only a few ARF assemblies under his belt would have absolutely ZERO issue getting the Columbia 400 from in the box to in the air in no time and with zero hassles. Once completed, Pilot RC has again designed an aircraft that flies extremely well. The Columbia 400 exhibited no bad habits that are typically attributed with scale aircraft. The airplane flew light on the wing, had almost zero stall tendencies even at extreme low speeds, and was completed predictable 100% of the time. While not an extreme aerobat, the Columbia 400 was designed well in that its performance capabilities far exceeded that of its full scale counterpart! Assembling and flying the Pilot RC Columbia 400 has been awesome! I had been telling my buddies for a long time that I wanted to put together a civilian type aircraft that was large and impressive, and the this aircraft definitely fit that bill! Hats off to Pilot R/C for another great job on another great aircraft! I look forward to seeing what else is in store for Pilot down the road!!! |
|||||||||||
| Pilot-RC Co,Ltd. Address:No.34, Chengnan Er Road , Zhongshan city,Guangdong Province, China E-mail:pilot-rc@139.com Phone:+86 760 88781293 http://www.pilot-rc.com | |||||||||||
| Thread Tools |
|
|
|
|
|
Nice plane, a little OVER priced, flies great and lands even better.
|
|
|
|
|
|
|
|
|
|
|
|
Not to mention... the Columbia is very large and the components to make things like the landing gear an detail accessories are definitely not your "run of the mill" design.
|
|
|
|
|
China
Joined Apr 2008
1,165 Posts
|
50cc Columbia 400 release now. check here:
http://www.pilot-rc.com/ProductShow.aspx?id=115 http://www.facebook.com/media/set/?s...3344912&type=1 |
|
|
|
|
|
Jim C said your selling it. How much are you asking for it?
|
|
|
|
|
|
The Tank- I have the same airplane as you with the same engine. I have flown it a few times and it was a dog in rolls. The ailerons are really small compared to the flaps, so i hooked up the flaps to work with the ailerons, and it works really well now. Did you feel this was as well? Im still trying to figure out how to program "crow" into the system so that i can use the flaps on landing. Any thoughts here? Thanks
|
| Currently Active Users Viewing This Thread: 1 (0 members and 1 guests) | |
| Thread Tools | |


