logo
Thread Tools
Old 11-19-2012, 10:22 AM
jdawg is offline
Find More Posts by jdawg
Registered User
jdawg's Avatar
United States, CA, Palmdale
Joined Jan 2011
199 Posts
MOAR!!! get to work Cole....there's only a few days left before "maiden Friday"
jdawg is offline Find More Posts by jdawg
Reply With Quote Quick reply to this message
Sign up now
to remove ads between posts
Old 11-19-2012, 12:16 PM
Coletrane is offline
Find More Posts by Coletrane
Team JR
Coletrane's Avatar
United States, OK, Owasso
Joined May 2011
271 Posts
Quote:
Originally Posted by jdawg View Post
MOAR!!! get to work Cole....there's only a few days left before "maiden Friday"
Pack sand busta......Got called in to work this morning to receive a new(to us) mission bird.....leaving hanger in a few min, off till nxt Monday! hooty hoooo! BTW wx looks solid all week here
Coletrane is offline Find More Posts by Coletrane
Reply With Quote Quick reply to this message
Old 11-19-2012, 12:27 PM
leelee is offline
Find More Posts by leelee
Knife Edge
leelee's Avatar
United States, NC, Lumberton
Joined Oct 2006
1,138 Posts
I wonder if the DLE60 twin would fit also?
leelee is offline Find More Posts by leelee
Reply With Quote Quick reply to this message
Old 11-19-2012, 04:25 PM
ant is offline
ant
Find More Posts by ant
ant
Registered User
ant's Avatar
United States, RI
Joined Apr 2011
1,735 Posts
Quote:
Originally Posted by leelee View Post
I wonder if the DLE60 twin would fit also?

doubt it,it's 10 3/4" wide at the plug caps
ant is offline Find More Posts by ant
Reply With Quote Quick reply to this message
Old 11-19-2012, 10:45 PM
Coletrane is offline
Find More Posts by Coletrane
Team JR
Coletrane's Avatar
United States, OK, Owasso
Joined May 2011
271 Posts
Quote:
Originally Posted by leelee View Post
I wonder if the DLE60 twin would fit also?
As Ant mentioned, negatory...its wider than the engine currently installed. The XYZ 53 twin with plugs removed, measures 7 3/8" at the top of each cylinder and plugs/caps installed measures 8 3/4" comfortably... The Revolver's cowl measures 8 3/4" wide at the cowl base where it affixes to the fuse and up front measures 9 1/4" at its widest point cheak to cheak. The engine is actually narrower than the cowl, but its not usable. The angled plugs on the XYZ sit to high vertically vs the cowl cheaks max usable width.....make since? If the cheaks/blisters were higher or taller on the cowl it would fit.
Coletrane is offline Find More Posts by Coletrane
Last edited by Coletrane; 11-19-2012 at 10:52 PM.
Reply With Quote Quick reply to this message
Old 11-19-2012, 10:49 PM
jdawg is offline
Find More Posts by jdawg
Registered User
jdawg's Avatar
United States, CA, Palmdale
Joined Jan 2011
199 Posts
That's all fine and dandy but we want progress pics!!!
jdawg is offline Find More Posts by jdawg
Reply With Quote Quick reply to this message
Old 11-19-2012, 10:52 PM
Coletrane is offline
Find More Posts by Coletrane
Team JR
Coletrane's Avatar
United States, OK, Owasso
Joined May 2011
271 Posts
Quote:
Originally Posted by jdawg View Post
That's all fine and dandy but we want progress pics!!!
typin a$$.......
Coletrane is offline Find More Posts by Coletrane
Reply With Quote Quick reply to this message
Old 11-19-2012, 10:54 PM
jdawg is offline
Find More Posts by jdawg
Registered User
jdawg's Avatar
United States, CA, Palmdale
Joined Jan 2011
199 Posts
jdawg is offline Find More Posts by jdawg
Reply With Quote Quick reply to this message
Old 11-19-2012, 11:24 PM
CHUCK is offline
Find More Posts by CHUCK
Registered User
CHUCK's Avatar
TUCSON,AZ.
Joined Oct 2006
1,284 Posts


that's the new Monokote hand to work with
CHUCK is offline Find More Posts by CHUCK
Reply With Quote Quick reply to this message
Old 11-20-2012, 12:42 AM
Coletrane is offline
Find More Posts by Coletrane
Team JR
Coletrane's Avatar
United States, OK, Owasso
Joined May 2011
271 Posts
Build Update: Moving on...completing the engine install...ignition. Im a big advocate of a safe, tidy organized ship is easier to maintain and troubleshoot, hence my attention to chafe/vibration protection and a clean wiring layup. For just about every giant scale gas engine install I like to perform a detailed wire protection upgrade on ALL ignition components to gaurd against pinched wiring, high vibration chaffing and normal wear and tear. It adds very very little weight, dosnt take much time and greatly increases reliability. The engine ignition module wiring connectors get de-pinned, a mil-spec snake skin sleeving installed, heat shrink on each end, then re-pin all connectors. Ill ops-check the component prior to install as well.... This is generally done one set at a time......

This is what I use, but theres hundreds of styles/colors/sizes out there from multiple places...

Name: wiring protection.jpg
Views: 321
Size: 128.5 KB
Description:

and these to secure wiring/fuel lines throughout....
Name: wiring clamps.jpg
Views: 357
Size: 112.6 KB
Description:

Hall sensor.....stock
Name: hall_sensor_needs protection.jpg
Views: 363
Size: 85.9 KB
Description:


Cut just slighty longer than your work...
Name: snakeskin#2.jpg
Views: 286
Size: 101.5 KB
Description:

Pushing the pins thru the snakeskin can be a PITA, so Ill put a short piece of heat shrink over the pins and shrink it up, pinching down the end to make a dull point. Now you can work the wiring thru the sleeving a tad easier....
Name: snakeskin#3.jpg
Views: 272
Size: 80.5 KB
Description:


After getting the sleeving over the wire, Ill cut 2 pcs of heat shrink tubing and slide them over the snakeskin and re-pin the connector.... this allows you to keep the heat shrink tubing snug against both ends of the assembly.
Name: snakeskin#7.jpg
Views: 271
Size: 106.7 KB
Description:


Ready to re-install.....
Name: snakeskin#8.jpg
Views: 240
Size: 113.0 KB
Description:


While I have the heat shrink/heat gun out, I like to add some protection to my RX anttennae elements.....2 layers....
Name: RX protection.jpg
Views: 282
Size: 107.2 KB
Description:
Name: RX protection#2.jpg
Views: 253
Size: 86.4 KB
Description:
Name: RX protection #3.jpg
Views: 235
Size: 107.9 KB
Description:

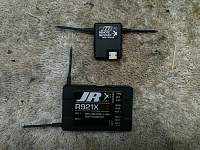
And heres the ignition, ready to install.....
Name: ign done.jpg
Views: 287
Size: 102.1 KB
Description:

Ignition installed.....
Name: ign done2.jpg
Views: 462
Size: 93.7 KB
Description:

Name: ign installed.jpg
Views: 359
Size: 91.1 KB
Description:
Coletrane is offline Find More Posts by Coletrane
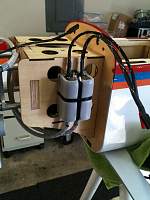
Last edited by Coletrane; 11-23-2012 at 12:11 PM.
Reply With Quote Quick reply to this message
Old 11-20-2012, 12:56 AM
jdawg is offline
Find More Posts by jdawg
Registered User
jdawg's Avatar
United States, CA, Palmdale
Joined Jan 2011
199 Posts
Quote:
Originally Posted by CHUCK View Post


that's the new Monokote hand to work with
What do ya mean?
jdawg is offline Find More Posts by jdawg
Reply With Quote Quick reply to this message
Old 11-20-2012, 01:30 AM
Coletrane is offline
Find More Posts by Coletrane
Team JR
Coletrane's Avatar
United States, OK, Owasso
Joined May 2011
271 Posts
Build Update: I know im jumping around, but my goal is to get the engine started and tested in enough time to swap it out if I have too for a Friday maiden. With that said, im gonna start plumbing the fuel system... GP provided ample fuel setup hardware that is actually really nice IMO. A large tank, two hvy clunks, solder on ferrules and brass fuel tubing. One of the neat additions that I havent seen in an ARF is a aluminum retainer ring supplied in the hardware bag. This ring goes on before pushing the stopper in to prevent splitting the tank when tightening the stopper assembly... I "always" install a Sullivan heavy duty aluminum stopper kit regardless, but I think ill test this GP setup out first.......


Stopper build up.... Upon grabbing the GP fuel setup hardware one of the supplied brass tubing pieces was too large and the provided ferrules would not slide over.... I had some K&S on hand....

Supplied.....
Name: supplied fuel tube_std sizing.jpg
Views: 292
Size: 81.5 KB
Description:


K&S........

Name: k_s tubing.jpg
Views: 265
Size: 85.0 KB
Description:

Soldering ferrules onto the tubing.......Besides making sure you use good clean parts, a clean surface, flux, HOT IRON etc I like to use another lil tip for soldering the ferrules on the tubing CLEANLY ....make your contact at the tip or very end of the work and heat the area until you see the solder shine and itll "sweat" or wick back on the brass tubing..

Name: ferrule solder#1.jpg
Views: 302
Size: 99.3 KB
Description:

Ka pow!
Name: stopper_done.jpg
Views: 296
Size: 136.4 KB
Description:


This is my all time favorite soldering iron, solder and flux....all 3 are easily obtained, but the portable Master iron is a tad pricey at $120.00...also IMO if your after a good portable butane soldering iron the Master brand is the best ive used. I have the Snap-On version in my hanger box and Im on #3...I love the Master, its awesome.

Name: clunk assembly.jpg
Views: 259
Size: 95.7 KB
Description:


I safetywire ALL my fuel system connections...PERIOD...regardless of opinions, Ive found it to be the best...I only use .021" dia stainless safety wire...

Name: clunk safetied_tools.jpg
Views: 316
Size: 124.1 KB
Description:


Clunk safetied.......
Name: clunk safetied.jpg
Views: 341
Size: 80.0 KB
Description:


Clunk installed in the tank.....here you can see the aluminum ring installed over the tank lip opening.. Also i doublewrap all my safeties to reduce cutting into the Tygon fuel line. If need be, ill slip a short piece of heat shrink over the area needing safetied to spread the pinch area of the wire. This also helps in preventing cutting the line and tightening up slightly oversized fuel line/barbs....

Name: safetywire2.jpg
Views: 297
Size: 99.7 KB
Description:


Name: safetywire3.jpg
Views: 273
Size: 79.7 KB
Description:

Name: safetywire4.jpg
Views: 268
Size: 78.0 KB
Description:

Name: safetywire_fueltee_done.jpg
Views: 362
Size: 114.0 KB
Description:

All safetied........
Name: safetywire_fueltee_done.jpg
Views: 362
Size: 114.0 KB
Description:
Coletrane is offline Find More Posts by Coletrane
Last edited by Coletrane; 11-23-2012 at 12:12 PM.
Reply With Quote Quick reply to this message
Old 11-20-2012, 02:08 AM
Coletrane is offline
Find More Posts by Coletrane
Team JR
Coletrane's Avatar
United States, OK, Owasso
Joined May 2011
271 Posts
Build Update: With clunk installed and lines safetied, its time to drop the tank in, set the supply line, fill line and locate a external vent location. The GP manual depicts the external vent line dropped thru the lower cowl and it kinda flops around down there....ehhh, cant do that...

I like to drop the external vents straight down thru the fuse and finish it off with a flush mount vent fitting for a clean & PROPER install....
Proposed exit area.....but its an open area of the fuse, so Ill need to add some lumber down there..

Name: ventdoubler1.jpg
Views: 236
Size: 67.5 KB
Description:


I traced an outline of the bottom of the fuse...shaped, sanded some 1/8" lite ply to make a plug

Name: ventdoubler2.jpg
Views: 198
Size: 81.7 KB
Description:

I then added another piece of 1/16" lite ply on top of the fit plug to drive the proper height and used thin CA to attach it all together....

Name: ventdoubler3.jpg
Views: 205
Size: 80.6 KB
Description:

Once this was test fit, it was secured down to the bottom of the fuse, making sure it was "flush to feel" with the monokote.
Name: day3 013.jpg
Views: 199
Size: 44.4 KB
Description:

Next Ill pop the hole in the bottom for the flush vent fitting.... For this lil task I like to use a Uni-bit. First verify diameter of the vent fitting and tape off the uni-bit to keep from drilling too deep and opening the hole too large....
Name: ventdrill.jpg
Views: 255
Size: 91.1 KB
Description:

Drilled...nice n clean...

Name: ventdrilled.jpg
Views: 234
Size: 36.1 KB
Description:

Of course the fitting is safetied...double wrapped

Name: ventdrilled1.jpg
Views: 306
Size: 52.4 KB
Description:


All done.......perfect!

Name: ventdrilled2.jpg
Views: 300
Size: 61.1 KB
Description:


On the interior, drill thru the upper deck.... I like to use another small peice of heat shrink for chafe protection....again

Name: ventinterior.jpg
Views: 253
Size: 64.0 KB
Description:


I like to use 3/8" dense foam as a fuel tank cushion in order to reduce wear on the tank etc.. Ive already ran the large zip-ties under the pre-cut opening in the upper deck flooring. The GP supplied fuel tank has nice embossed valleys for large zip ties to rest in, preventing fore/aft movement even further.

Name: tankinstall.jpg
Views: 243
Size: 73.0 KB
Description:


Heres another shot of the supply, tee and vent lines ...

Name: tankinstall2.jpg
Views: 244
Size: 54.8 KB
Description:

Once I get the fuel tank into postion, ill cinch up the tie wraps until just snug, clipping most of the used tie off, but leaving plenty there to grab... Ill do the final tighten a bit later.

Name: tankinstall4.jpg
Views: 268
Size: 90.7 KB
Description:


Fuel dot....Miracle install is pretty straightforward here

Name: fueldot1.jpg
Views: 293
Size: 132.9 KB
Description:

Name: fueldot2.jpg
Views: 251
Size: 39.2 KB
Description:

Name: fueldot3.jpg
Views: 251
Size: 49.5 KB
Description:
Coletrane is offline Find More Posts by Coletrane
Last edited by Coletrane; 11-23-2012 at 12:12 PM.
Reply With Quote Quick reply to this message
Old 11-20-2012, 02:18 AM
CHUCK is offline
Find More Posts by CHUCK
Registered User
CHUCK's Avatar
TUCSON,AZ.
Joined Oct 2006
1,284 Posts
Quote:
Originally Posted by jdawg View Post
What do ya mean?
Not to take away of his build thread, I love a good build thread. The new Monokote is hard to work with. They probably burned a hole in in trying to shrink it, that's all.let us know how that engine runs
CHUCK is offline Find More Posts by CHUCK
Reply With Quote Quick reply to this message
Old 11-20-2012, 02:21 AM
jdawg is offline
Find More Posts by jdawg
Registered User
jdawg's Avatar
United States, CA, Palmdale
Joined Jan 2011
199 Posts
Quote:
Originally Posted by CHUCK View Post
Not to take away of his build thread, I love a good build thread. The new Monokote is hard to work with. They probably burned a hole in in trying to shrink it, that's all.let us know how that engine runs
ahh gotcha! I've heard complaints about the new monokote...
jdawg is offline Find More Posts by jdawg
Reply With Quote Quick reply to this message


Quick Reply
Message:


Currently Active Users Viewing This Thread: 1 (0 members and 1 guests)
 
Thread Tools