 11-21-2012, 05:26 PM
|
||
|
|
||
|
United States, CA, Palmdale
Joined Jan 2011
199 Posts
|
Quote:

|
|
|
|


|
|

|
|
|
11-21-2012, 07:53 PM
|
||
|
|
||
|
United States, OK, Owasso
Joined May 2011
271 Posts
|
Quote:
|
|
|
|
|
|
|
11-21-2012, 07:57 PM
|
||
|
|
||
|
United States, CA, Palmdale
Joined Jan 2011
199 Posts
|
Quote:
i've "listened" and you still suck...  sorry about this Cole, i'm done with this guy bud... 
|
|
|
|
|
|
|
11-21-2012, 08:20 PM
|
|
|
|
|
|
United States, SD, Rapid City
Joined Mar 2011
594 Posts
|
 Great Planes has always designed or built really good kits and arfs. You are doing a great job putting that plane together and it should be a awesome plane to fly. Have fun with it.. Great Planes has always designed or built really good kits and arfs. You are doing a great job putting that plane together and it should be a awesome plane to fly. Have fun with it..
|
|
|
|
|
11-21-2012, 08:50 PM
|
||
|
|
||
|
United States, OK, Owasso
Joined May 2011
271 Posts
|
Quote:
|
|
|
|
Last edited by Coletrane; 11-22-2012 at 02:40 AM.
|
|
|
11-21-2012, 09:23 PM
|
|
|
|
|
|
United States, OK, Owasso
Joined May 2011
271 Posts
|
I stand corrected, apologies to any legitimate indivudual that might truly be interested in this GP Revolver 50cc.....
Per Hobbico manual..... ""Following the success of the .40 and .60 size Revolver we have responded to your request for an even larger version. This 50cc Revolver is a great flying airplane in the tradition of its smaller counterparts and is an easy to transport giant scale model."" ""You will find that the Revolver 50cc flies like a much lighter airplane. It has a wide speed envelope and a light wing loading. a great plane to make your foray into large airplanes.""Though not a 3D airplane, the Revolver is very aerobatic and capable of snaps, spins rolls, lomcevaks and knife edge flight. If you are new to giant scale models you will find the Revolver ..... |
|
|
|
|
11-21-2012, 10:52 PM
|
|
|
|
|
|
United States, OK, Owasso
Joined May 2011
271 Posts
|
Build Update: Back to reality....Not having too much faith in the XYZ engine I wanted to make sure the lil twin wouldnt self destruct on intial fire up, so a couple days ago I tore into it and performed some PM. With the engine sitting on my work bench I removed the carb, reeds/assembly and pulled both spark plugs. I flushed the engine thoroughly with isoprop and blew it dry as best as possible. I also verified proper seating of the reeds to the block face and 2 out of the 4 needed some help. Re-assembled I felt confident the engine internals were clean of FOD and intake setup functional. I then moved on to timing and glad I did, as it was set at roughly 18* BTDC. Corrected the timing to a static 27*, which is NOT at either end of the hall sensor p/u, approx 3/4 of total avail adjustment... With all that completed the engine was mounted on the airframe per thread timeline......
I figured this early morning was a great day to give the engine a quick run test to see what I was up against, so i scabbed up a RX/batt combo just for the engine run. Once fueled, I checked all my instal for leaks and/or weapage and couldnt see any.... I had already bench tested the ignition, so i knew the twin would get spark.. It quickly primed and "popped" on the 5th flip, but just would NOT start by hand propping. I then grabbed my "persuader" and gave it a blip, firing it up quickly. It was intially super fat, but I managed to dial both needles back in short order. I dont adhere to the theory of breaking gas engines in on the ground, but I just wanted some confidence in power. After approx 12min of run time and 3 heat cycles I dialed the needles back a smidge more, seeing 1800~ish idle and 6700~WFO...on a Zoar 22x8 woody. Dunno for certain, but I didnt think that was tooo awefully bad....???? Either way, I didnt get pics or a vid because the cheap a$$ stock headache inducers leak like a strainer and blew oil frikin everywhere. Porus castings & even worse welding....I have some DLE60 twin muffs, gonne see how that looks. The pull/pull setup is straightforward as usual, but GP did this bird a bit diferent. They added nyrod tubes to house the pull/pull wire inside of, from servo to the aft external openings. IMO this is a nice feature if properly done, but this seemed too narrow.  If using anything wider than a stock servo arm, the wires will rub on the opening. I had a SWB 2 3/4" arm on hand and it was the closest match to the rudder horn.... Nothing unique, other than the rubbing. I am going to change this, but not sure of direction....either remove the wire and remove the nyrod housings from the bulkhead so the housing can flex as needed or isntall a shorter horn/arm combo...  At the rudder....  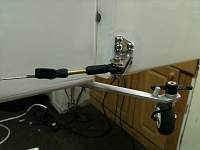 Stab/Elevator prep...horn install. For all 30cc and up gas builds I prefer to use Aero-Works metal double truss control horns. Easily installed, but take your time and make sure you get the horn marked accurately, as Great Planes does not pre-drill the surface(like AW does!) Marking locations 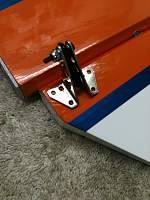  Depending on fastner grip length and horn material thickness its possible to punch thru the surface. Same goes for popping your holes... Ill adjust the drill in the chuck or use a piece of masking tape at the appropriate length for proper fastner engagment, but not creating swiss cheese on the top of the ele... 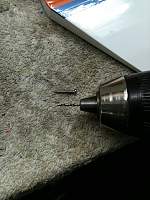 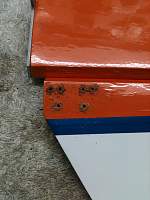 I set the fastners wet, or add a drop of BSI "Max-Cure" CA and snug em up tight.  Elevator/Stab install.....  The stabs and elevators come pre-hinged and pre-glued, theyre ready to install from the box. Once slid on the stab tubes each stab has provisions for 2ea 4-40 fasteners to secure to the fuse. The included hardware was fine, but I like a cleaner look...top fastners factory supplied....below are what will be installed...  For proper rigging and to aid in holding the elevators nuetral, I like to use a modified spring clamp with tongue depressors glued on the jaws. This helps obtaing that perfect 90* arm postion......  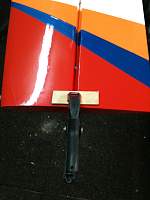  Elevator setup is as expected, simple and quick. For the elevator servo(s) I used a pair of 33" extensions, the factory recomended length was 36" which was entirely too long. The elev servo extensions reside inside a nice factory installed tube from rudder area to aft servo opening. Regarding extensions I never use "exactly" what is called out for, I make them custom, for a custom install.  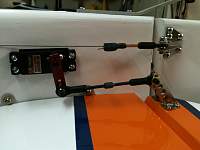 Back half of this build is in the books, RTF!  Next to be installed is the guidance setup...RX, Smart-Fly, Batts etc....(typing now) |
|
|
Last edited by Coletrane; 11-23-2012 at 12:09 PM.
|
|
11-22-2012, 02:21 AM
|
|
|
|
|
|
United States, OK, Owasso
Joined May 2011
271 Posts
|
Build Update:The order of a build or sequence at which items are to be installed on a ARF is a topic that I feel is important and I probably should have clarified this rite from the start, in one of my opening posts. I might go back and edit to reflect this too.. Yes, some manufacturers depict exactly where to put what items and it will "typically" balance at point XYZ, BUT I dont follow the manufacturers assembly instructions and some items going in this bird arent as tested or written. Generally speaking I try to assemble/install all things that are "fixed" regarding their respective placements fore and aft. Main landing gear assemblies, engine, stabs. Doing so leaves all items that might be moved around in order to obtain the correct C of G without adding any additional weight...rudder servo placement, batteries, fuel tank, RX etc. Although sometimes there just isnt a way around it and extra weight must be installed...... With that said, I mocked up all items awaiting install and verified the recomended C of G, this drives the placement of the guidance setup....
The two 2800mah Li-Ion flight packs need to be placed as close to the spar as possible, preferably in front of it. This meant the batts would need to stradle the fuel tank, but Im not down for that. Setting them directly behind the spar would work, but I planned for the power panel to occupy that real estate too.... Plan is to mount the batts below the servo tray and mount the Smart-Fly board directly above, make them both accessable for removal is a must..... Planned location: 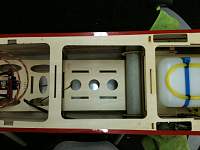 For this Smart-Fly board, I chose to use 2ea 1/2" square stock cut to length:  Since I cannot access the bottom side to secure the square stock with fasteners, it must be glued in place securely. To do this, I used to BSI "max-cure" thick CA to initially set the square stock and will add fillets of BSI thin CA and cotton flock on both sides for added adhesion and rigidity. The cotton flock and thin CA is extremely strong, is NOT brittle, and when applied correctly creates one of the strongest bonds I know... Adding a small pinch of cotton flock:  The cotton needs to be shaped and packed for ultimate strength...for clean radius'd fillets I like to use a smooth round object that fits in the specific area of work. For this job I am using a fine point Sharpie lid with a small tongue depressor stick CA'd to it as a handle. Whatever item you use, drives the radius of your fillet...for smaller, I use a nyrod sleeve or ball point pen, larger fillets I use a empty CA bottle or anything that has the shape you desire... Tool:  Packed, shaped and ready for CA: 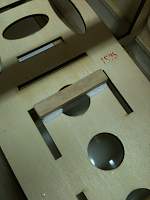 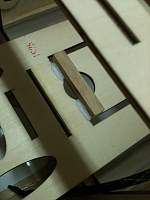 When adding CA, dont drip it on the flocks, set the tip as close as possible and control the flow watching the puddle...sorta like welding. 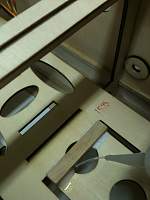 Other side:  All done:  I didnt actually set the RX in place tonight, Ill be setting that tomorrow morning and wiring everything up Prepping flight packs for install..... I have had really solid performance from TBM's Ultra Performance series Li-Ion batteries. For the Revolver 50cc I will be installing 2ea 7.4vdc 2800mah 2s Li-Ion packs for rx/servos and ignition via the IBEC. Here is the stock pack:  These packs come terminated with a standard JR, Deans and TP/FP balance plug.... 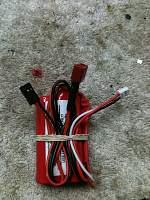 Both power leads measure 11"....  The Smart-Fly Sport Plus power panel uses std JR connections for power I need to cap/stow the deans connection. I prefer to do this one wire at a time =) Black:  For capping and stowing power wires, after heating the heat shrink I pinch the ends closed while its still hot, trying to seal off as best as possible...  Repeat...  Now, just to go overboard, Ill add one more layer of heat shrink tubing.... 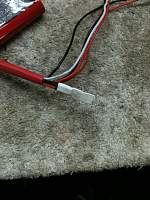 Pinched off as well  Gently re-heat the protected area and tuck into the outter layer of red heat shrink...  Done..... 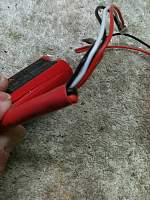 Without the un-needed Deans connector, helps simplify the end product.. 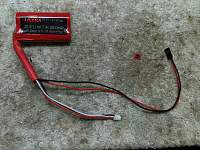 Nice n purdy, ready for chafe/vibration protection....  I will be using zip-ties to secure the batts to the tray and I dont like to do this without adding another layer of safety. This is 1/8" adhesive back foam, similar to what is used under camper shells when mounted to truck beds....this happens to be a mil-spec grade remnant =))   After adding 2 layers of the 1/8" foam, I add 1 layer of black gaffers tape to the top and bottom of the pack. This tape is very material like and wont chafe very easily..  RTF......  Done for tonight.....Ill "try" to add my mornings progress soon as I can, but gonna be a hectic day tomorrow.....big family. Regardless, I will be finishing things up tomorrow night in preparation for the friday maiden. All looks to be on track and easily accomplished...... Oh.....damn....its late here...... "Happy Thanksgiving" ya'll....... . |
|
|
Last edited by Coletrane; 11-23-2012 at 12:10 PM.
|
|
11-22-2012, 09:37 AM
|
|
|
|
|
|
Joined Nov 2012
2 Posts
|
I love the GP Revolver, I have 3 of them. The 59" electric, 70" nitro, & 70" with a DLE 20 which is the best yet. What I have learn about the Revolver is this: A must, and an easy fix for the landing gear. A metal strip tieing all 4 bolts together and making the gear like one piece. Second: the front of the firewall should have a 1/6 thick ply to tie together the landing gear block to the firewall a little better. I glue and screw this and tie it all together. This will help prevent the LG from shearing off.
I have clipped the wings and added flaps. Flaps are the most effective for slowing the plane down and reducing the floating effect. Taking the inner 1/3 of the airlorons and making them flaps had NO noticable loss of roll rate. However, you can mix in the flaps to act as ailerons. My 59" electric is a screaming demon at 130 MPH. Love the Revolver! Mike |
|
|
|
|
11-22-2012, 02:06 PM
|
|
|
|
|
|
Munster Indiana
Joined Jan 2006
2,391 Posts
|
I think everyone new here could learn from this marketing scam.
I mean if you want to build this plane thats GREAT but an “entry level 50cc plane”??? Why? If you feel you need for an entry level 50cc plane maybe you should be flying something much smaller. This plane is like training wheels once you fly it a couple times you won’t need / want it any more. With all the money a 50cc planes cost I feel that a pilot would be better off with a more scale and suitable aerobatic plane. Just my 2 cents. |
|
|
|
|
11-22-2012, 02:10 PM
|
||
|
|
||
|
United States, CA, Palmdale
Joined Jan 2011
199 Posts
|
Quote:
|
|
|
|
|
|
|
11-22-2012, 02:37 PM
|
|
|
|
|
|
Elyria, Ohio
Joined Sep 2006
95 Posts
|
It looks like there is no room for a smoke tank?
|
|
|
|
«
Previous Thread
|
Next Thread
»
| Currently Active Users Viewing This Thread: 1 (0 members and 1 guests) | |
| Thread Tools | |

