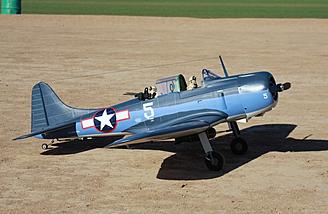
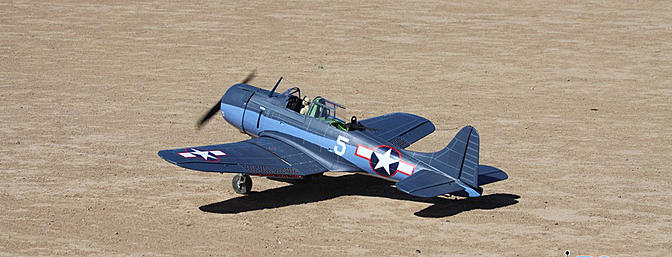
Legend Models - VQ SBD-5 Dauntless 30cc ARF - FlyingGiants Review
Jerry Festa takes this iconic warbird for a test dive!

A Review by Jerry Festa
| Wingspan: | 81" |
| Weight: | 14.5 lbs. |
| Length: | 57 " |
| Wing Area: | 1103 sq. in. |
| Wing Loading: | 31 oz/sq. ft. |
| Servos:</b> | 3 standard, 8 mini (10-11 servos) |
| Servos used: | 4 standard 7 mini |
| Transmitter: | 8 channel |
| Transmitter Used: | JR 9303 |
| Receiver: | JR AR8000 |
| Flight Battery: | HydriMax 2000 mAh |
| Engine: | 26- 30cc gas or 1.60 Glow |
| Engine Used: | DLE35RA |
| Motor: | 3000 Watt brushless DC motor |
| Manufacturer: | VQ |
| Available From: | JB Hobbies and Model Aviation, LLC |
| Webpage: | https://www.jb-hobbies.com/ |
| Price: | $459.99 |
Many WWII aircraft had their 'day in the sun' as they say but few can be credited with turning the war around. The SBD Dauntless was such a plane and between June 3 and 7 1942 the United States not only found but sank four of Japan's large aircraft carriers�Akagi, Kaga, Soryu and Hiryu all of which were part of the six-carrier force that had just attacked Pearl Harbor six months earlier�and they also lost a heavy cruiser. The U.S. lost only the carrier Yorktown and a destroyer. The final verdict was that the USA was NOT neutralized at Pearl Harbor and tide of the war was turning in their favor. A lot of credit for sinking those four carriers was due to dive bombing from the Dauntless.
The most characteristic feature of the Dauntless is the split flap/dive brakes. As the dive brakes go up and the flaps go down the airplane will not keep gaining speed in a dive as much as 70 degrees. In fact to enhance accuracy, the SBD�s big perforated dive flaps slowed the aircraft�s descent speed to only about 276 mph (240 knots) and would drop their bomb at altitude between 1500' to 2000' followed then by a pull out stressing the plane and pilot to approximately 6G's! Needless to say all this time the plane was the center of attention from anti-aircraft fire. That took some well trained brave pilots to say the least.
VQ decided to add to the history of the Dauntless by releasing their 81" ARF that was designed around three types of power plants...1.60 two-cycle; 30cc gas engine; or a 3000 Watt brushless DC motor. For this review the DLE 35RA was selected. You cannot get the stunning effects of dive brakes without additional servos and this plane requires 10 or 11 servos depending on your power choice.
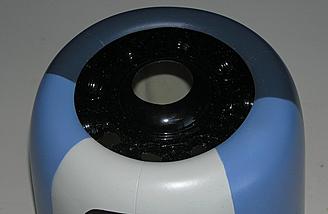
The kit is very complete and almost everything needed was supplied. The scale appearance is quite attractive and appropriate for the time frame when this plane played its role in WWII Pacific Theater. This ARF features many scale features such as functional dive brakes and flaps, pre-painted pilot AND a rear gunner, fiberglass cowl, radial engine facade, scale guns and sling bomb. And to aid in realism, the rear gunner gets to sit behind a plywood dual 50-caliber guns!
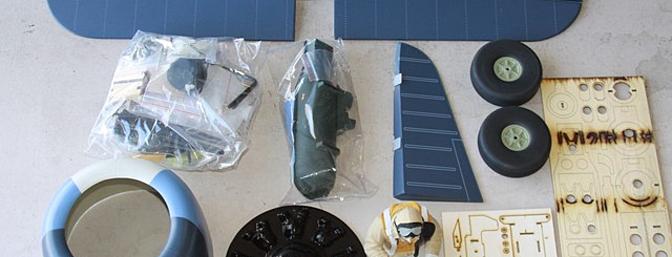
Kit Contents:


Here is what you get:


What you need to complete this ARF
Radio (recommend 7 channels or greater)

10-11 servo extensions of various sizes depending on radio
Flight battery/Ignition if using gas
Thick and Thin CA; "RC 56" glue for canopy

Assembly
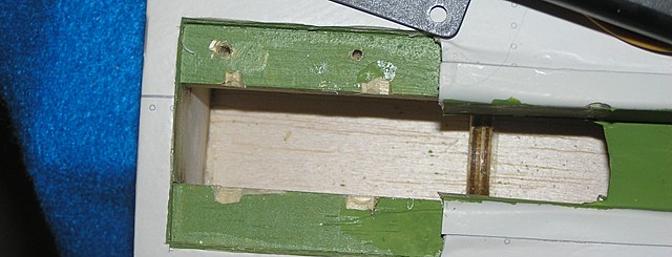
Center Wing Section
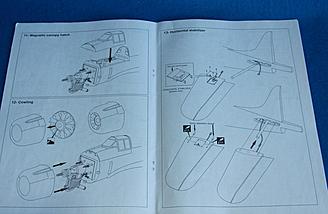
Things got off to a somewhat awkward start with page 2 of the manual (page 1 was installing the supplied fixed landing gear). Not many words can be found in this manual, just pictures throughout which is fine but only if you are an experienced modeler. Sadly this one lacked more than it should. Nothing serious, just lack of communication.

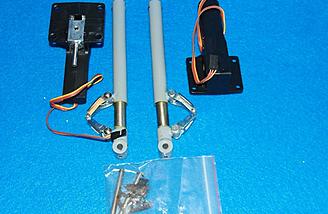
Page two (first picture) shows the electric retract unit being installed but its leads are directed toward a center servo. For the inexperience it would be assumed those two connect � the servo to the retract unit�(but you should ask where and why). Those retracts being diagrammed are electric and the leads are directed toward the center of the TOP of the wing where there is an exit hole! The retracts are totally separate from the servo!
Placing the optional electric retracts in the wing posed another concern�the units did not lie flat on the mounting blocks. They rock fore/aft! My buddy George and his critical fighter pilot eyes figures the triangle mounting reinforcements on the bottom of the retracts unit are striking the mounting blocks and if four little spots of wood could be removed from the blocks the units should lie flat � and they did! What a guy!!!
Some trimming of the plastic liner was necessary to clear the unit and permit an exit for the extension wires to snake around various ribs, formers, stringers and what have you to reach that center 'exit' hole. The toughest one was naturally the unit furthest from the hole. I would NOT recommend using those plastic clips that hold the retract unit's connector wire to the extension as they only complicate the procedure in reaching that center exit hole. I would recommend you use either heat shrink or some dental floss to secure that connection.

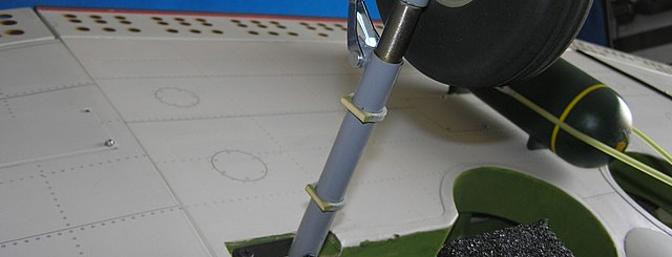
When installing the axles it was noticed they are just a bit too long so for atheistic reasons, about 1/4" was removed making the axle flush with both the wheel and the strut. Also some flat spots were created so the strut will hold the axle better.
One of the landing gears aligned perfectly straight ahead while the other had a little bit of toe-out. Two adjustment screws at the very bottom of the strut were loosened and the wheel realigned. Maybe I should add some toe-in but for the first flights I thought I would try straight and true.

Landing Gear Doors
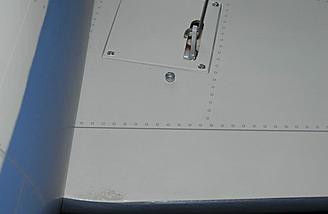
Next question concerns the landing gear doors. The actual landing gear strut sits just about flush with the bottom of the wing and any doors added will extend into the air stream. So the dilemma will continue � the guys at the field at 75% leaving the doors off and 25% putting them on. Full scale had'em...and yes they are supplied BUT (don't ya just hate it when someone says that?) if you follow the instructions, you will end up with gear doors that sit about 1/4" above the wing when retracted and are upside down! Therefore place the curved part of the door next to the wheel - which is sadly mounted to the inside of the center line instead of facing outward like the full scale. After a dry run, the struts stick way too high off the wing and personally I think they do not look good, so another option will have to be tried.


The spacers for the doors were just too long resulting in the door being too far from the strut, so the spacers were cut down so they almost touched the strut itself.
To resolve the landing gear situation, the inside piece of the door (the one with the holes in it) was cut down so that part could fit inside the plastic liner and the outer door could thereby lie on the bottom of the wing. The doors where then glued to the spacers with epoxy mixed with Micro-Balloons to give a nice finished look.


Center Wing Flap
The servo shown on page 2 is the center FLAP servo and if you look closely at the inside of the flap, you will see a control horn neatly hidden between the top of the flap and bottom of the wing, totally out of sight! Putting two and two together, a ball link that had already been connected to a push rod fits the bill and can be found in the hardware bag! Low and behold, that set up fits perfectly on the pre-installed control horn.
When setting up the flap servo (mini size) don't get too carried away just yet - as you will have to install two more flap servos - one in each outer wing panel and their orientation should all look exactlyalike. At this point it is fine just to have a push rod connected to the servo.

Both electric retracts required a 12� extension to reach the center of the wing panel and extend about 9�-11� outside the wing. At this point l changed to a long �Y� connector and removed the 12� extensions on the retract lessening one connector. So back to the drawing board, remove the 12" extensions and connect the "Y" extension (it would be nice if I could think ahead once in a while!). The flap servo did not need an extension and exits the wing with about 7� left over- long enough to reach 'somewhere' in the fuselage (a 6" extension from the receiver was used to simplify field assembly).
Outer Wing Panels
For the aileron servos, another �King Max� servo was selected and was installed without any difficulty. It was decided at this time to use a 24� extension as this would permit the connector to extend out to and exit the center section. At this point both aileron connectors would connect with a 'quick' disconnect.
-
 Aileron servo is mounted on plywood hatch and needs an extension to reach the center exit point.
-
 Pre-mounted hardwood mounts are just the right distance for a standard servo.


Push rods and Clevis
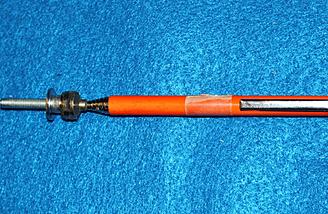
The two aileron servos were standard size and were attached to a hatch that was secured to the wing with four screws. The push rods were 2mm and the clevises didn't seem to fit well as I could pull a clevis off the threaded portion of the push rod unless the clevis was threaded about 1/2 up the threads AND a lock nut was used to hold the clevis tight. I could substitute 2-56 push rods and appropriate clevis and probably would if this was not a product review but it is so I used all their hardware. If it fails, I'll let you know...better I lose one plane than MANY of you out there in R/C world:)
The next step was to install another mini servo to move those beautiful �porous� dive brakes. Installation of the servos was no problem but remember both servo connections have to move in concert with each other.
The next challenge was to get the three flap servos to play together and only trial and error can resolve the issue of one flap moving more than another or not enough. Take some time and adjust the push rods and/or servo arms so all three flaps move the same amount - especially the two outer ones!!! Likewise the two dive brakes should move the same amount and if that is accomplished but they don't move as much as the flaps, no problem - just make certain they move the same amount in relation to each other.

As a programming note, the dive brakes have to be connected to a separate channel and act as a master when deploying the �dive brakes� which will include the flaps, but the option to use only the flaps has to be made available.
| VQ Dauntless dive brakes / flaps (0 min 21 sec) |
Putting this all together can be intimidating if you don't have a plan...I used some servo labels from "unclegeorge" (uncgeorge@comcast.net) so connections can be made without errors.


Tail
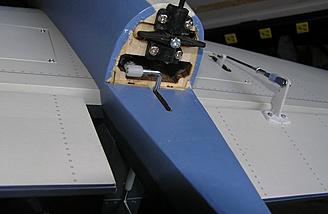
The elevator servos (mini) were installed inside the stabilizer and used a short push rod to connect to the elevator. The elevators were already hinged and appeared well glued into place. The hinges were of the nylon-pinned type similar to the type Du-Bro produces. I took the extra precaution of 'painting' the inside of the elevator servo hatch with 30-minute epoxy securing the mounting blocks a bit more than hopefully needed. Some may also add a small wood screw through the hatch and into the mounting blocks to give an added insurance against failure - don't forget this plane will be powered by a gas engine and gas engines are known for their vibrations!


-
 Fuselage before removing covering for stabilizer access.
-
 Left stabilizer installed and waiting for the right half to also be installed.
-
 The final fix; looks good to me!
-
 Each stab is secured to each other via use of a screw drilled into the aluminum joiner.
Tail Wheel
VQ did a very nice job of locating the tail wheel in a very scale-like location, but that meant some additional work was required. The tail wheel bracket was fitted with the wire and secured to the back of a former with four screws. Then it was discovered the steering arm lined right up with a threaded connector but the actual tail wheel arm would connect with a wire with a "Z" bend in it! I felt the size of the tail wheel was not scale and replaced with a smaller one.
-
 Tail wheel bracket with tail wheel attached.
-
 Rudder push rod on the left, tail wheel steering push rod on the right.

Fuselage
The first activity of this entire project was to mount the engine after coating the firewall with 30-Minute Z-Poxy. The mounting was not difficult with the exception of tightening the lower two mounting standoffs. Once the engine was mounted a bit of wood had to be removed to clear the muffler and a hole was drilled for the throttle push rod.


-
 Supplies needed for gasoline fuel for the DLE 35RA
-
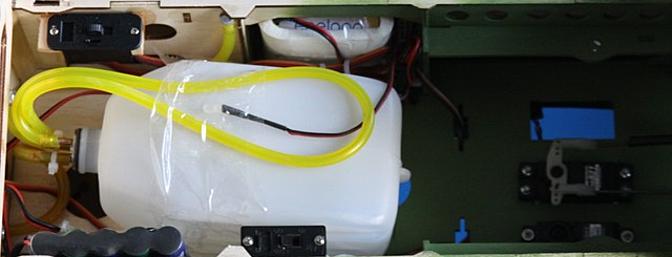
 Tank installed with Velcro on bottom and strap around the tank.
The next agenda item was the installation of the elevator and rudder servos and to get 'sort-of' organized as the part list was few, the plane gaining weight and few pages left in the instruction manual. This is a time to get excited for sure. Cowl has to be mounted and some minor details worked out.


Completion
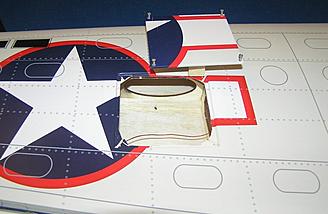
Some of the finer things in life that make a model appear more realistic are included in this VQ offering. For example there is in addition to the beautifully painted pilots a center line bomb to be build, a rear gun platform to assemble, a tail hook to create and a method of joining the outer wing panels to the center panel to create the illusion of a exterior joint. Because the Dauntless looks so cool with two crew members; they have to be out in the open, so the canopy has to be modified to let the fresh air circulate around them.
The CG was next on the list after finishing the 'cool' features and with both batteries mounted on the motor box the CG came out right at the aft end of the suggested range! What a relief - but that only happened when both the rear gunner and machine gun was removed (that's sad). Rather than add extra nose weight to compensate, the decision was made to make the first dozen or so flights without the guns and gunner. Mine balances around 6.25" back from the leading edge! It still flies slightly nose heavy, but I like it that way.
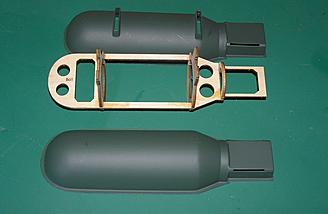
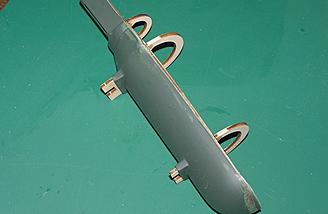
Bomb

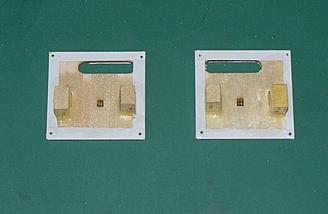
Gun Platform


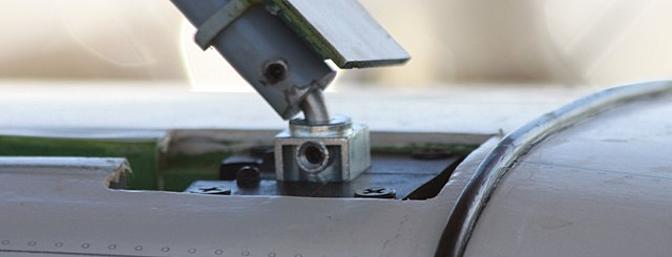
Wing Joint

Tail Hook


Engine
Spending my tax refund on a new DLE 35RA was a pleasure - at least Uncle Sam didn't get it, but Tower did. Being brand new one morning was spent getting familiar with the engine. Trouble at first - it wouldn't run without fuel. Turned out the fuel line to the carb was plugged with probably flux when the barbs were soldered on the brass lines.


Once that was cleaned out we got that puppy running and run it did. Right out of the box the new DLE 35RA idled right at 1800 rpm and top end near 8800 rpm with a Xoar 19/8. Kept the 30:1 Redline flowing just enough to drink about 2/3's of a tank at 2500-3000 with breaks of going from idle to 3000 and back again. After running for 5 minutes, we took a break and when we tried starting the engine again, it started on the 4th flip! I'm a happy camper!
Flying
What exactly does SBD stand for anyway? The Navy called it a "Scout Dive Bomber" (shouldn't that have been SDB instead of SBD?) Anyway, the full scale was nicknamed "Slow But Deadly" for a good reason, as the top speed wasn't that fast compared to many of other warbirds at that time. And the same goes with this model...it isn't a rocket ship and even in a dive that large radial cowl and dive brakes keeps the speed nice and scale like. Due to the CG requirements, both the rear gunner and machine gun are removed for flying and reinserted for static situations. Everyone agrees the engine/plane combination is right on.
Basics
The Dauntless will do the 'normal' warbird maneuvers - loops, rolls, stall/spin, and hammerheads. Recovery from a spin is surprisingly quick and stable. Of course the best of the best maneuvers is the low, fast fly-by. Sadly in order to do a good 'dive bomb' you have to be pretty high and you really can't see the dive brakes/flaps because in order to not pile-drive the plane into the ground, two switches (dive brakes first, then flaps) have to be activated but yet have time to control (elevator) the pull-out. That was later changed to activate both dive brakes and flaps at the same time, on one switch! Both the dive brakes and flaps have a slight delay so after the switch is activated, it takes a bit of time for those control surfaces to return to their normal position. Be extra careful matching the flaps degree of deployment as mine was just slightly off and the effect was pronounced!
Taking Off and Landing
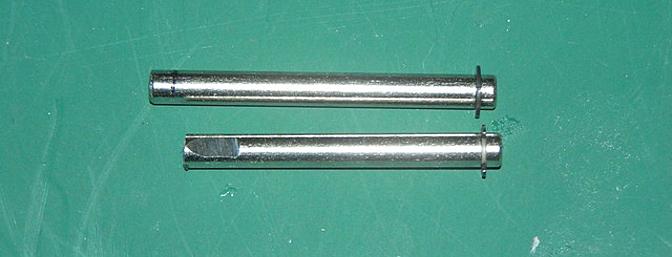
Our first take off was aborted when the Dauntless decided to make a strong left turn just as it was about to fly resulting in a bent landing gear on the right side. The strut didn't bend, the retract unit didn't come out of the wing but the short piece of 5mm steel that fits inside the strut bent. Not to be denied an opportunity to see this bird fly, Shane got a hammer and straightened that piece out in no time! Note to self: replace those pieces with something harder!
The second attempt at taking off was more successful but the plane seemed out of trim, wanting to climb and turn left. So a couple of trips around the circuit resulted in a relatively fast plane flying straight and level. Whereas George was filming this adventure, he called out for a low pass so he could capture the Dauntless in all its glory. With the DLE35RA sounding good, I throttled down a bit so we could get a nice slow fly-by and when about 3/4th of the way down the runway I powered up and the engine quit!

Knowing what would lie ahead if I tried to stretch the glide (not knowing if this was even possible), some quick down elevator brought the Dauntless down quickly and by misjudging the flair I 'planted' her firmly on the runway. The damage was relatively minor: two bent landing gears and a lose cowl. Yep, the same 5mm (soft) steel inner strut was bent again. In the video the part that flies off was the pilot trying to bail out, but he also misjudged the flair!

The steel insert was replaced with some 3/16" landing gear wire from a previous plane. Ron astutely said, "Yes those original inserts bent but the units themselves remained unscathed in the wing. If they had not bent, maybe your WING would have needed repair!" Good point Ron, I just have to remember to grease those landings, and by the way, the prop wasn't broken so it must have been a good landing (ha ha).
Aerobatics/Special Flight Performance
The most spectacular maneuver was the dive bomb and as explained earlier, is not for the slight of heart, as you need a 70-degree or more angles and a set of quick fingers. So we decided to 'dive' at a 45-degree angle just for fun and there you can see the dive brakes/flaps at work.
Is This For a Beginner?
Sorry but this bird is not for the novice due to its complex assembly and warbird characteristics on landings and take offs.
Flight Video/Photo Gallery
| Legend Models/VQ 81" SBD-5 Dauntless 30cc ARF - RCGroups Review (14 min 21 sec) |


Conclusion
You want a warbird that will catch everyone's eye along the flight line? How about an 'everyday' fun flying giant scale warbird? If the answer to both questions is yes, consider this sized VQ Dauntless! The 35cc engine was (IMHO) the right choice and in spite of the Arizona's heat, pulled the Dauntless around with authority. I'm very happy with this airplane. After beating this bird up for almost 3 months, the only problems I have come across are related to the landing gear - not the retract unit itself, but the steel strut between the actual shock absorbing strut and the retract unit. Once that was upgraded to a stronger steel, the gear held up VERY well. The landing gear blocks could use some additional glue as they are only glued to the ribs and some sheeting. Other than that, this bird is a keeper!!!
Pluses
Very Complete kit!
"Extras" included two pilots, bomb, tail hook, landing gear doors, etc.
Functional Dive Brakes.
Flaps and dive brakes linkage all hidden.
Great color scheme.
Laser-cut parts.
Fixed gear option.
Minuses
Landing gear has wheels mounted on wrong side of strut (for scale).
Landing gear mounting blocks could use additional reinforcement.
Manual needs improvement.
Tail wheel too large.
Main strut's inner metal strut too soft.
Tail gunner and machine gun weigh a lot (5.5oz) and they are behind the CG!
Last edited by Matt Gunn; 07-15-2016 at 11:14 AM..| Thread Tools |
 07-15-2016, 07:26 PM
|
|
|
|
|
|
Newcastle, Australia
Joined Jan 2006
89 Posts
|
Fantastic review. Thanks for all the detail and showing the good and bad points. Nice looking bird
|
|
|


|
|
07-15-2016, 10:58 PM
|
|
|
|
|
|
Las Vegas, NV
Joined Jan 2006
198 Posts
|
Flight demo was pitiful. It's a DIVE bomber! Should be flown much slower and smoother. Should have circle climbed WAY high, deployed the dive brakes while at idle power, gently pushed the nose over into a near VIRTICLE dive, stabilize, then smoothly recover to level flight while retracting the dive brakes and adding some (not full) power... But then; I wasn't flying the model! Easy for me to be critical...
Old Dawg |
|
|
|
|
07-15-2016, 11:34 PM
|
||
|
|
||
|
United States, AZ, Tolleson
Joined May 2012
74 Posts
|
Quote:
I was given the chance to fly this model by Jerry, the plane flew smoothly but is a heavy bird. I didnt have a chance to test the dive brakes in the flight. |
|
|
|
|
|

|
07-16-2016, 07:36 AM
|
|
|
|
|
|
United States, TX, La Porte
Joined Oct 2008
1,343 Posts
|
The plane looks pretty good, but those gear would be a deal killer for me. There would have to be something better for me to be interested.
|
|
|
|
|
07-16-2016, 08:49 PM
|
||
|
|
||
|
Pennsyvania
Joined Jan 2006
1,592 Posts
|
Quote:
|
|
|
|
|
|
|
07-17-2016, 05:08 PM
|
||
|
|
||
|
Joined Feb 2012
273 Posts
|
Quote:
On topic .... great detailed review with appropriate "pros" and "cons". Thank you for the time and the effort. |
|
|
|
|
|
|
07-17-2016, 05:29 PM
|
|
|
|
|
|
United States, AL, Mobile
Joined Feb 2007
557 Posts
|
Texastbird, one local modeler installed Sierra retracts and dropped them down quite a bit (in the wing) and now has scale wheels in the correct position.
G Limit, I do apologize that I did not include that maneuver in the review but being that it was too far away and out of focus most of the time, I deleted it. AS722 and Beej, thanks for the kind words...I'm still trying to recover financially from this project and your kind comments take some of the sting out  .....yes, this was a self-funded project! And now I find out he (JB Hobbies) is coming out with a large (80" F8F Bearcat that uses a 30ccc)....I might have to go on life support for that one!. .....yes, this was a self-funded project! And now I find out he (JB Hobbies) is coming out with a large (80" F8F Bearcat that uses a 30ccc)....I might have to go on life support for that one!.Jerry |
|
|
|
|
01-05-2017, 09:01 PM
|
|
|
|
|
|
Joined Dec 2014
3 Posts
|
Dauntless Landing Gear
Great review on Dauntless. I found exactly the same issues with my SBD. I did add weight to allow the tail gunner and gun to be in place for flight. The soft 5mm strut mount was a real problem. On my first flight I landed on a grass strip - I thought it was a pretty good landing until the plane nosed over and broke the prop. When I recovered the plane, I found that both landing gear rods had bent - very soft material. Also, because the oleo does not fit down tight against the trunion on on the retract, I think that the bending force on the exposed rod was excessive. To fix the problem, I used 5mm drill rod and added a spacer between the trunion and oleo such that the 5mm rod was not exposed. In other words, the oleo being solidly against the trunion, reduced the load on the on the 5mm rod. So far so good, I am very careful on landings!
|
|
|
|
|
01-30-2017, 04:33 PM
|
|
|
|
|
|
Joined Nov 2007
15 Posts
|
Elevator servos
Hello Jerry
Love your review on this Dauntless. I have my own sitting in my living room at the moment and I�m about to start assembling it. However, I�m a bit confused about using mini servos in the tail for elevators on a plane this size. What kind of servos did you run on the elevators? The hatches allows only for mini servos and the strongest i can find form Power HD and Hitech is 3,5-4 kg torque and think this is a bit on the weak side when pulling up after a dive. Any thoughts? Best regards Ole Christian Norway |
|
|
|
|
01-31-2017, 01:57 PM
|
|
|
|
|
|
United States, AL, Mobile
Joined Feb 2007
557 Posts
|
o-esped, I used those King Max mini and thought the torque wasn't enough, but it proved me wrong. If I were doing it again I think I would go with Power HD's because I worry too much
.I do not have any difficulty pulling out of dives, but remember to epoxy the inside of the elevator hatch so the servo blocks don't separate from hatch itself. |
|
|
|
|
02-01-2017, 02:54 AM
|
|
|
|
|
|
Joined Nov 2007
15 Posts
|
Thanks for the feedback
I have gone for the Hitec HS-5087MH with 4,3kg (60 oz-in) torque on 7,4V. http://hitecrcd.com/products/servos/...servo-/product So I hope I'don't have to worry to much in a dive
|
|
|
|
| Currently Active Users Viewing This Thread: 1 (0 members and 1 guests) | |
| Thread Tools | |

