|
|
|
|
|
Chinn's Build - Part 4 - Framing 'r Up!
[Jeremy's back in 2008 with the final two articles in his awesome competition foamy build! Checkit!]
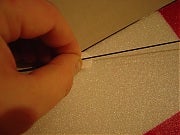
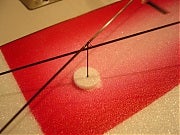
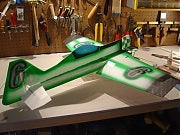
INDOOR SEASON IS HERE – FRAMING UP YOUR INDOOR FOAMY Now you’ve cut perfect parts, and finished them nicely – its time to frame this bad bird up. This is an opportunity to build either a tank or a feather – Don’t build a tank. There are many little tricks to do this easily, cleanly and strong without compromising weight. Building the airplane straight is the first step in getting an airplane that flies straight. Build the airplane crooked and you just made everything else you'll want to do with the airplane more difficult - including trimming and flying. Build it straight, and you should find that the airplane is easier to trim and easier to fly. Some of the ideas I’m going to put forth also are subjects for debate in some circles. I won’t say that my way is the only way, but I will say that I know it works. I know that it can be done light, and I know it can be bulletproof tough! How on earth would I know? Dozens of designs and countless builds with every conceivable method have helped me decide what works. To start with the Juka, we need to add some carbon to the structure, hinge the flying surfaces and prepare the final assemblies. The first piece of carbon to add is one of the easiest. The elevator has a 6” piece of 3mm flat carbon inserted in a cut made across the halves. When installing this piece, use thin foamsafe CA and a glueproof surface. Why thin CA? I use it for the same reasons you use it while building a balsa model. CA has wicking properties, which allow it to be pulled into the structure. If you have tight enough glue joints, the CA will wick in and make a very strong structure. When people build with thick CA, they inevitably use too much and add useless weight. Don’t overdo it though, as it will make ugly shiny spots on the downside surface and add weight. After gluing the elevator carbon in, I glue a piece of 3mm flat carbon to the leading edge of the wing. Most of my Indoor Pattern airplanes omit this carbon, but for flying freestyle with this design, I found the carbon necessary. Again, we’re going to use thin foamsafe CA, but before we do, we’ll tape the carbon on with four small pieces of tape. I like the ¾” wide 3M crystal clear tape I get from my grocery store. Don’t overdo the tape – it adds weight and its really only there to tack the leading edge carbon in place. I put the tape 1” in from the tips of the carbon, and a similar sized piece 3” out from the center on either side to hold it in place as its glued. Accelerator makes this job a little faster- However, don’t get accelerator on the tape, as the chemical will dissolve the tape adhesive. Next up is separating the surfaces and hinging. Cut the ‘tabs’ you left to hold the parts together for painting and use your straight edge and sharp blade. Hinging is a significant source of weight in most people’s builds, but they don’t realize it! Badly cut or shaped bevels are a serious source of poor performance. I cut my bevels on a cutting mat while using a stainless straightedge and a brand new blade. Holding the blade at 45 degrees, I cut the bevel in one pass. Then get the other part and bevel it. When cutting the bevels on the wing, don’t cut too far in as you’ll cut the mating surface for the fuse shockies! As for other methods, sanding bevels just makes a mess and is very unlikely to give a good hingeline. Take your time, use a sharp blade and your straight edge and it will come out right. Once each of your bevels is done, flip the parts over and align everything. Make any trimming now of the ends of counterbalances so you won’t have any binding. 1/32” to 1/16” of clearance is all you need. Butt the hingeline together with no gap, and the parts perfectly flat on the board. For airplanes this size, I use 3 pieces of tape per aileron as a hinge. The squares of tape should be approximately 2” square. I use the same 3M Crystal Clear packaging tape you can buy at any office supply store or grocery store. It’s cheap and it bonds better than any other tape I’ve used (even better than blenderm). Whatever you do, don’t remove the wing or other surface from the board until the hinging job is done. The most common mistake I see on builds from foamies to giantscale birds is crooked hingelines. Crooked hingelines cause binding of the servo, poor centering and make trimming difficult at best. I place one piece of tape in the center of the hingeline, and one on either end. No more is necessary! Don’t tape the hingeline across its entire span, this just adds weight and binding of the control surface. For the elevator, I use a single piece on either end of the hingline, and one piece offset of center opposite the control horn. Same goes for the rudder. After everything has been hinged, flip the hinged parts over and add the nose shocky and the tail shocky. Follow up by adding the horizontal stab/elevator assembly. Use thin CA for this job and be careful to keep accelerator away from the hinges as it will ‘eat’ the tape’s adhesive and make your hinges useless. Carefully separate the top and bottom halves of the fuse and get the bottom half ready to glue to the assembly you just glued up. Use squares, machinist blocks, or whatever you have to ensure that the bottom half of the fuse is glued on square. Don’t glue the blocks to the plane!!!!! Time to brace that structure! Lots of different methods have been tried by myself, but I always have come back to this same method. This helps keep the airplane straight and true and prevents the dreaded Shocky tailtwist! As for the other methods – Kevlar thread is very strong, but only works in tension, IE, when in compression, Kevlar just goes slack. Foam braces are very quick and easy, but when you add a glue joint along the top and bottom edge over its entire length, you are now heavier than carbon and glue. Some of the keys to making carbon truss bracing work are: ensuring you get a good glue joint by making the most of the material, using the right glue to promote a good joint and keep the weight down, preventing the creation of additional stress risers in the build and good layout of the parts involved.... For Carbon truss bracing, I’d suggest .030 or .040 carbon rod, and if you want it really light, use a Carbon tube pultrusion from DPP(available from www.f1d.biz) Cut the carbon to length with a pair of sharp shears or scissors (don’t use the wife’s good sewing scissors). Insert the carbon into the Depron, twisting it as you insert it. The carbon should insert into the depron at least 2mm and not have any bend along its length (that just induces stress and asks for a failure). Use thin CA to secure the carbon rods. I like to fit up all the carbon for one side then glue all of it at once. This keeps down on the accelerator contamination on the glue bottle. Finish by turning the structure 180 degrees and doing the other side as a mirror image of the first. The wing bracing uses small ½” dia depron circles glued to the fuse and the wing to increase the glue area and spread the load. You can cut these and other circles in Depron using a depron hole saw. I use K&S Brass tubing for foamy hole saws. I sharpen the inside edge of the tube and cut some small slits or edges into the cutting edge as serrations. Stick a wooden handle on the tube for comfort and ease of use, but don’t forget to put a hole in the handle so you can knock out the circles! Use .040 carbon rod for wing bracing, or tube if you want to get really light. Cut it to length, making sure that the rod will stick at least 8mm into the depron on either end. Fit the rod/tube in place and make sure it does not bend over its length and glue it into place with thin CA. Turn the structure and do the other wing. As you install all this bracing, do it all on a perfectly flat surface, and weight the flat portions of the structure down to ensure that it all stays perfectly flat like the surface its on! Finish the bracing up by adding a small spacer rod from scrap carbon rod. Insert it in a circle directly under the crossing point of the braces. Use a little thick CA to glue the rod to the crossing point of the braces and you’re done! Landing gear is IMO a must-have on an indoor foamy. Most facility managers don’t want their floors scratched up by an airplane sliding across the floor, and the savings in broken propellers is worth it. I use lightweight spoked plastic wheels, fiberglass or carbon rod for legs and .032 music wire for axles. If you’re tough on landing gear, make the legs from 3/32” fiberglass rod. The glass rod is cheaper than carbon and is much less likely to break. For your lightest builds, carbon rod, or carbon tube can be used to save weight. This really is not the ultimate application for carbon however, and performance wise, the fiberglass does better with little weight penalty. Landing gear without reinforcements in the fuse will certainly result in a torn up fuselage in short order, so you must make reinforcements. I use a reinforcement similar in style to those in the Ikarus kits, but I make it lighter and stronger. The reinforcement is a ¾” dia circle of 1/64” or 1/32” plywood with two oblong holes in it. The picture explains it better than I can in words, so look at the picture. Hopefully you cut some out during the parts cutting portion. One other detail worth mentioning on the landing gear is that it is definitely part of the structure. The gear in this design ensures the wing and fuselage stay square to each other. Don’t leave the gear off without bracing in some fashion. To install the gear, make a hole in the fuse at the location shown on the plans and slide both gear legs through. Slide the ply reinforcements over the legs and pull the axle ends up until the other end touches the wing. Mark the spot where it hits the wing and glue a depron reinforcement circle on the wing. Pull the legs back down and twist them as you insert them at least 4-5mm deep into the structure. Once you are sure this entire assembly is straight, glue everything in place with thin CA. Finish the gear by bending up your axles from .032” music wire. Scuff the ends of the wire with a dremel wheel or drum and tack glue one on each gear leg. After making sure they are both straight (with possibly a little toe-in) wrap the axle end to the gear leg with Kevlar thread. If you don’t have any Kevlar, dress or carpet thread works just as good. Leave the wheelpants off for now. If you get any glue on the bearing portion of the wheel, try to spin the wheel with your hand until it spins again. You can then put a drop of oil on the axle and spin the wheel with a dremel sanding drum, minus the sanding tube! One variation on this gear installation is to simply leave off the wheels and allow the airplane to skid on the wheelpants. Putting a little clear tape on the bottom of the wheelpants seems to let them skid more smoothly and without marking the floor. A scrap of carbon from the bracing can be glued in the tail for a skid of necessary. If you fly off a concrete surface, put a small curl of .032” wire on the end with some heat shrink tubing. Stand the airplane up on its landing gear and check out the perfectly straight airframe you’ve built! Finish this part of the assembly by gluing in the top half of the fuselage and hinging on the rudder. You’ve now built a very strong, very straight airframe. In the next installment, we’ll gear this thing up and get it ready to fly! |
|
|
|
|
|
|
|
Re: Chinn's Build - Part 4 - Framing 'r Up!
more shots!
|
|
|
|
|
|
Re: Chinn's Build - Part 4 - Framing 'r Up!
and a few more
|
|
|
|
|
belgium
Joined Jul 2006
30 Posts
|
Re: Chinn's Build - Part 4 - Framing 'r Up!
Thanks for your time Jeremy. Very informative.
 I should be getting my airbrush tomorrow. For the motor I'm going to get an AXI but I don't know if I should get a 2203/46 or a 2203/52.. Any advice? |
|
|
|
|
|
Re: Chinn's Build - Part 4 - Framing 'r Up!
WOW!!! looks Great..... Hope to build one soon but am thinking of doing it with EPP. I will post some pics....Thanks for the build thread Jeremy...
  John |
|
|
|
|
|
Re: Chinn's Build - Part 4 - Framing 'r Up!
Its great to hear what "other" techniques are used in foamy building. Great article
|
|
|
|
|
|
Re: Chinn's Build - Part 4 - Framing 'r Up!
Sweet!
Very nice looking bird. I wish I could paint like that. |
|
|
||
|
|
Re: Chinn's Build - Part 4 - Framing 'r Up!
Thanks Darklighter!
Quote:
https://www.flyinggiants.com/forums/...ng-finish.html |
|
|
|
|
|
|
Re: Chinn's Build - Part 4 - Framing 'r Up!
Thanks for the great ideas. I need to work on my airbrushing skills
how much difference is there in an epp version of this plane |
|
|
||
|
|
Re: Chinn's Build - Part 4 - Framing 'r Up!
Quote:
|
|
|
|
|
|
|
Re: Chinn's Build - Part 4 - Framing 'r Up!
I have two boxes full of EPP so that is what I am going to build it with. I really like working with epp and have a system for keeping the weight down with using hot glue ( less is more) and you can also airbrush it with descent results.....
I hope to get started on it as soon as I free up my work table. I will post some pics!!! Great video Matchless!!! She is a keeper!!   John |
«
Previous Thread
|
Next Thread
»
| Currently Active Users Viewing This Thread: 1 (0 members and 1 guests) | |
| Thread Tools | |
 Similar Threads
|
|||||
| Category | Thread | Thread Starter | Forum | Replies | Last Post |
| n00bs Gonna Build a Carden | gareth.ky | Airframes and Kits | 479 | 03-28-2011 07:15 PM | |
| Ultimate Indoor Foamy Build, The Series! | Matchless | General Discussion | 42 | 03-01-2011 12:02 PM | |
| INDOOR SEASON IS HERE! – PART 3: LAYING A FINISH | Matchless | General Discussion | 29 | 12-02-2008 01:04 PM | |
| Godfrey Pro Foam 42" Extra Build Thread | GremlinX | Build Threads | 9 | 07-18-2006 08:12 AM | |


