Posted by gareth.ky |
09-22-2013 @ 12:36 PM | 14,479 Views
I have looked high and low for ideas to make putting the stabs on my airplane better. I hate all the time it takes. I hate that I need tools and that all the linkages are in the way of those tools and my hands. I hate dropping tiny screws in the grass. Someone should just solve this. If I were designing the airplane from scratch I would have more options but trying to retrofit something around a 3mm/4-40 bolt is really, really hard.
The best thing that I have come up with are these thumb screws from McMaster: http://www.mcmaster.com/#98704a120
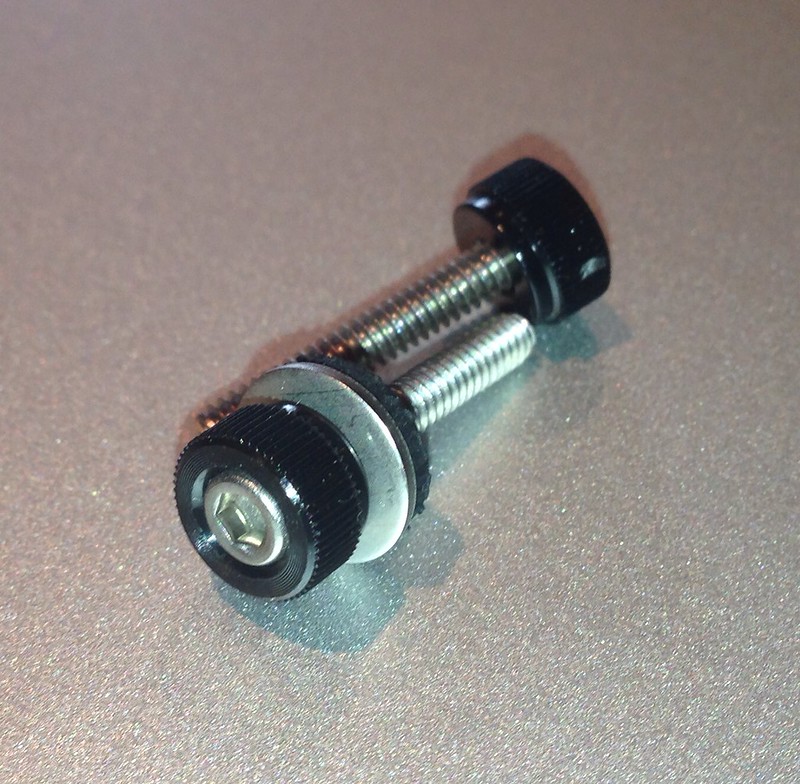
They call it a "Plastic-Head Thumb Screws with Socket Drive". I haven't found the socket drive necessary but its nice to have. I add a small bonded washer (ass seen in the photo) and I get a nice vibration resistant thumb screw that I can use with no tools. They don't offer metric which is really disappointing. SFGs and canopy bolts are often M3 to work with those little plastic thumb screws.
But it would be nice if no screws were involved at all!
I've found a source of small locking quick release pins: http://www.rcbooya.com/

They are 1/4" diameter. That means you would have to drill out the 'ears' on the stabs and then glue some kind of custom socket (made from phenolic tubing?) into the airframe. I haven't gotten brave enough to hack up one of my airplanes and try it.
If the airplanes were designed for this from the factory that would really be much better.
The best thing that I have come up with are these thumb screws from McMaster: http://www.mcmaster.com/#98704a120
They call it a "Plastic-Head Thumb Screws with Socket Drive". I haven't found the socket drive necessary but its nice to have. I add a small bonded washer (ass seen in the photo) and I get a nice vibration resistant thumb screw that I can use with no tools. They don't offer metric which is really disappointing. SFGs and canopy bolts are often M3 to work with those little plastic thumb screws.
But it would be nice if no screws were involved at all!
I've found a source of small locking quick release pins: http://www.rcbooya.com/
They are 1/4" diameter. That means you would have to drill out the 'ears' on the stabs and then glue some kind of custom socket (made from phenolic tubing?) into the airframe. I haven't gotten brave enough to hack up one of my airplanes and try it.
If the airplanes were designed for this from the factory that would really be much better.
Comments (15)
Add Comment
Posted by gareth.ky |
09-16-2013 @ 02:54 AM | 13,629 Views
In my last blog entry (like a year ago!) I covered applying ultracoat quickly without using the Windex method. Prior to that I started a thread to investigate low cost vinyl cutters that could be used for our hobby. The results of which you can find here. Now that I have a complete, low cost, CAD/CAM tool chain for covering/vinyl at my disposal I can do crazy things like this:
So that's nice but the question that's bugging me now is: whats next? I don't I want to re-cover another large aerobatic airplane. I took that project on because I didn't know if I could do it. That the fun part for me, figuring out how to do things I've never done before.
I think it may be time for something totally different...
| Correcting a Design for Hinge Bevels (12 min 16 sec) |
So that's nice but the question that's bugging me now is: whats next? I don't I want to re-cover another large aerobatic airplane. I took that project on because I didn't know if I could do it. That the fun part for me, figuring out how to do things I've never done before.
I think it may be time for something totally different...
Posted by gareth.ky |
09-24-2012 @ 11:48 PM | 26,290 Views
I discovered the trick to applying Ultracoat over itself by accident. I was doing a repair and I had the iron temp set very low. The temp knob on my iron is covered up by the rag I'm using as a sock so I couldn't see the dial. At this very low temperature you can lay ultracoat down over itself, bubble free, at a pretty rapid pace. It seems to work equally well over sheeted and un-sheeted surfaces. You have to move the iron rather quickly in a kind of swirling motion and work your way across the surface in a methodical way.
Compared to the windex method this is slightly more labour intensive but you will be done long before the windex dries so it's faster.
I dont know what the magical temperature is (edit: it's about 210F measured through a sock). In later experiments I found that if you are getting bubbles it's a sure sign that the iron is too hot. My theory is that a hot iron heats up the covering to the sticking point that it is not directly pressing down on. So the covering sticks and forms air bubbles. With a cool iron, the covering doesn't get hot enough to stick unless it's directly under the iron. That lets you press all of the air out and get a nice bubble free result.
This is certainly a skill/technique thing but then covering is all about skill and technique.
Posted by gareth.ky |
01-11-2011 @ 11:21 AM | 18,254 Views
After my work re-covering and painting a 50cc sized airplane I had a number of things that I didn't have good answers for. I want to solve these problems before I try another finishing job.
Laying Ultracoat over Ultracoat
Monokote and Ultracoat are really different materials. Monocoat is a very smooth film as it comes off the roll but Ultracoat has a very slightly rippled surface. This really messes with the 'windex' method. The ripples pull away from the surface and become air pockets when the windex dries out. This makes lots of tiny bubbles which is a nightmare.
We need a technique for doing Ultracoat over Ultracoat that is better and faster. One idea is to blend a solution of windex and trim solvent to activate the adhesive. Another might be to heat the Ultracoat on glass to remove the ripples before applying. Some serious experiments need to be done here.
Vinyl Cutters
I showed that its easy to cut both Ultracoat and Monocoat on a vinyl cutter that has controllable cut pressure. I dont own a cutter, I had a generous friend that let me come by and mass with his. I wouldnt do another project without one in the shop. Here's why, its good for 3 things we do a lot of:
Spot Tack Covering Glue
Ever had some covering that comes to a thin point peel up? Ever used too much trim solvent and washed the glue off a piece of covering? We need a glue that we can use to tack down spots like that. It needs to clean up off the surface easily and go down in a very thin layer. Something thats aerosolized might work best. Another topic for research.
Trim Solvent Replacement
I don't know whats in that stuff but it works. I went through maybe 4 bottle of it on the last project. I didn't have time to figure out what it is exactly. If we are going to start mixing it up with windex and using it for stripping airplanes etc it would be better to find a hardware store chemical (or blend) that we can use instead.
Covering Compound Curves
The SHP had a nasty compound convex curved area where the rudder meets the fuse. This was the source of a lot of frustration. It eventually took 2 people to do. I understand they use 4 or more people in the factory to do this part. I'd like to get some video of that! Maybe there is something cool we could do with heat lamps to make this easier. A lot of models don't have these curves so its not 100% essential for the next project.
Thoughts?
Laying Ultracoat over Ultracoat
Monokote and Ultracoat are really different materials. Monocoat is a very smooth film as it comes off the roll but Ultracoat has a very slightly rippled surface. This really messes with the 'windex' method. The ripples pull away from the surface and become air pockets when the windex dries out. This makes lots of tiny bubbles which is a nightmare.
We need a technique for doing Ultracoat over Ultracoat that is better and faster. One idea is to blend a solution of windex and trim solvent to activate the adhesive. Another might be to heat the Ultracoat on glass to remove the ripples before applying. Some serious experiments need to be done here.
Vinyl Cutters
I showed that its easy to cut both Ultracoat and Monocoat on a vinyl cutter that has controllable cut pressure. I dont own a cutter, I had a generous friend that let me come by and mass with his. I wouldnt do another project without one in the shop. Here's why, its good for 3 things we do a lot of:
- Cutting Covering
- Cutting Vinyl Graphics
- Cutting Vinyl Paint Masks
Spot Tack Covering Glue
Ever had some covering that comes to a thin point peel up? Ever used too much trim solvent and washed the glue off a piece of covering? We need a glue that we can use to tack down spots like that. It needs to clean up off the surface easily and go down in a very thin layer. Something thats aerosolized might work best. Another topic for research.
Trim Solvent Replacement
I don't know whats in that stuff but it works. I went through maybe 4 bottle of it on the last project. I didn't have time to figure out what it is exactly. If we are going to start mixing it up with windex and using it for stripping airplanes etc it would be better to find a hardware store chemical (or blend) that we can use instead.
Covering Compound Curves
The SHP had a nasty compound convex curved area where the rudder meets the fuse. This was the source of a lot of frustration. It eventually took 2 people to do. I understand they use 4 or more people in the factory to do this part. I'd like to get some video of that! Maybe there is something cool we could do with heat lamps to make this easier. A lot of models don't have these curves so its not 100% essential for the next project.
Thoughts?
- User Lists


