|
|
|
|
United States, CA, El Cajon
Joined Apr 2007
30 Posts
|
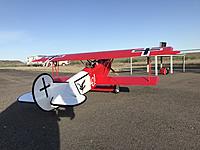
This mod was actually quite fun to do. Make sure you iron down the trailing edges, both sides. I taped and marked the underside and put a strip of tape on the top side. Using a sanding drum on my cordless Dremel, I sanded to my markings leaving a couple of mm between the scallops. Smoothed it out with hand sanding and used the sand paper to make a clean cut on the covering. Because this is not a solid trailing edge, I had to run some CA and hold together the TE at the joints. Filled with filler, sanded a bit more then used a matching red model masters to touch up the raw edge. If I have any issues with the covering separating at the TE, I will run some CA to hold that down. By the way, I will be covering the wing bottoms with a lozenge pattern that I am getting from Callie. Whole plane will be satin coated and weathered.
Thinking about looking into the Engine dummy kit from Balsa USA 1/4 DVII Will be pulled with a new DA 50cc |
|
|
|
|
||
|
Joined Mar 2019
56 Posts
|
Quote:
Very well done indeed! Thank you for sharing your methods and I look forward to seeing the progress. |
|
|
|
|
|
United States, MI, Novi
Joined Apr 2008
76 Posts
|
Actually, I just talked to Balsa USA, and the 1/4 scale isn't available as a complete kit (the way the 1/3scale one is). The best you can do is get the cylinders and exhaust from them, and make the rest of the parts yourself. I'm going to just use the stock one for now, and later maybe a 3D printed one as previously suggested.
|
|
|
|
|
United States, CA, El Cajon
Joined Apr 2007
30 Posts
|
3D would be the way to go but it would have to be price effective as I do not have a printer and would have to buy a produced one., Maybe making a resin mold of the existing one would work, certainly will need the weight. I have the DA 50 but now considering the much heavier G 62 I have.
|
|
|
|
|
United States, WI, Fox Point
Joined Nov 2013
64 Posts
|
[QUOTE=MANFRED;2832455]This mod was actually quite fun to do. Make sure you iron down the trailing edges, both sides. I taped and marked the underside and put a strip of tape on the top side. Using a sanding drum on my cordless Dremel, I sanded to my markings leaving a couple of mm between the scallops. Smoothed it out with hand sanding and used the sand paper to make a clean cut on the covering. Because this is not a solid trailing edge, I had to run some CA and hold together the TE at the joints. Filled with filler, sanded a bit more then used a matching red model masters to touch up the raw edge. If I have any issues with the covering separating at the TE, I will run some CA to hold that down. By the way, I will be covering the wing bottoms with a lozenge pattern that I am getting from Callie. Whole plane will be satin coated and weathered.
Thinking about looking into the Engine dummy kit from Balsa USA 1/4 Lookin good Manfred! Could you post details of the Callie Lozenge please. |
|
|
||
|
United States, OH, Oak Harbor
Joined Sep 2016
25 Posts
|
Quote:
|
|
|
|
|
|
Joined Mar 2019
56 Posts
|
I'm curious how you are going to do the satin finish. I want to do the same to mine. I used to use LustrreKote flat clear...it was great. You didn't have to do anything to prepare the covering other than clean it. It would stick to the gloss covering, would not scratch off, and was fuel proof. Unfortunately Top Flite doesn't make it anymore. I have tried others like Krylon, etc., but they don't stick well and can be scratched off with a finger nail. I'm going electric so it doesn't have to be fuel proof. I may have to lightly rub the gloss off of the covering with steel wool to get something to stick, but if there is a better way...I am open to suggestions 
|
|
|
|
|
Joined Oct 2009
12 Posts
|
Fokker Decal placement
Further to the skull and birs, what would be the suggested placement of the other markings (decals) ie. the small crossed? Does anyone have a phot of their finished ones with decals in place? Thanks...
|
|
|
|
|
|
Hangar9 supplied a variety of markings to choose from. I didnít have a clue. So I did a D7 image search and then put on something that I liked.
|
|
|
|
|
Joined Jan 2016
412 Posts
|
The idea was to supply a bunch of decals so maybe those that wanted something slightly different to their club mate/ friend could get creative? Some are scale. Some are not. This D7 was never, ever intended to come straight out of the box and go on a static judging table at Top Gun
 I just thought that the extra markings might be a nice bonus? I just thought that the extra markings might be a nice bonus? Regards Ali |
|
|
||
|
|
Quote:
|
|
|
|
|
|
|
One thing I forgot to mention after flying the plane 8 flights last week. I was worried that the exhaust going up was going to make a mess. I cut the Teflon extensions on my DLE 55RA flush with the dumby engine. After 8 flights the top of the plane was clean. There was nothing to clean on top. I run RedLine 2 stroke oil at 40:1.
So the clean plane was a bonus. The holder of the plane gets a face full of exhaust on start up |
|
|
|
|
United States, CA, El Cajon
Joined Apr 2007
30 Posts
|
Adam, there are several clear coats you can use. I like minwax polyurethane and the rustoleam 2X clear. Just be conscious of the weight added. I don't use a dead flat too often as it attracts dust and can be hard to clean. Make sure all markings are on before coating. I will shoot mine with a detail air gun for more control. Weathering can be added before or after depending on the paint you use for fuel proofing. I really don't think weight should be an issue with this kind of lift but try to keep as light as possible. Good luck. Waiting for samples on the lozenge from Callie.
|
|
|
||
|
Joined Mar 2019
56 Posts
|
Quote:
I have used the Minwax semi gloss and gloss on epo foam planes...what has to be done when using the duller Minwax to covering to prepare it? Or does it just stick? Are you using the aerosol version or the brush on? I love using Callie...she is awesome. I assume she is just going to make that in sheets and you will cut to fit? Thanks for all the advice. |
|
|
|
||
|
Joined Mar 2019
56 Posts
|
Quote:
I appreciate the suggestion...I'm familiar with the Testors stuff, and yep you are right...probably not going to use 18 cans of that! 
|
|
«
Previous Thread
|
Next Thread
»
| Currently Active Users Viewing This Thread: 3 (0 members and 3 guests) | |
| Thread Tools | |


