|
|
|
|
||
|
|
Quote:
I am installing a PB smoke pump as well on my 330SC 35% and I was wondering if you could share the print file for the bracket so I can send to friend to print one for me? That would be awesome 
|
|
|
|
|
|
|
PowerBox Smoke Pump Sketch
I would gladly share the designs. On the original design I had two holes for M3 cap screws to fit into but the holes did not line up with the two holes on the pump so I had to drill two new holes. I did remove the holes on this design. The three holes in the bottom are designed for M3 cap screws with a washer of 7mm diameter. The cap screw will not protrude above the base of the stand making for a neat install.
|
|
|
|
|
|
Build Update #6
Hello,
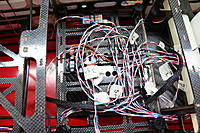
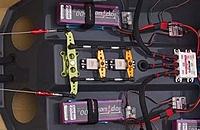
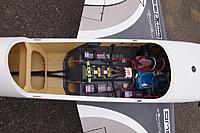
So like I have mentioned, I can't continue my build due to circumstances beyond my control. I have skipped a few build updates, so here is the second last one. In this build update, I will talk about finishing the work under my receiver tray, the cables running to the back of my plane for the two elevator servos and mounting the wheel pants. I started to finish the work under the receiver tray by marking where each wire runs, what will be plugged in and I made a list of where my leads will plug in. I did decide to mount my Jeti RSat 900 backup receiver underneath my custom receiver tray to keep things neat. As usual, I printed a bracket for the receiver and used an o-ring to keep it securely in the bracket. I did also mount my altitude sensor under my receiver tray; this keeps my receiver tray empty, and like I said neat, I hate a setup where everything is just plugged in and tied down using cable ties. I tell myself that cable ties were designed for companies that need to tidy up cable ties quickly but need to remove them within a few days, industries such as sound and lighting and definitely not for RC model builders. I also decided to print a plug that fits into the plastic tube that runs from the centre of the fuselage to the back to keep your cables tidy, I think that the rough edge of the tube will damage the cables that rub against it and it looks tidy when the cables enter the tube in an orderly method. To finish off, I took a photo of the battery tray that my two 4100mAh 3 Cell LiFePO4 batteries will fit into. I make use of XT-60 plugs on all my batteries which means I don't need to change the leads on my chargers continually. These little details make the hobby fun and minimal effort, leaving time for nothing but fun. Many of you might ask why I have this much telemetry in my aerobatic plane, to answer your question I am a very analytic person, I love having facts, and by installing telemetry I can download the recorded data to my computer analyse it and match it to my flying sequence, and this allows me to perfect my sequence not only form a physical standpoint but from an analytic standpoint as well. Cheers for now. |
|
|
||
|
|
Quote:

|
|
|
|
|
|
|
Because I don't have the engine yet and not yet sure where the CG will be I have not yet glued the battery try into place because of this reason. I hope to be able to put the batteries here as its in a convenient place and drastically lowers the risk of Electromagnetic interference (EMI). In my Extra 300 I have them in roughly the same place and my CG worked out perfectly, I am not sure how much the CG will differ between the two planes as the laser has a much shorter distance between the CG point and the fire wall. This means that the weight of the engine will have a less significant effect on the CG.
|
|
|
|
|
|
Build Update #7
Hello,
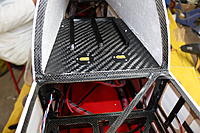
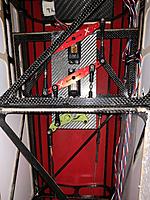
I have not worked on my Laser for quite some time, but our lockdown is partially lifted as of 01 May, so I am expecting the stuff still on order early next week. In the meanwhile, I have decided to opt for the pull-pull rudder system instead of the push-pull system. I decided to do this as this brings more of the weight closer to the CG point marked on the inside of the fuselage. By bringing the weight closer to the CG point, I decrease the distance the CG is shifted. This, in turn, brought another problem, with most pull-pull systems the cables are attached straight to the servo arm, this creates a force pulling against the servo spline, I don't think this is the best situation as it puts loads of strain on the servo casing, servo gears and the servo motor. The Krill models, on the other hand, has this arm that is attached to a ball bearing that is pressed into a mount that bolts to the airframe, this puts the strain on the ball bearings and not on the servos. The two servos then get connected to each other and to the third arm using linkages instead of cable that is under tension. I contacted our local Krill dealer, and he had an Ultimate's replacement receiver tray in stock. I will take apart the receiver tray or might even just cut it to fit in the Laser's rudder tray if the carbon fibre on the Krill's tray matches the carbon fibre in the Laser. Below I have some pictures of the rudder tray in the Krill Extra 330LX as well as the Krill Ultimate Tray that I bought. Unfortunately, the only picture I have at this moment is of the tray wrapped in its packaging ready for shipping, but once I have it, I will post a picture of it. Cheers for now! |
|
|
|
|
Canada, ON, Windsor
Joined May 2015
8 Posts
|
Great build. I have flown this airplane for 1 season. Still waiting to get back to flying.
Can't say anything bad about this plane and it's flying characteristics. Have a GP 123 with mtw 80 cans on booard. all savox 1270 HV servos on 2S lipos. More than enough. Full smoke system with 2 servos in tail for rudder.two 3600 lipos balanced it perfect using supplied dowels to balance. so far thrust and balance have been right on. Bill |
|
|
|
|
Canada, ON, Windsor
Joined May 2015
8 Posts
|
Not sure what motor you are using, but with my setup, 4 servo in the tail,I still have the batteries behind c of g.
Sent from my SM-T810 using Tapatalk |
|
|
|
|
|
I’m waiting for my 3W 110i B2 CS. I am installing to Hacker 3 Cell LiFePO4 4100mAh batteries right behind the canopy so I have roughly 800 grams quite far behind my CG. I also have the Jeti Central Box 400 behind the CG with some telemetry so I think she might end either a little tail heavy or if I’m lucky it will end up perfect first time round like it did with my Pilot Extra 300L
|
|
|
|
|
|
|
|
|
|
|
United States, IL, Evanston
Joined Apr 2020
22 Posts
|
|
|
|
|
|
|
Build Update #8
Hello,
I finally received my servo's last week. I have installed all my servos and completed the programming/setup. The engine is on its way from Germany, so we hope to receive it sometime next week. I am close to finishing the build, so this build log will soon end in a maiden flight. I have decided to change the two main wing connectors to D-Sub plug, so I picked up two sets of PowerBox One4Three cables. I had to move the two forward stands that I made for the receiver tray as they did interfere with the wing plugs. I made two brackets to fix the two plugs to the body, and the offcuts from the rudder tray worked like a charm. They still need to be secured to the fuselage using some epoxy and two screws. It might be a bit much, but the two plugs will be under the receiver tray, so getting to them if they come loose will be a pain. The CentralBox 400 is quite big but surprisingly lightweight for the size and the options it offers. Compared to a CentralBox 210 or 220 with two voltage regulators I think it is worth the few extra grams in terms of the looks and practicality. The Krill rudder tray was the only short cut I took, and it paid off. I have to admit I did not think that it would be that easy to modify the tray. I did have to make a plywood sheet to go underneath the tray to lift it high enough to clear the lip on the back of the tray in the Laser. I could have cut the lip so that the tray could pass between, but since that would decrease the strength, I decided not to do it. The Krill tray does only have one slot for a servo but using the Laser's tray as a template I could easily cut the second hole without having the servo sit skew making the programming just that much harder. I, unfortunately, am not super impressed by the Savöx servos when they work in tandem. Its as if they do not return to the centre as well as the JR servos in my Extra 300 does. Considering the price and the quality of the servo when looking at it, the very slight variation in the centre position is not that big of a problem. They offer tons of torque at 7.4v so I will stick to the 7.4v they rate the servo for and in the highly unlikely case that the servos don't perform quick and powerful enough I will push them to the 8.4v limit as previously discussed on this build log. I have already ordered my second set for the next project that arrived a few weeks ago. By the looks of it, I might have two planes ready for maiden by the time the lockdown restrictions are lifted enough for us to return to flying. |
«
Previous Thread
|
Next Thread
»
| Currently Active Users Viewing This Thread: 1 (0 members and 1 guests) | |
| Thread Tools | |


