logo
Thread Tools
Old 09-14-2020, 12:13 AM
Schlumpfi is offline
Find More Posts by Schlumpfi
Registered User
Joined Nov 2011
76 Posts
Quick build update - I will not have time to build more this week but will prepare at least some CNC parts.

I have covered the first side of the fuselage top with balsa. Came out quite decently, not perfect though. Will need a bit of filler, but I will do that only when the whole fuselage is ready for sanding..
Schlumpfi is offline Find More Posts by Schlumpfi
Reply With Quote Quick reply to this message
Sign up now
to remove ads between posts
Old 09-14-2020, 04:25 PM
The Hodge is offline
Find More Posts by The Hodge
Skip Model Designs Intl.
The Hodge's Avatar
Australia, VIC
Joined Mar 2008
4,062 Posts
This is coming together very nicely,

Sheeting is a long process, Especially when it comes to finishing But you will be rewarded with a rally nice built and finished model.
The Hodge is offline Find More Posts by The Hodge
Reply With Quote Quick reply to this message
Old 09-22-2020, 07:21 AM
Schlumpfi is offline
Find More Posts by Schlumpfi
Registered User
Joined Nov 2011
76 Posts
Back to building! I finished sheeting the stab area and the fuselage rear yesterday. Came out nicely, but took quite some hours. Today is sanding day - as the weather is good outside. Will post pics later.

All parts including engine have arrived from TC, means I can start fitting all in. On first try - the Valach fits nicely into the cowl and the mufflers very well into the Tunnels...

Still searching for a good pilot bust. Suggestions are welcome!
Schlumpfi is offline Find More Posts by Schlumpfi
Reply With Quote Quick reply to this message
Old 09-22-2020, 04:56 PM
The Hodge is offline
Find More Posts by The Hodge
Skip Model Designs Intl.
The Hodge's Avatar
Australia, VIC
Joined Mar 2008
4,062 Posts
Fantastic work, Looking forward to todays updates Cant wat to see that 140
The Hodge is offline Find More Posts by The Hodge
Reply With Quote Quick reply to this message
Old 09-23-2020, 05:00 AM
Schlumpfi is offline
Find More Posts by Schlumpfi
Registered User
Joined Nov 2011
76 Posts
On popular request - some pics and some thoughts regarding the Valach 140 (-:

As you see the Valach fits nicely into the cowl. What I will have to figure out is how to make the cowl openable to easily adjust Ventils (one screw sits quite low) and carburetor. The engine stand will need a cutout, as the Carburetor extends to the back. All manageable. Please see also the shiny muffler... I have two of these beauties (-:
Schlumpfi is offline Find More Posts by Schlumpfi
Reply With Quote Quick reply to this message
Old 09-23-2020, 02:33 PM
Schlumpfi is offline
Find More Posts by Schlumpfi
Registered User
Joined Nov 2011
76 Posts
Some more build pictures. To not get bored, I work at several areas at the same time.

1 ) Rudder: I will cover the rudder completely in balsa 2mm. This will add some stability. There is still some sanding required for full motion range

2) Mufflers: I bought clamps from TC to fix them in place. I built simple stand-offs to fit them into place. Looks good

3) Sanding the fuselage. Most challenging is to shape the transition between the fuselage and the stab. The picture is after three layers of filler

I am currently further working on how to fit in the Valach. Would have been easier if I had the engine before building the fuselage... I ordered the spinner just to see how all will fit. It might be that I will have to shorten the „engine box“ a bit. The Valach needs either standoffs that are included with the engine or a large cutoff below the mounting screws. Later seems for now far more complicate to me. I will see how all fits once the spinner is here by test fitting. I will make some simple formers out of ply to test before making the final one out of birch/carbon...
Schlumpfi is offline Find More Posts by Schlumpfi
Reply With Quote Quick reply to this message
Old 09-23-2020, 04:14 PM
The Hodge is offline
Find More Posts by The Hodge
Skip Model Designs Intl.
The Hodge's Avatar
Australia, VIC
Joined Mar 2008
4,062 Posts
Quote:
Originally Posted by Schlumpfi View Post
On popular request - some pics and some thoughts regarding the Valach 140 (-:

As you see the Valach fits nicely into the cowl. What I will have to figure out is how to make the cowl openable to easily adjust Ventils (one screw sits quite low) and carburetor. The engine stand will need a cutout, as the Carburetor extends to the back. All manageable. Please see also the shiny muffler... I have two of these beauties (-:
She Looks Nice, Starter will make for Easy starts and all fits in the cowl
The Hodge is offline Find More Posts by The Hodge
Reply With Quote Quick reply to this message
Old 09-23-2020, 04:16 PM
The Hodge is offline
Find More Posts by The Hodge
Skip Model Designs Intl.
The Hodge's Avatar
Australia, VIC
Joined Mar 2008
4,062 Posts
Quote:
Originally Posted by Schlumpfi View Post
Some more build pictures. To not get bored, I work at several areas at the same time.

1 ) Rudder: I will cover the rudder completely in balsa 2mm. This will add some stability. There is still some sanding required for full motion range

2) Mufflers: I bought clamps from TC to fix them in place. I built simple stand-offs to fit them into place. Looks good

3) Sanding the fuselage. Most challenging is to shape the transition between the fuselage and the stab. The picture is after three layers of filler

I am currently further working on how to fit in the Valach. Would have been easier if I had the engine before building the fuselage... I ordered the spinner just to see how all will fit. It might be that I will have to shorten the „engine box“ a bit. The Valach needs either standoffs that are included with the engine or a large cutoff below the mounting screws. Later seems for now far more complicate to me. I will see how all fits once the spinner is here by test fitting. I will make some simple formers out of ply to test before making the final one out of birch/carbon...
Great progress, Rudder Looks great, Looking more like a Sbach!

Cans fit perfect too. Engine wise either option will work well, Might be easier to cut out the fire wall and mill a neww one that you can then PIN in place with the correct mounting depth to suit the engine and stand off?

Altho cutting out for the carb might not be a huge deal. Clamp it on and lets check it out
The Hodge is offline Find More Posts by The Hodge
Reply With Quote Quick reply to this message
Old 09-24-2020, 12:12 PM
Schlumpfi is offline
Find More Posts by Schlumpfi
Registered User
Joined Nov 2011
76 Posts
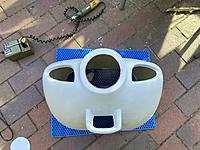
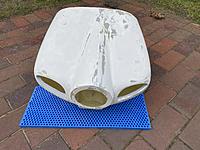
The hodge is right - the engine has to be test fitted. To do so, i first had to prepare the cowl.

My cowl was covered with grey filler that was too brittle, it came off on multiple places, esp those that where the cowl was elastic. This means today was filled with sanding off the filler and cutting the holes in the cowl.

I will have to do some more prep work on the cowl. Obviously new filler - a thin layer will do, there are no deep dents to smoothen. Further I will strengthen the areas in which the cowl will be divided and also around the cutout for the muffler pipes with a thin layer of carbon.
Schlumpfi is offline Find More Posts by Schlumpfi
Reply With Quote Quick reply to this message
Old 09-24-2020, 04:05 PM
The Hodge is offline
Find More Posts by The Hodge
Skip Model Designs Intl.
The Hodge's Avatar
Australia, VIC
Joined Mar 2008
4,062 Posts
Nothing is essy is it? But you got there, I like the cowl shape, Looks nice., Looks great on the fuse, The plane is getting bigger

Do you have the Wheel pants as well? You have 2 cowls right? Wonder if you send one to Dan if he could re make one and re-Release the kit?
The Hodge is offline Find More Posts by The Hodge
Reply With Quote Quick reply to this message
Old 09-24-2020, 04:10 PM
The Hodge is offline
Find More Posts by The Hodge
Skip Model Designs Intl.
The Hodge's Avatar
Australia, VIC
Joined Mar 2008
4,062 Posts
Quote:
Originally Posted by Schlumpfi View Post
And this is the test fitting of the engine. As I expected it has to “go back” around 2 cm. I tried a bit around and found a good solution on how to to modify the engine stand/box for that. More simple than I feared. I will draw a new engine former tomorrow and test in the new position. Planning on using 6mm birch (2x3mm) with thin layers of carbon for enhanced stability...
Thats Fits Great, Pretty small mods to the firewall Great news.

I would still baffle unless the cylinders are only 5mm from the inlet, Bu if there back 12-20mm then do a simple baffle to direct the air over the fins.

With the Bottom on the Motor box you will need to open it up to allow the carb to go down, So to remove the engine you would undo all the bolts and remove them ,allow the engine to slide down, Allowing the carb to exit the motor box, and out comes the motor. Hope that makes sense.
The Hodge is offline Find More Posts by The Hodge
Last edited by The Hodge; 09-24-2020 at 04:40 PM.
Reply With Quote Quick reply to this message
Old 09-25-2020, 03:23 PM
Schlumpfi is offline
Find More Posts by Schlumpfi
Registered User
Joined Nov 2011
76 Posts
Hi, to answer the questions - yes I have two cowls and two canopies (so if Dan wants one for forming he can contact me and we can work something out)...

I had exactly the same idea re the motor installation and removal, eg to do it from below. See the pics

See my progress today in the comments below the pics. Mainly worked on firewall and rudder. The firewall is now hardening, I laminated it eg one layer carbon/1 layer birch plywood/ one layer carbon/ 1 layer birch plywood. Usually I would first laminate and than mill, but was to lazy for that and did not want to waste the firewall that I already milled...
Schlumpfi is offline Find More Posts by Schlumpfi
Reply With Quote Quick reply to this message
Old 09-25-2020, 03:27 PM
Schlumpfi is offline
Find More Posts by Schlumpfi
Registered User
Joined Nov 2011
76 Posts
Ah quickly - I also received real good wheel pants. I have a landing gear that I bought on the aftermarket. I am a bit sceptical on it - looks great, fits great, but might be a bit to soft in the end. Will see...
Schlumpfi is offline Find More Posts by Schlumpfi
Reply With Quote Quick reply to this message
Old 09-25-2020, 04:31 PM
The Hodge is offline
Find More Posts by The Hodge
Skip Model Designs Intl.
The Hodge's Avatar
Australia, VIC
Joined Mar 2008
4,062 Posts
All looking Great, Great minds think alike hahah

The Inlet pipe you can just notch the firewall to suit to give clearance. nice Ti bolts too

That Rudder looks nice - Will have lots of Authority!
The Hodge is offline Find More Posts by The Hodge
Reply With Quote Quick reply to this message


Quick Reply
Message:


Currently Active Users Viewing This Thread: 1 (0 members and 1 guests)
 
Thread Tools