logo
Thread Tools
This thread is privately moderated by orthobird, who may elect to delete unwanted replies.
Old 12-22-2017, 07:24 PM
orthobird is offline
Find More Posts by orthobird
I used to hammer at 1500 feet
orthobird's Avatar
United States, LA, Shreveport
Joined Apr 2012
9,044 Posts
Build Log
Cam S. build version of Kam Aero Extra

Motor-Box construction:
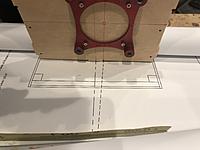
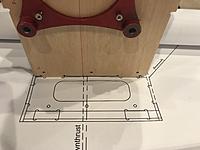
1. 1st step is to identify all the parts needed and to draw out the lines on the firewall for the down thrust and the right thrust.

I will do 3 degrees of right thrust and one degree of down thrust.

Using the plans, I was able to identify the lines.
orthobird is offline Find More Posts by orthobird
Reply With Quote Quick reply to this message
Sign up now
to remove ads between posts
Old 12-22-2017, 07:33 PM
orthobird is offline
Find More Posts by orthobird
I used to hammer at 1500 feet
orthobird's Avatar
United States, LA, Shreveport
Joined Apr 2012
9,044 Posts
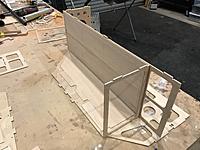
Motorbox; Test Fitting of all the parts

1. right and left motor-box sides.
2. firewall
3. chin plate
4. rear motor box plate
5. rear tunnel former
6. floor of motor-box
7. top plate to the front of the motor-box
8. gear plate
9. oak wood for reinforcement of the motor-box to the firewall
10. oak wood rails for the reinforcement of the gear plate.
11. F2, F3, F4 right and left sides.

the inside of the MBSIdes have been pre-sheeted. Makes it much easier to do now.


Assemble the whole thing with no glue. Make sure everything keys in. Quality is superb. Best wood I have seen in a kit.
orthobird is offline Find More Posts by orthobird
Reply With Quote Quick reply to this message
Old 12-22-2017, 07:39 PM
orthobird is offline
Find More Posts by orthobird
I used to hammer at 1500 feet
orthobird's Avatar
United States, LA, Shreveport
Joined Apr 2012
9,044 Posts
gear plate installation.

The gear plate was lightened. In doing so, 1.2 ounces was removed.

the firewall also had almost 2 ounces of material removed.

the oak wood rails needs to be cut in the front, so that they match the angle of the chin plate.

Once glue is applied, the oak is clamped and then 3 screws are used to hold it in place.
I then drilled from the landing gear into the oak and installed 8-32 screws with blind nuts.
orthobird is offline Find More Posts by orthobird
Reply With Quote Quick reply to this message
Old 12-22-2017, 07:43 PM
orthobird is offline
Find More Posts by orthobird
I used to hammer at 1500 feet
orthobird's Avatar
United States, LA, Shreveport
Joined Apr 2012
9,044 Posts
Installation of the side formers

used a right angle to make sure they are square, and then used clamps til it cured.
orthobird is offline Find More Posts by orthobird
Reply With Quote Quick reply to this message
Old 12-22-2017, 07:45 PM
orthobird is offline
Find More Posts by orthobird
I used to hammer at 1500 feet
orthobird's Avatar
United States, LA, Shreveport
Joined Apr 2012
9,044 Posts
Weight of the motor-box

total weight of the motor box: 2 pounds and 14 ounces.
orthobird is offline Find More Posts by orthobird
Reply With Quote Quick reply to this message
Old 12-22-2017, 07:47 PM
orthobird is offline
Find More Posts by orthobird
I used to hammer at 1500 feet
orthobird's Avatar
United States, LA, Shreveport
Joined Apr 2012
9,044 Posts
complete motor-box

Next step is to make the fuselage sides.
orthobird is offline Find More Posts by orthobird
Reply With Quote Quick reply to this message
Old 12-22-2017, 07:50 PM
orthobird is offline
Find More Posts by orthobird
I used to hammer at 1500 feet
orthobird's Avatar
United States, LA, Shreveport
Joined Apr 2012
9,044 Posts
Fuselage sides

very important:
The plans have a full length of the fuselage sides. Meaning, without the curve as in the lateral view of the plans of the fuselage.

I cut out the 2 fuselage sides plans, and then placed them on my work-bench. I then covered with wax paper, and used an aluminum angle to pin the plans to the table with the wax paper.

Make the right side over the plans for the right side. When done with the right side, do not build the left side on the plans for the right side. Instead, use the plans for the left side to build the left Fuse side.
orthobird is offline Find More Posts by orthobird
Reply With Quote Quick reply to this message
Old 12-22-2017, 07:58 PM
orthobird is offline
Find More Posts by orthobird
I used to hammer at 1500 feet
orthobird's Avatar
United States, LA, Shreveport
Joined Apr 2012
9,044 Posts
Fuse sides. Making the longerons.

kit comes with 48" sticks. 8 of them are marked red on one end. these are higher density. Use these to make the longerons.

Splice them as per the plans, and then clamp one of the longerons to the aluminum angle. This will be the top of the right fuselage side.

the kit comes with 3 different length truss sticks.

place them on the plans, without glueing them on. only position them to see where each one goes.

once you know where each one goes, glue the balsa doubler by the tail area, and then glue on the plywood rail for the area under the canopy. something new, it is a brace that is removable.

after this, then glue on the truss sticks using medium CA. Use a right angle, and work from the front and work your way back.

Once all of them are glued on, the glue the longeron which is the lower one, again, making sure that everything is true and square.

then glue in the servo hardwood points and use some balsa scrap to finish the servo bay.
orthobird is offline Find More Posts by orthobird
Reply With Quote Quick reply to this message
Old 12-22-2017, 08:50 PM
orthobird is offline
Find More Posts by orthobird
I used to hammer at 1500 feet
orthobird's Avatar
United States, LA, Shreveport
Joined Apr 2012
9,044 Posts
Addendum

When building the motor=box, I need to remind, that there are three locations to add the 1/2" by 1/4" basswood cross brace.

one is for F2

and the other two are for the fuel tank tray.


Please see the red arrows.
orthobird is offline Find More Posts by orthobird
Reply With Quote Quick reply to this message
Old 12-22-2017, 10:05 PM
orthobird is offline
Find More Posts by orthobird
I used to hammer at 1500 feet
orthobird's Avatar
United States, LA, Shreveport
Joined Apr 2012
9,044 Posts
fuse sides. Preparing to sheet the truss and longerons.

did quick inspection, and so far so good.

I believe all this work was done from yesterday and today. Meaning, from firewall to what you see now. under 48 hours.
orthobird is offline Find More Posts by orthobird
Reply With Quote Quick reply to this message
Old 12-22-2017, 10:09 PM
orthobird is offline
Find More Posts by orthobird
I used to hammer at 1500 feet
orthobird's Avatar
United States, LA, Shreveport
Joined Apr 2012
9,044 Posts
sheeting fuse sides.

need to use the 1/8" thick balsa by 4" wide by 48" length. total of 8 sheets in the kit.

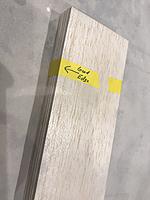
they come edge trued from the manufacturer. Pretty darn good. the quality of the balsa is top notch. No knots anywhere.

I marked the side that is true with a black marker.

then, you need to edge glue two sheets so that it becomes 1/8" x 48" x 8"

tomorrow, once it is dry, then I will sand the end and then butt glue two of the sheets, so it will become the fuse side sheeting of 1/8" x 8" by 96"
orthobird is offline Find More Posts by orthobird
Reply With Quote Quick reply to this message
Old 12-22-2017, 10:41 PM
The Dirt Doctor is offline
Find More Posts by The Dirt Doctor
Registered User
Vicksburg, MS
Joined Nov 2006
2,394 Posts
Wow! Great and quick build job Cam. Will it be ready for 2018 IMAC season?
The Dirt Doctor is offline Find More Posts by The Dirt Doctor
Reply With Quote Quick reply to this message
Old 12-22-2017, 10:47 PM
orthobird is offline
Find More Posts by orthobird
I used to hammer at 1500 feet
orthobird's Avatar
United States, LA, Shreveport
Joined Apr 2012
9,044 Posts
making the fuse sides long sheet

Quote:
Originally Posted by The Dirt Doctor View Post
Wow! Great and quick build job Cam. Will it be ready for 2018 IMAC season?
Absolutely, I hope so Bobby. Hope to have the fuselage sides sheeted and installed to motor box by tomorrow evening.

here is it, now 96" length by 8" width.

tomorrow, I will sand lightly and then glue on the truss and longerons to it.
orthobird is offline Find More Posts by orthobird
Reply With Quote Quick reply to this message
Old 12-23-2017, 07:17 AM
orthobird is offline
Find More Posts by orthobird
I used to hammer at 1500 feet
orthobird's Avatar
United States, LA, Shreveport
Joined Apr 2012
9,044 Posts
the fuselage side sheets are done.

this is after removing the tape and sanding them down a bit. next step, to make sure the upper border is true.
orthobird is offline Find More Posts by orthobird
Reply With Quote Quick reply to this message


Quick Reply
Message:

Currently Active Users Viewing This Thread: 1 (0 members and 1 guests)
 
Thread Tools