|
|
|
|
|
Quick Update, Turned over the Laminated tails parts after 30 hours of drying time. Now i did have a cling wrap on the bench to stop glue and water mess during fitting of the laminations, Ohh and to stop it gluing to the bench
 But with this i knew that the side of the tail that was face down may take longer to dry due being against the plastic film. and when i turned it over i did notice that the last 1mm of so that was in contact with the film as a little soft still and damp/Not fully Dry, So it was a good idea to turn them over, on the turned over side i seen few little gaps between a lamination (There was 2-3 points) i was able to squeeze in glue and Pin or Clamp till they dry. But so far has come out great, Tested a part of the overhang on the Elevators & Feels pretty solid/Stiff. Apart from black and rusty nail lines in the balsa  (They were new nails) GET ZINC PLATED.... But this should be fine as its will be mostly sanded and shaped and should eliminate them. (They were new nails) GET ZINC PLATED.... But this should be fine as its will be mostly sanded and shaped and should eliminate them.So end of next week we will start on the stab Hinging and shaping of the tail and then onto the start of the Fuse 
|
|
|
|
|
|
|
|
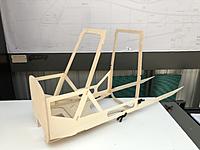
So here is how the Tail plane looks once all un pinned.
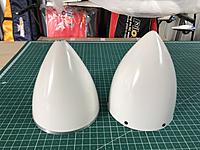
Also the new Spinner Arrived  . The Kit one is on the left. New one on the Right looks great i think, Very scale. . The Kit one is on the left. New one on the Right looks great i think, Very scale.
|
|
|
|
|
|
And Here is the Fuse, One 6mm Birch and the rest 3mm Poplar. There is another 6mm poplar sheet but that only got 2 parts on it for the fuse.
There is a few 6mm Birch parts that ill try to take some weight out of as its bit overbuilt. |
|
|
|
|
|
OK So here we have the front half of the fuse parts cut out and all tabs sanded etc. Also the tail parts have had a once over with the sanding block, Ready for rounding / Shaping.
Onto the fuse parts, Removed some weight from the bottom of the Fuse shapes that are from 6mm Birch! and also from the landing gear doubler (Now Matches the gear shape) And Here is the Front of Fuse, Dry fitted.  Strongly suggest to trial fit everything before gluing etc. One issues tho it appears the RH side fuse side at the front is about 1mm Short. But i have reached our to Bodo to get some clarification on this. |
|
|
|
|
|
Thanks Guys, Im enjoying the build so far The Fuse will go together pretty fast as will the wings for that matter, Thanks to EMHW's build design, But im sure this will keep me going for 6+ months
 . .,I have a few more builds after this one , So lots to come  Yeah builds are awesome, We need more of it for sure!!. Something satisfying about seeing Milled parts sheets turning into a full Aircraft, Built by your very self. 
|
|
|
|
|
|
Thanks Guys
 I should have updates every week I should have updates every week  In the mean time i thought i would share the Production of the Custom Fiala prop. So its starts off as a block of Beach wood, then cut to the rough shape and out line drawn. The it goes to the CNC mill and gets shaped there, once one side is done is then turned over then the back side is done. Here is a few pics. Next is hand finishing then Varnish and balancing. 
|
|
|
|
|
|
Back to working on the Bella
 Motor Mount, Have changed direction with this as i see in Europe all the guy there run a stand of style, Like how the 3W engines are mounted, Or used to be early on. Should be nice and ridged and spread the load better than the motor box design i first had. Fairly easy design, I will be using 25mm Oak Dowel as the stand off and 6mm-9mm Birch or 6mm Carbon for the Actual mount. Here is a few pics of how it would look, I wont remove as much of the firewall tho like they have as i have plans for a tray for the tank behind the firewall. |
|
|
|
|
|
And after a few hours i have come up with this and tested it on my firewall.
Looks pretty good. Just some tweaking to do on it.  Just working out the fuel tank and the Cans before i cut the firewall open, Cans should be on route in a week and the tank i have 
|
|
|
|
|
|
Thank you,
Just waiting for a word back from EMHW re an error with the fuse side (One side is about 1mm shorter & lower slot is out of alignment) before i start to glue the fuse front. And need to finalize the engine mount, Fuel tank location and Can position so i can open up the firewall to suit before i glue as this will be much easier. while apart. I have made up templates already and will re check then cut to suit. Should have more progress in the week. 
|
|
|
|
|
|
My Prop arrived from Fiala, It looks great, I dont think ill paint it as it looks too nice
 , But will do scale white tip tho. , But will do scale white tip tho.And Opened up the can tunnel with help of a CAD template i made. Next will be the fuel tank opening as the neck will sick out a little. |
«
Previous Thread
|
Next Thread
»
| Currently Active Users Viewing This Thread: 1 (0 members and 1 guests) | |
| Thread Tools | |


