|
|
|
|
|
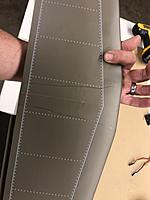
Ok, started on the wing/retracts, still waiting for the servos to get here. So doing what I can until then. I did get the EME35 Auto Start, cant wait to mount that up too!
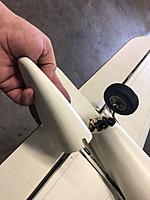
First thing, take THIN CA and run around everything you can reach, just something I do that doesnt hurt. Then, I put the struts on the retracts, hook the retracts to a rx, cycle them, get the gear legs up, I had to file the slot for the set screws down closer to the retract, *you must have the struts touching the retract! Otherwise the rod will bend with any load on it. Drill out the wheels to accept the axles, I used a 13/64" bit, and had to put two washers between the wheels and the strut for clearance of the tire to the strut. I used my dremel to sand a groove in the wing opening for the strut to fit in, Ill have to clearance it a big more when I get the doors mounted to the struts. Thats it for last night, these are big beefy retracts, felt like they had alot of power. * Be sure to drill a pilot hole for each of the retract screws, otherwise youll split the wood. |
|
|
|
|
|
|
|
Busy weekend, still waiting for my servos to get here, hopefully today.
Elevator is glued on, I had to do a little shaving in the fuse to get it square to the wing, but it all went well. I had to do the same to the bearcat. Once its all glued in you can go in the back bottom of the fuse and drop some glue in there too. The wing center section, I took a pen and marked on the fuse where the colors line up, to help with lining it up in the future. I got everything hinged, they call for epoxy so I did that, and they say to pin the elevator hinges with tooth picks, I did that and the ailerons too, for fun. I always cut the covering out of the way under the control horns, and glue the horns as well as screwing them on. The rudder control rod, just like I did with the bearcat build, I added some ply pieces to take the slop out of the bottom. Also, the little eye you thread onto the rod for the rudder control linkage to hook to, drill it out, mine split.. The tailwheel linkage, the black horn, I had to sand mine down for a smooth fit, otherwise it was too tight, then I ground a slot for the collar set screw outside of the tire to keep it locked on there. And a touch of blue locktite. And I glued on the filler piece on the front bottom of the wing.
|
|
|
|
|
|
Glued in the dowels for the wings, I had to do some filing on the wing center section to get everything smooth and one dowel was off a tiny bit, but it fits great now. The manual says to glue the aluminum spar into the wing center section, I dont think Im going to do that. BUT, measure and get it centered, and mark it with something so you know where it has to be.
Then the little cap to finish off the tail area |
|
|
|
|
|
Retracts and doors. With the way the gear is on this, you have two options for the 'doors', one is to space them out beyond the tires so they dont hit when the suspension works, or like I chose to do, get them to fit the wing right and trim to clear the tires when compressed.
Also you should file where the little fillets are under the retracts, once you screw the retracts in place once, youll see where they go. |
|
|
|
|
|
Back to work! Servos finally arrived too!
Mounting the engine and cowl, Heres how I do it. I use tape and paper to mark where the center of the cowl lugs are, transfers easy to the cowl. Cutout for the exhaust, plug and head, the head of my engine rubbed a little bit on the cowl no matter what I tried, so I figure it needed cooling anyway. Ill probably trip the muffler pipe later so its not hanging out so far. The pushrods for the elevator. Trying to make them free moving, put a slight bend in them on the forward end, seemed to help alot for mine. |
|
|
|
|
|
And to finish off the gear, I took them LG apart, scuffed and painted them white, reassembled, and use some of the spare covering supplied to cover the gear doors to match the wing. Whala!
|
|
|
|
|
|
Looking good. Can you get to the low speed needle?
|
|
|
|
|
|
Looks awesome painted, but now you gotta spend some cash on some nice wheels lol
|
|
|
|
|
|
Servo installation time! Here is the wing center section flap servo, I had to open up the servo rails a little to fit these in there, but easy work with the dremel!
|
|
|
|
|
|
Wing servo installation. Had to dremel out to fit the little servos, and I repositioned the blocks for the aileron servo, and epoxied it in place. Then installed the sevos in the fuselage for the elevators and rudder.
|
|
|
|
|
|
So, on the opposite wing I installed the horns on the other side of the servos, so a simple Y can be used and everything goes the right way.
Then the fuel tank assembled, swapped out the black stopper for a GAS one, and used my own gas fuel tubing. |
|
|
|
|
|
Throttle servo is in, fairings on the elevator control rods, CG Marked out (not tested yet), Ignition and remote start box installed, getting very close to finally firing this bad boy up! Should finally be ready to maiden next weekend!
|
|
|
|
|
|
Made a hole in the top of the wing center section for the wiring to reach the fuselage.
Aileron linkages screwed on and tightened down. |
«
Previous Thread
|
Next Thread
»
| Currently Active Users Viewing This Thread: 2 (0 members and 2 guests) | |
| Thread Tools | |


