|
|
|
|
|
Get the one from Herve. Itís 70mm drop. No other drop will work.
Iíll be posting my canister install tomorrow with plenty of pics. |
|
|
|
|
||
|
United States, FL, Orlando
Joined Mar 2007
2,476 Posts
|
Quote:
|
|
|
|
|
|
|
I finally flew the Extra about a month ago. It was an uneventful maiden with 3 clicks of up elevator and 4 clicks of left aileron trim. CG is still slightly forward for my preferences. I didn't want to get too serious with setup and CG adjustment as I was not happy at all with the noise level of the Jtec exhaust. I've had in the back of my head the idea of putting a canister in it. The few times that I've flown it the guys have commented on how loud it was which made up my mind to finally pull the trigger on a canister.
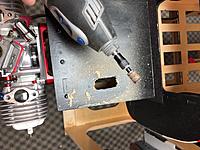
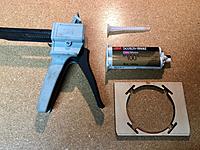
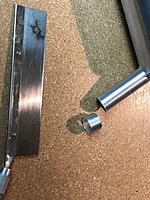
After talking to Herve and DA about which setup to run I ordered the header from Herve and the can from DA. So after a slight fiasco with USPS delivering my goodies to the wrong address (TWICE I might add) I finally got my MTW TDH110 and related accessories. I'm not a fast builder as I like to take my time and I'm often told that I'm far too critical about how I do things. On the other hand I do like building and take pride in my work so the job ended up taking about a week of an hour here and an hour there to finish. Given the right motivation it would be a few hour job. Since it appears that I'm the first to put a can in this particular airplane I was figuring things out as I went. Needless to say it was a pretty easy job but there were a few obstacles that I'll point out later. (As a side note; After I got the canister from DA I wasnít sure if it was going to work for this particular Extra based on the canister size and the fact that itís a rear dump. I called DA and had a very informative chat with them regarding canisters. He said that I should do my best to get the rear dump to fit as the front dump canisters arenít as efficient as the rear dump and donít sound as good.) What follows are pics of the modifications and installation including closing in the canister tunnel to keep the heat of the can from inside the fuse. At the same time I relocated the throttle servo from inside the fuse alongside the tank to the bottom of the engine box. I used a DA70 reverse throttle arm from Terry's Custom which works great! The first few pics are of the relocation of the throttle servo. Easy job if you have the right tools. I marked the location and drilled four small holes to locate the corners. I used a Unibit to auger out most of the material, cleaned things up with a Dremel and sanding drum then final tuning with sanding bars that I made custom to fit my servos. Glued some backing rails inside, drilled and hardened the holes with CA. For years Iíve always set up my throttles from the middle out. Meaning throttle at half stick, servo in the middle and throttle arm at (perceived) half throttle. After watching a video on Terrys Custom about setting up the throttle I realized Iíve been doing it wrong all these years. Half open throttle doesnít mean half throttle. No wonder my throttle isnít linear! 1/3 open is about half throttle, so after a little fiddling with arm placement I got it pretty close and nearly +/- 100% servo travel. The laser cut Canister mount that I got from DA needs to be trimmed top and bottom in order to fit in between the upper tray and the lower mount. Taking a few measurements got me close so I trimmed it up and did a few test fits. The end result is a snug fit with a notch to clear the bottom center stringer. Youíll need to remove part of the upper cross member and the lower bulkhead to clear the can. Make the clearance wider than what is visually seen when you put the mount in there. Remember the silicone isolators need to have clearance too. At first I was concerned about removing too much of the lower bulkhead but the 1/4 ply mount will serve as a structural member once itís epoxied in place. Speaking of epoxy, I started using 3M epoxy in a dual syringe/gun plunger a while back and this stuff is great! You can get different cure times and different viscosities. I used 5 minute ďno sagĒ with this install to keep the epoxy where it needed to be. Using the dispenser it mixes as you eject it into place. Cleanup is easy, the only waste is what is left in the mixing nozzle. One of the snags that I knew I was going to run into was how to get a rear dump canister into the fuse. There is about a 2 inch outlet at the rear of the can that you need to jockey around to get out exit. I hated to do it but I had to cut about 1/2 inch off the outlet. In addition I needed to make a clearance in one side of the canister mount, you can see this in the pic. My first thoughts were to cut all the way through the mount on one side but didnít need to resort to that extreme. So now you slide the can into the fuse with the outlet pointed to one side, angle the can to the side as the outlet passes through the mount then gently push and straighten the can at the same time you rotate it so the outlet exits the bottom of the fuse. Just takes a little adjusting here and there with the clearance on the mount and the length of the outlet. I had thought about having the outlet exit the lower side of the fuse but didnít want to pull covering and glue in sheet balsa etc. To close in the tunnel I used craft foam from HobbyLobby. This stuff is about 1/4 inch thick rubbery foam. You can cut it with an Exacto or scissors and glue it using regular CA. Itís the same stuff I used to baffle the engine in the cowl. Very pliable, light weight and CHEAP! I opted to use this instead of balsa because I thought it would do a better job of insulating the heat of the can and might also hold down on resonance of the fuse from the exhaust being inside. Just take some rough measurements and start to cut the pieces and glue them in place with thick CA. Bolting up everything is pretty straight forward. Slide the canister into the tunnel and into position. I used a heat gun to heat up one end of the coupler and slide it onto the header. Just pay attention to how far onto the header you slide the coupler, I tried to put the canister as far back as I could for CG reasons. Donít forget the clamps, use a squeeze clamp and not plumbing type hose clamps, they wonít hold tight like the squeeze clamps after the parts heat up. Slide the header onto the canister, you might need to twist or wiggle it around a bit. Use a little heat on the Teflon coupler to help ease things. I used the gaskets and red Loctite on the bolts. If they loosen up Iíll swap the gaskets for Copper Seal RTV. The clearance between the fuel line and the header is a little close so pay attention to having too much slack in your fuel line. I may look for some heat resistant tape to wrap the header in that location. I hope to run it this weekend. Iíll try to post some pics and short video once I get it tuned as Iíve been told to expect to lean it out a bit once the canister is on it.
|
|
|
|
|
United States, CA, Santa Clarita
Joined May 2014
697 Posts
|
Nice job! I take it you haven't tried the can yet flying. Please post when you do. I have the jtec mufflers as well and flying they are OK to me but on the ground it sounds like a Harley d.
Interesting on da's take on front vs rear dump canisters. Seems like in other planes reviews the front dump is giving better overall performance. My next thing to research is why we need to I close the canister tunnel. |
|
|
|
|
|
Closing the tunnel helps to draw air through the tunnel and keep it cool. Exit should be larger than the intake.
|
|
|
|
|
|
Anyone use standard sized In-cowl mufflers for a DA70 on this bird? I would love to not have to buy another set of mufflers if the standard muffs will fit in the cowl without cutting.
|
|
|
||
|
United States, FL, Orlando
Joined Mar 2007
2,476 Posts
|
Quote:
If the current one are made by Slimline, they should fit too: there is plenty of space in teh cowl. I had the same engine in the previous smaller (88") version of this Extra, and everything fit comfortably in the cowl. |
|
|
|
||
|
|
Quote:
|
|
|
|
|
|
|
Where did you guys end up putting the batteries? With the DA70 and stick mufflers it’s looking like it’s going to very nose heavy when balancing on the tube.
|
|
|
|
|
|
Maiden day on the 330
|
|
|
|
|
United States, FL, Orlando
Joined Mar 2007
2,476 Posts
|
Looking nice. Any video?
|
|
|
|||
|
|
Yup, my better half took a few short clips so I compiled them into one. These are from first two flights.
|
||
«
Previous Thread
|
Next Thread
»
| Currently Active Users Viewing This Thread: 1 (0 members and 1 guests) | |
| Thread Tools | |


