logo
Thread Tools
Old 12-12-2019, 04:34 PM
carrid02 is offline
Find More Posts by carrid02
Registered User
carrid02's Avatar
Abilene, TX
Joined Jan 2006
1,379 Posts
I got the tail tubes glued into the 124 Pro and 109 Pro stabs using gorilla glue. The glue expands as it dries and makes such a great joint.

-Craig
carrid02 is offline Find More Posts by carrid02
Reply With Quote Quick reply to this message
Sign up now
to remove ads between posts
Old 12-12-2019, 04:37 PM
carrid02 is offline
Find More Posts by carrid02
Registered User
carrid02's Avatar
Abilene, TX
Joined Jan 2006
1,379 Posts
Quote:
Originally Posted by alky6 View Post
Awesome! Thanks for the pics of the process. I like how you have the aluminum templates that are laid over a set of plans to make the blanks. What are you using to hold the templates against the foam? Screws?
Paul
I use some 1” nails with a wide/flat shoulder. The holes in the templates are just slightly larger than the nail so I can line up the template and put the nail in place. Each template might get 4-6+ nails depending on how big the template is.

This system works when you’re making 2–3 sets of cores but it’s not exact enough for mass production... I’d really need more CNC for that.
carrid02 is offline Find More Posts by carrid02
Reply With Quote Quick reply to this message
Old 12-12-2019, 04:49 PM
carrid02 is offline
Find More Posts by carrid02
Registered User
carrid02's Avatar
Abilene, TX
Joined Jan 2006
1,379 Posts
Ok, so the carden kit calls for a 1/2” CF strip to be laminated on top and bottom of each stab along the stab tube. I’ve cut them into 1/4” strips and added one across the elevator.

Before I glue, I sand a 1/4” groove into the foam 1/16” deep so the CF strip recessed into the foam. Makes the final sheeting appear as if it’s not even there.

-Craig
carrid02 is offline Find More Posts by carrid02
Reply With Quote Quick reply to this message
Old 12-14-2019, 09:37 AM
carrid02 is offline
Find More Posts by carrid02
Registered User
carrid02's Avatar
Abilene, TX
Joined Jan 2006
1,379 Posts
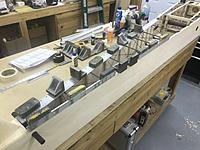
Next up is sheeting! I got the sheeting edge glued and sanded to 400. I’m using gorilla glue on the skins. Put both cores under lots of weight!.... and tada!... both stabs came out straight and strong.

Next up, I’ll add the leading edge and trailer edge, then root and tip caps.

I’m going to use a different attachment method for the stabs so I’ll go a little out of order on completing these steps but it’ll all make sense as I go along.

-Craig
carrid02 is offline Find More Posts by carrid02
Reply With Quote Quick reply to this message
Old 12-15-2019, 09:43 AM
carrid02 is offline
Find More Posts by carrid02
Registered User
carrid02's Avatar
Abilene, TX
Joined Jan 2006
1,379 Posts
LE/TE have been glued and shaped! Root and tip cap has been glued on! Getting closer!
carrid02 is offline Find More Posts by carrid02
Reply With Quote Quick reply to this message
Old 12-22-2019, 07:21 PM
carrid02 is offline
Find More Posts by carrid02
Registered User
carrid02's Avatar
Abilene, TX
Joined Jan 2006
1,379 Posts
Been workin on the pro!

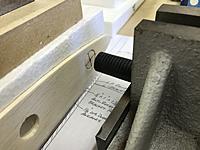
I’m mounting the stabs to the fuse using a front tube (like on most composite airplanes) so this is the process I used to measure and cut the front tube location.

-Craig
carrid02 is offline Find More Posts by carrid02
Reply With Quote Quick reply to this message
Old 12-22-2019, 07:24 PM
carrid02 is offline
Find More Posts by carrid02
Registered User
carrid02's Avatar
Abilene, TX
Joined Jan 2006
1,379 Posts
I used all types of measuring techniques to check/re check the alignment of the stabs... then I glued it!

-Craig
carrid02 is offline Find More Posts by carrid02
Reply With Quote Quick reply to this message
Old 12-25-2019, 08:27 AM
carrid02 is offline
Find More Posts by carrid02
Registered User
carrid02's Avatar
Abilene, TX
Joined Jan 2006
1,379 Posts
MERRY CHRISTMAS!!!

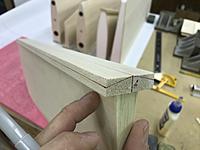
In these pics, I’ve cut out the elevators/rudder per the plans. I’ve also glued on hinge stock, LE, and begun hinging the elevators.

Next, I’ll prep the fuse for glueing on the fin and top deck.

-Craig
carrid02 is offline Find More Posts by carrid02
Reply With Quote Quick reply to this message
Old 12-27-2019, 07:35 PM
carrid02 is offline
Find More Posts by carrid02
Registered User
carrid02's Avatar
Abilene, TX
Joined Jan 2006
1,379 Posts
Well, I got the fin glued on with hysol and the balsa turtle deck strips glued with wood glue.

Before I glued the fin, I poked 1/8” holes in the foam at the base of the fin so the hysol would penetrate the foam better... hoping to make a slightly deeper bond.

The turtle deck strips have 1/2 moon nubbies that extend in the fuse a little. These create a sandwich of glue that supports the CF cross pieces in the fuse. Now they’re “locked in” and won’t ever break out.

-Craig
carrid02 is offline Find More Posts by carrid02
Reply With Quote Quick reply to this message
Old 12-28-2019, 10:24 AM
ben_beyer is offline
Find More Posts by ben_beyer
Notorious B.E.N.
ben_beyer's Avatar
United States, TX, Bryan
Joined Feb 2006
3,968 Posts
Did you use a bandsaw to cut the rudder hinge bevel?
ben_beyer is offline Find More Posts by ben_beyer
Reply With Quote Quick reply to this message
Old 12-28-2019, 11:03 AM
carrid02 is offline
Find More Posts by carrid02
Registered User
carrid02's Avatar
Abilene, TX
Joined Jan 2006
1,379 Posts
Hey Ben... no, I sanded it by hand. I measured the angle at each end, drew a center line, then drew a line down each hinge stock. That gave me the “outline” of where I needed to sand.

I found that you really need to glue the stock on before you sand, because some of my hinge stock had as slight bow to it. Glueing first made it perfectly straight so I could sand it.

-Craig
carrid02 is offline Find More Posts by carrid02
Reply With Quote Quick reply to this message
Old 12-28-2019, 11:05 AM
carrid02 is offline
Find More Posts by carrid02
Registered User
carrid02's Avatar
Abilene, TX
Joined Jan 2006
1,379 Posts
I got the rear deck glued on! I used the supplied template to cutout around the fin, then used gorilla glue to glue on the fin.

Looking really straight and fit perfect to the fuse deck!!!

-Craig
carrid02 is offline Find More Posts by carrid02
Reply With Quote Quick reply to this message
Old 12-28-2019, 12:39 PM
sthudson is offline
Find More Posts by sthudson
Registered User
sthudson's Avatar
Grants Pass, OR
Joined Sep 2007
644 Posts
Looking good! Thanks for sharing all the details.
sthudson is offline Find More Posts by sthudson
Reply With Quote Quick reply to this message
Old 12-28-2019, 12:45 PM
carrid02 is offline
Find More Posts by carrid02
Registered User
carrid02's Avatar
Abilene, TX
Joined Jan 2006
1,379 Posts
My pleasure! I’m trying to explain somewhat but not every detail. Let me know if you see something that needs clarification... I’m happy to explain.

-Craig
carrid02 is offline Find More Posts by carrid02
Reply With Quote Quick reply to this message
Old 12-28-2019, 12:52 PM
carrid02 is offline
Find More Posts by carrid02
Registered User
carrid02's Avatar
Abilene, TX
Joined Jan 2006
1,379 Posts
Some folks have asked how I sand the hinge stock but not the softer 1/16” sheeting. I add a couple pieces of tape to the sheeting for protection and sand the stock with 120. Then I remove the tape and finish sanding with 220 and 320. (I’ll sand to 1000 before covering)

I also got the turtle deck blended to the fuse, got all the tail surfaces sanded/hinged and got the music wire pocketed to the root of each surface. The wire will be covered over when I get to that point.

It’s lookin like an airplane!!! Hatch/canopy/cowl next!!!

-Craig
carrid02 is offline Find More Posts by carrid02
Reply With Quote Quick reply to this message


Quick Reply
Message:


Currently Active Users Viewing This Thread: 1 (0 members and 1 guests)
 
Thread Tools