 12-05-2009, 12:02 AM
|
|||
|
|
|||
|
La Jolla, CA USA
Joined Oct 2006
2,715 Posts
|
Extreme Flight 78" Extra 300 Build
The long anticipated Extreme Flight 78" Extra 300 has finally been shipped. Mine arrived this afternoon. Here in San Diego we have a precision flying series called EMAC which is limited to electric powered planes. The EF 78" Extra 300 seemed like the perfect platform for this series, so a number of us did a group buy. Almost the entire Advanced class will be flying this model next year, so it should be a great series. Much like a spec. class in racing with equal equipment for all. I will be posting my build, and a few of the other guys will be contributing information where their build differs from mine.
Chris took a long time developing this plane, and has tweaked it to the max. Being 78" wing span, and 76" in length, it is stretched about as far as it can be and still fit in the IMAC 10% scale rules. If you look at the dimensions of this plane, the proportions are almost identical to the Dalton ML Extra, which has been a stellar performer in IMAC for the last couple of years. I am hoping my plane will come in very close to 11 pounds with my light weight battery freestyle setup, and still under 12 pounds with my big batteries in EMAC setup (it needs to fly almost 10 minutes to complete two Advanced sequences). I like to fly straight lines, but we all gotta cut loose once in a while and do some 3D. I've seen some videos, and this plane can 3D with the best of them. At 11 pounds, and 1225 square inches of wing, it should be a very light flying plane in 3D mode. I've just had a very tough week. I've been in and out of the Hospital for four days trying to pass a Flintstone sized Kidney Stone. This sucker will not come out, and is about the most painful thing I have ever had. Some advice, if anyone ever asks "Who wants a Kidney Stone?", don't raise your hand. It's bad news. They have me drugged up, and I have to pee through a strainer. I'm hoping that when it finally comes out it will have the face of Jesus, or Obama on it, so I can sell it on E-Bay or something. The arrival of the EF 78" raised my spirits. We have two more days of good weather in the forecast, so I hope to do some flying this weekend. After that, San Diego's version of a building season will begin. We'll have 4 or 5 days of freezing, 60 degree temperatures, and showers, so I hope to get a lot done. For those of you who have never seen it, here is a video of our friend Donatas winning at the World Air Games in Torino Italy this Summer, flying the EF 78" Extra 300.
Anyway, on with the build! |
||
|
|
Last edited by 1bwana1; 12-05-2009 at 01:51 AM.


|
||
|
|

|
12-05-2009, 12:39 AM
|
|
|
|
|
|
La Jolla, CA USA
Joined Oct 2006
2,715 Posts
|
Re: Extreme Flight 78" Extra 300 Build
OK, here is the obligatory "whats in the box" photo.
 Obviously my Wife is out of town at a Horse show (and you thought our hobby is expensive), so I unpacked the plane on her "fancy eating table" for the picture. Luckily she never reads the "dumb toy airplane" forums so she'll never know. Everything appears to have arrived in good shape, so no broken parts to worry about. Whenever I get a new ARF kit I go through it just to get an impression of the quality. This is an Extreme Flight product, so everything looks to be top notch. Although I generally iron all my planes, and will do so with this one as well, I have yet to see a single wrinkle in the covering. One thing I like to do is weigh the two wings to see how close they are. Having wings of equal weight is something custom builders focus on, as it has a profound effect on precision flight. Unfortunately, many ARFs are not even close, and a lot of weight must be added to one wing. In this case my left wing weighs 394 grams, and the right wing 399 grams. Pretty darn close for an ARF. To me this shows good design, consistent wood selection, glue application, and covering methods. I like it! My big custom built IMAC planes have spoiled me when it comes to hardware. I rarely can bring myself to use much of what comes in an ARF kit. However, I am very pleased with the hardware package that came in the EF kit. Composite dual control horns for all surfaces, Dubro Ball Links, my favorite Titanium "Pro-Link" linkages (I love these, and never heard of them being included in a kit this size before), carbon fiber wing and stab tubes, and even a CF rear gear setup. All great stuff. This may be the first ARF I've ever built where I will not have to buy, or change, any hardware. That represents a huge savings, making this plane even more of a value. Well done EF! The one extra thing that all of us purchased was the optional carbon fiber main landing gear. I have never had good luck with Chinese aluminum landing gear. Also, I will need to save weight wherever I can to make my final weight goal. The standard gear in my kit weighed right at 6 ounces, the carbon fiber gear weighs 2 7/8 ounces. Just about half, well worth the price. The bonus is that they appear to be very well made, with a nice air-foiled design. I recommend this option to anyone who buys this model. OK, the drugs are telling me it's time to go to bed. Please forgive my spelling and writing, I'm not all here right now. Tomorrow I'll start actually putting the pieces together, probably starting with gluing in all the hinges. Please feel free to question, comment, make suggestions, or contribute any way you want to as we go along. T.Bob, and Craven, feel free to harrass, and otherwise create problems (like we can stop you LOL!). See ya tomorrow.... |
|
|
|
|
12-05-2009, 12:50 AM
|
||
|
|
||
|
La Jolla, CA USA
Joined Oct 2006
2,715 Posts
|
Re: Extreme Flight 78" Extra 300 Build
Quote:
|
|
|
|
|
|

|
12-05-2009, 08:39 AM
|
||
|
|
||
|
United States, NJ, Chester Township
Joined Jan 2006
1,559 Posts
|
Re: Extreme Flight 78" Extra 300 Build
Quote:
 Just not sure what gasser I'm going to run maybe one of those Syssa 30's on a composite pipe ? Just not sure what gasser I'm going to run maybe one of those Syssa 30's on a composite pipe ?I have the same color scheme on my EXP so I'm not sure if I want the same color or not.  Frank |
|
|
|
|
|
|
12-06-2009, 02:14 AM
|
|
|
|
|
|
La Jolla, CA USA
Joined Oct 2006
2,715 Posts
|
Re: Extreme Flight 78" Extra 300 Build
Normally, I start a build by removing the covering from all the openings required in the kit. Even though the manual says to do this, it looks like EF has done this step for us, and did a better job of it than I can. Save me a lot of time, thanks guys! So, I started the build with gluing in the hinges. I really like Robart style hinges. they have proven reliable, and are easy to work with. The entire process of gluing the hinges into one side of all the surfaces took only about 1 1/2 hours, and went without any unexpected snags.
Here is a picture of my hinge gluing setup. 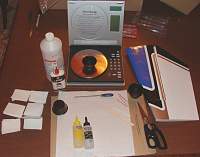 My method is pretty simple. The setup consists of: 30 minute, two part epoxy Cups for mixing the epoxy A scale for weighing the epoxy to ensure proper mix Mixing stick Denatured Alcohol for cleaning the hinge posts Toothpicks 3 in One penetrating oil a Qtip that I have removed the cotton from one end. I use this to apply the epoxy into the the holes for the hinges. It is the perfect size. File for making adjustments to the holes. Scissors (didn't need on this kit) Hobby knife (also didn't need) Pre cut paper towel pieces for keeping things clean. I hate messy glue jobs! Before I start the gluing, I do a dry fit inspection of all the surfaces to ensure I end up with a nice, tight, non-binding hinge line. I look to make sure that the the alignment is good, that the center of the hinge pivot point lines up tip of the bevels, and provides the trow I am looking for. If I find I need to do some adjusting, I use the round file, and/or hobby knife to tweak the openings until I am happy. With this kit I only lightly adjusted two openings. The hinge holes were properly done at the factory, this has not been my experience with some other kits. On the elevator, the manual says you will need to cut one of the hinge posts to make sure it doesn't hit the stab tube. On my kit this had already been done for me at the factory. Less work again. When I was dry fitting the ailerons I checked to make sure that the surfaces lined up perfectly at the wing tips. They did not, they were off by about 1/8th inch. This is too much for me, and it would be a lot of work to fix. T then checked the gap at the root of the wing/aileron and it was straight, even, and the right size. It didn't make sense that EF would make the ailerons too short, it's not like them. Then it hit me, this kit comes with side force generators that attach to the wing tips. I dry fitted one of these, and sure enough, the gap was perfect, and required for the SFGs. False alarm! Here is a picture of a dry fitted elevator/stab. Everything is tight, and straight. I think you will all have to agree that there is plenty of throw!  Now that all surfaces have been dry fit, it is time to start the gluing. I do this one surface at a time. First I remove all the hinges and line them up on a clean paper towel. I apply oil to the hinges to make sure the epoxy won't stick to the parts of the hinge that needs to move. I use a cup to hold some of the 3 in 1 oil. I use a toothpick to dip into the oil pool, and apply a light oil coat to all parts of the hinge that need to move. I use the toothpick method because I can be very accurate, get the coverage I need, and be sure not to get any oil on places I want the glue to stick. If you use too much, it will run down the rod, and the epoxy won't stick, if you use too little the hinge will be glued solid. This is very important! Next it is time to mix the epoxy. Since I mix a fresh batch for each surface, I only need a small amount. I mixed about 1 1/2 grams each of epoxy, and hardener for each batch. Next I dip the QTip in the epoxy (remember use the side which has had the cotton removed), get a nice bead of epoxy and coat the inside of each hinge hole. Make sure you coat all the way down to where the wood stops. I use a spinning, plunging motion to make sure I get complete coverage. You don't need a lot, but you do need good coverage. Done carefully, an small amount of epoxy will come out the top of the hole. Wipe this off with a pre-cut paper towel. Next, cover one rod of the hinge completely with epoxy. Again not too heavy, just enough to ensure good coverage. Then push it into the hinge hole with a twisting, motion. If you have used just the right amount of epoxy a small bead will come out of the hole when about 1/8 inch from the hinge knuckle. Stop pushing, and do all the hinges to this point. Now go back, and clean off all the excess epoxy. You can now push the hinge the rest of the way into the hole. It is very important to get the alignment of the hinges right. You want the center of the metal hinge pins to be right at the peak of the surface bevel. You want the throw of the hinge to be exactly perpendicular to the bevel line. Check the alignment, and make sure that each hinge can rotate freely the desired amount, and that the alignment doesn't change as it rotates throughout it's movement. Now is the time to look over the surface, and clean up any extra glue, or fingerprints that may have gotten on it. The surface is now finished, set it aside to dry. While drying, I stand it vertically so any glue will flow down into the hole. You are now ready to start the whole process over on the next surface. After I complete each surface, I go back to all previously completed surface and gently rotate the hinges through their entire range of motion. This "exercising" of the hinges will makes sure that epoxy doesn't bond in the hinge. This simple method has worked well for me. It is easier to do than it sounds. In fact it takes longer to type how to do it than it does to actually do it. If you guys have other methods, please feel free to post. I'm always interested in learning how to do things better. Total time into the build so far 1 1/2 hours. Tomorrow I'll glue the surfaces other side, and hopefully have time to glue on all the control horns. |
|
|
|
|
12-06-2009, 02:18 AM
|
|
|
|
|
|
La Jolla, CA USA
Joined Oct 2006
2,715 Posts
|
Re: Extreme Flight 78" Extra 300 Build
Hey Daniel, welcome to the thread. It seems we have very similar taste in planes. We are both big fans of Extreme Flight and DW Foamies. Feel free to chime in with any suggestions.
Congratulations to you, and Michael for your great results in the Video Freestyle contest! Say hi to your Brother for me! |
|
|
Last edited by 1bwana1; 12-06-2009 at 02:59 AM.
|
|
12-09-2009, 10:56 PM
|
|
|
|
|
|
United States, NJ, Chester Township
Joined Jan 2006
1,559 Posts
|
Re: Extreme Flight 78" Extra 300 Build
I wasn't sure if I was subscribed to this thread anymore
 The man must be busy with other stuff,it is Xmas time you know ?!! The man must be busy with other stuff,it is Xmas time you know ?!!Oh wait a minute he was trying to pass a Stone,maybe it finally passed,hope all is well !! |
|
|
|
|
12-09-2009, 11:21 PM
|
||
|
|
||
|
High Prairie, Washington
Joined Jul 2007
4,363 Posts
|
Re: Extreme Flight 78" Extra 300 Build
Quote:
This thing is a sweet looking plane and I'm sure that it'll fly a lot like the 88". Will you be able to make a video? |
|
|
|
|
|
|
12-10-2009, 11:33 AM
|
|
|
|
|
|
La Jolla, CA USA
Joined Oct 2006
2,715 Posts
|
Re: Extreme Flight 78" Extra 300 Build
Hey guys, sorry to have disappeared for so long. I finally passed the stone Saturday night. All I can say is ouch, I never want to have to do that again. I am getting caught up at work, so it back on with the build.
Daniel, I don't have a video camera, but some of the other guys at the field do. I'll try and get a video up when we do the maiden. I'm expecting this plane to fly even better than the 88" version, which as we all know is a great flying plane. Chris has made some major tweaks to the design by stretching the fuse, moving the canopy, changing the wing design, and I'm sure more. It seems to be a hybrid of the old EF 300, and the new 48" 300-EXP, incorporating the best of each while keeping in the IMAC 10% rule. I'm really looking forward to getting this one in the air. |
|
|
|

|
12-10-2009, 11:53 AM
|
|
|
|
|
|
United States, NJ, Chester Township
Joined Jan 2006
1,559 Posts
|
Re: Extreme Flight 78" Extra 300 Build
I have the EXP and it is an awesome flyer.. The only thing is I always liked EF planes having scale outlines. Like my EF Yaks big round fuse not squared off like other Yaks. This Extra being stretched out and looks kinda skinny to me. I understand the mods make it fly much better,but I still like a more scale look .. Not that it's going to stop me from getting one,which I'm hoping when the Gas/Glow version comes out,I'll get one..or the new Edge..tough decision for sure...
Frank PS. Glad to hear you passed the stone !! Now get to building, Slacker !!! Just kidding !
|
|
|
|
«
Previous Thread
|
Next Thread
»
| Currently Active Users Viewing This Thread: 1 (0 members and 1 guests) | |
| Thread Tools | |


 Similar Threads
|
|||||
| Category | Thread | Thread Starter | Forum | Replies | Last Post |
| NEW EXTREME FLIGHT 78" EXTRA 300!!!!!! | mxcop | General Discussion - Electrics | 1745 | 07-18-2020 03:22 PM | |
| Extreme Flight 88" 50cc Extra 300 Build! | The Flyin Hawaiian | Airframes and Kits | 3359 | 11-11-2019 10:21 AM | |
| New Extreme Flight RC 48" Extra 300 EXP Build | mxcop | General Discussion - Electrics | 374 | 09-27-2014 10:35 AM | |
| Extreme Flight Extra 300, 50cc, 88.5inch Wingspan, Build !!!!!!! | LimeyTom | Build Threads | 44 | 11-09-2009 08:34 AM | |
| Extreme Flight Extra 300 88,5" - ELECTRIC!! | folgado | General Discussion - Electrics | 34 | 09-08-2009 03:28 AM | |