logo
Thread Tools
Old 11-03-2017, 11:01 PM
grabs39 is offline
Find More Posts by grabs39
crooked lefty
grabs39's Avatar
United States, AZ, Queen Creek
Joined Jun 2013
666 Posts
Did I read 4 builds at once? You guys rock!
grabs39 is offline Find More Posts by grabs39
Reply With Quote Quick reply to this message
Sign up now
to remove ads between posts
Old 11-04-2017, 09:01 AM
tom wheeler is offline
Find More Posts by tom wheeler
Registered User
tom wheeler's Avatar
United States, MI, Auburn Hills
Joined Apr 2006
1,708 Posts
Quote:
Originally Posted by grabs39 View Post
Did I read 4 builds at once? You guys rock!
Hi John,
Yep we are going to be busy, when we pick up the kits from Cam he plans on showing us some of the fixtures he has come up with to speed up the fuse side builds. Maybe we'll come up with a few more tools and processes as well.

Tom
tom wheeler is offline Find More Posts by tom wheeler
Reply With Quote Quick reply to this message
Old 11-14-2017, 10:50 AM
Hammerman is offline
Find More Posts by Hammerman
DA isn't Haulin it? It Drags
Hammerman's Avatar
United States, AZ, Tucson
Joined Mar 2006
2,620 Posts
Any news?
Hammerman is offline Find More Posts by Hammerman
Reply With Quote Quick reply to this message
Old 11-14-2017, 11:55 AM
RaysGems is offline
Find More Posts by RaysGems
Team Futaba USA
RaysGems's Avatar
Hebron, KY
Joined Oct 2006
114 Posts
The kit quality is outstanding.
RaysGems is offline Find More Posts by RaysGems
Reply With Quote Quick reply to this message
Old 11-14-2017, 05:13 PM
tom wheeler is offline
Find More Posts by tom wheeler
Registered User
tom wheeler's Avatar
United States, MI, Auburn Hills
Joined Apr 2006
1,708 Posts
Quote:
Originally Posted by Hammerman View Post
Any news?
Good day to ask.....Cam dropped all four kits off to Ron and I this morning, they truly look great. The quality of the wood is sensational, all of the ply parts are made from real aircraft ply from Wicks Aircraft. The balsa is top of the line as well, all of the balsa is weighted and grouped for usage. The wing sheeting is all "C" grain so it's light and also very strong. The fuse and turtle deck sheeting is "A" grain so the grain lines are parallel to the sheet so they form well around curves. All of the sheeting has also been edge trued.

We spent a few hours going over the plans with Cam, making sure we were all on the same page with the construction of the kits. Right now the there is no instruction book, Ron and I are building the first ones and this thread will act to support a build manual that Ty Lyman will be authoring, Ty, your kit is on the way, Cam had your wood parts boxed and a ready to ship to you today.

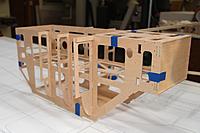
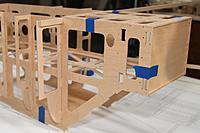
Next we dry assembled a motor box, everything fit right in place, the ply is awesome and a real nice feature is that were each piece fit together in it's tabs and slots meat, at each their four corners there is a small radius relive so that the glue truly locks everything in place. This will become more evident as we get into the build process.

As mentioned Ron and I have four kits, one kit is being built for John Sabini of New York, his will be powered by a DA 150. The other kit is for Jerry Unruh on California and will be powered by a DA 200. The motor boxes as they come have firewall locations for both 2 and 4 cylinder engines.

The other two kit's will be built and are available, just let Cam or us know and they could be yours......

Ron and I are really looking forward to this build and we hope you can follow along with us. These will be great IMAC machines!!

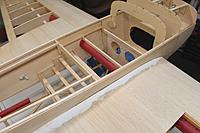
Now for a little trivia, (last three pictures) Ron and I in the past few weeks to keep busy are building a kit for a customer that was started about 20 years ago. I was going to build the whole kit for him, but he started and framed up the wings. He went away for last 20 years and he has just returned so I asked him if he wanted the kit completed. He did so this is what we have been doing for the past few weeks. We made some modifications to the kit so canisters can be used and we planned off the very blunt leading edge and added a new one that should allow better snap performance.

We of course know the kit manufacture, but wondering how many of you recognize this kit. Some details, Extra 300L, 104" wing span, fixed (non-tube) tail group.

Tom
tom wheeler is offline Find More Posts by tom wheeler
Last edited by tom wheeler; 11-14-2017 at 05:19 PM.
Reply With Quote Quick reply to this message
Old 11-14-2017, 05:50 PM
torquen is offline
Find More Posts by torquen
Registered User
torquen's Avatar
Lodi, Ca. USA
Joined Jan 2006
1,650 Posts
Quote:
Originally Posted by tom wheeler View Post
Good day to ask.....Cam dropped all four kits off to Ron and I this morning, they truly look great. The quality of the wood is sensational, all of the ply parts are made from real aircraft ply from Wicks Aircraft. The balsa is top of the line as well, all of the balsa is weighted and grouped for usage. The wing sheeting is all "C" grain so it's light and also very strong. The fuse and turtle deck sheeting is "A" grain so the grain lines are parallel to the sheet so they form well around curves. All of the sheeting has also been edge trued.

We spent a few hours going over the plans with Cam, making sure we were all on the same page with the construction of the kits. Right now the there is no instruction book, Ron and I are building the first ones and this thread will act to support a build manual that Ty Lyman will be authoring, Ty, your kit is on the way, Cam had your wood parts boxed and a ready to ship to you today.

Next we dry assembled a motor box, everything fit right in place, the ply is awesome and a real nice feature is that were each piece fit together in it's tabs and slots meat, at each their four corners there is a small radius relive so that the glue truly locks everything in place. This will become more evident as we get into the build process.

As mentioned Ron and I have four kits, one kit is being built for John Sabini of New York, his will be powered by a DA 150. The other kit is for Jerry Unruh on California and will be powered by a DA 200. The motor boxes as they come have firewall locations for both 2 and 4 cylinder engines.

The other two kit's will be built and are available, just let Cam or us know and they could be yours......

Ron and I are really looking forward to this build and we hope you can follow along with us. These will be great IMAC machines!!

Now for a little trivia, (last three pictures) Ron and I in the past few weeks to keep busy are building a kit for a customer that was started about 20 years ago. I was going to build the whole kit for him, but he started and framed up the wings. He went away for last 20 years and he has just returned so I asked him if he wanted the kit completed. He did so this is what we have been doing for the past few weeks. We made some modifications to the kit so canisters can be used and we planned off the very blunt leading edge and added a new one that should allow better snap performance.

We of course know the kit manufacture, but wondering how many of you recognize this kit. Some details, Extra 300L, 104" wing span, fixed (non-tube) tail group.

Tom
Ohio RC is what the 20 year build looks like.

Awesome. Can't wait to see the build on the KAM Aero. I'm wanting to make this my next plane.
Garrett Morrison
torquen is offline Find More Posts by torquen
Reply With Quote Quick reply to this message
Old 11-14-2017, 05:53 PM
Keith Cannon is offline
Find More Posts by Keith Cannon
Only Amateurs Measure First
Keith Cannon's Avatar
United States, CO, Parker
Joined Apr 2016
1,389 Posts
Quote:
Originally Posted by tom wheeler View Post
Good day to ask.....Cam dropped all four kits off to Ron and I this morning, they truly look great. The quality of the wood is sensational, all of the ply parts are made from real aircraft ply from Wicks Aircraft. The balsa is top of the line as well, all of the balsa is weighted and grouped for usage. The wing sheeting is all "C" grain so it's light and also very strong. The fuse and turtle deck sheeting is "A" grain so the grain lines are parallel to the sheet so they form well around curves. All of the sheeting has also been edge trued.

We spent a few hours going over the plans with Cam, making sure we were all on the same page with the construction of the kits. Right now the there is no instruction book, Ron and I are building the first ones and this thread will act to support a build manual that Ty Lyman will be authoring, Ty, your kit is on the way, Cam had your wood parts boxed and a ready to ship to you today.

Next we dry assembled a motor box, everything fit right in place, the ply is awesome and a real nice feature is that were each piece fit together in it's tabs and slots meat, at each their four corners there is a small radius relive so that the glue truly locks everything in place. This will become more evident as we get into the build process.

As mentioned Ron and I have four kits, one kit is being built for John Sabini of New York, his will be powered by a DA 150. The other kit is for Jerry Unruh on California and will be powered by a DA 200. The motor boxes as they come have firewall locations for both 2 and 4 cylinder engines.

The other two kit's will be built and are available, just let Cam or us know and they could be yours......

Ron and I are really looking forward to this build and we hope you can follow along with us. These will be great IMAC machines!!

Now for a little trivia, (last three pictures) Ron and I in the past few weeks to keep busy are building a kit for a customer that was started about 20 years ago. I was going to build the whole kit for him, but he started and framed up the wings. He went away for last 20 years and he has just returned so I asked him if he wanted the kit completed. He did so this is what we have been doing for the past few weeks. We made some modifications to the kit so canisters can be used and we planned off the very blunt leading edge and added a new one that should allow better snap performance.

We of course know the kit manufacture, but wondering how many of you recognize this kit. Some details, Extra 300L, 104" wing span, fixed (non-tube) tail group.

Tom
Its been an hour, are they done yet?
Keith Cannon is offline Find More Posts by Keith Cannon
Reply With Quote Quick reply to this message
Old 11-14-2017, 06:48 PM
KEITH RUSH is offline
Find More Posts by KEITH RUSH
KEITH RUSH
KEITH RUSH's Avatar
United States, FL, Jacksonville
Joined Mar 2006
605 Posts
Quote:
Originally Posted by tom wheeler View Post
Good day to ask.....Cam dropped all four kits off to Ron and I this morning, they truly look great. The quality of the wood is sensational, all of the ply parts are made from real aircraft ply from Wicks Aircraft. The balsa is top of the line as well, all of the balsa is weighted and grouped for usage. The wing sheeting is all "C" grain so it's light and also very strong. The fuse and turtle deck sheeting is "A" grain so the grain lines are parallel to the sheet so they form well around curves. All of the sheeting has also been edge trued.

We spent a few hours going over the plans with Cam, making sure we were all on the same page with the construction of the kits. Right now the there is no instruction book, Ron and I are building the first ones and this thread will act to support a build manual that Ty Lyman will be authoring, Ty, your kit is on the way, Cam had your wood parts boxed and a ready to ship to you today.

Next we dry assembled a motor box, everything fit right in place, the ply is awesome and a real nice feature is that were each piece fit together in it's tabs and slots meat, at each their four corners there is a small radius relive so that the glue truly locks everything in place. This will become more evident as we get into the build process.

As mentioned Ron and I have four kits, one kit is being built for John Sabini of New York, his will be powered by a DA 150. The other kit is for Jerry Unruh on California and will be powered by a DA 200. The motor boxes as they come have firewall locations for both 2 and 4 cylinder engines.

The other two kit's will be built and are available, just let Cam or us know and they could be yours......

Ron and I are really looking forward to this build and we hope you can follow along with us. These will be great IMAC machines!!

Now for a little trivia, (last three pictures) Ron and I in the past few weeks to keep busy are building a kit for a customer that was started about 20 years ago. I was going to build the whole kit for him, but he started and framed up the wings. He went away for last 20 years and he has just returned so I asked him if he wanted the kit completed. He did so this is what we have been doing for the past few weeks. We made some modifications to the kit so canisters can be used and we planned off the very blunt leading edge and added a new one that should allow better snap performance.

We of course know the kit manufacture, but wondering how many of you recognize this kit. Some details, Extra 300L, 104" wing span, fixed (non-tube) tail group.

Tom
Ohio RC Extra for sure

Keith
KEITH RUSH is offline Find More Posts by KEITH RUSH
Reply With Quote Quick reply to this message
Old 11-14-2017, 06:56 PM
tom wheeler is offline
Find More Posts by tom wheeler
Registered User
tom wheeler's Avatar
United States, MI, Auburn Hills
Joined Apr 2006
1,708 Posts
Yep...it's Ohio RC, back in the day I built about 25 of them.

Tom
tom wheeler is offline Find More Posts by tom wheeler
Reply With Quote Quick reply to this message
Old 11-14-2017, 08:02 PM
Fly RC II is offline
Find More Posts by Fly RC II
Love RC!
Fly RC II's Avatar
United States, OH, Strongsville
Joined Jan 2006
140 Posts
Quote:
Originally Posted by Keith Cannon View Post
Its been an hour, are they done yet?
Yes! I'm going to love following along here! Pleasure to make your acquaintance Keith! I will be building one starting in mid to late December. I'm in the Cleveland area (south). We are moving into a new house the same time.

David
Fly RC II is offline Find More Posts by Fly RC II
Reply With Quote Quick reply to this message
Old 11-15-2017, 08:22 AM
Hammerman is offline
Find More Posts by Hammerman
DA isn't Haulin it? It Drags
Hammerman's Avatar
United States, AZ, Tucson
Joined Mar 2006
2,620 Posts
With ordering a kit, I will also be following this build. Hope to have my kit soon.
Hammerman is offline Find More Posts by Hammerman
Reply With Quote Quick reply to this message
Old 11-15-2017, 09:49 AM
Flybye Steve is offline
Find More Posts by Flybye Steve
Registered User
United States, MD, Parkton
Joined Jun 2008
1,508 Posts
Hey Tom, great to see this get started.
When you glue the motor box together, will you have it assembled and apply the adhesive to the outside of the joints or apply glue in the joints as you assemble it?
What type or brand of adhesive will you use?
Is that a drawing supplied with the kit that I see on the table under the motor box?
Flybye Steve is offline Find More Posts by Flybye Steve
Last edited by Flybye Steve; 11-15-2017 at 09:53 AM. Reason: added a question
Reply With Quote Quick reply to this message
Old 11-15-2017, 12:03 PM
tom wheeler is offline
Find More Posts by tom wheeler
Registered User
tom wheeler's Avatar
United States, MI, Auburn Hills
Joined Apr 2006
1,708 Posts
Quote:
Originally Posted by Flybye Steve View Post
Hey Tom, great to see this get started.
When you glue the motor box together, will you have it assembled and apply the adhesive to the outside of the joints or apply glue in the joints as you assemble it?
What type or brand of adhesive will you use?
Is that a drawing supplied with the kit that I see on the table under the motor box?
Steve,

We will use a mix of Titebond II and Zpoxy for the motor box. The firewall, landing gear plate along with the 1/2" x 1/2" oak reinforcement rails will be all glued in place with Zpoxy. All of the rest of the motor box will be glued in place with Titebond II. We will apply the glue in the joints as we assemble, once everything is in place and clamped were needed we use "acid" brushes to clean up the joints. If you look at this close up photo you can see at each of the four corners of the tab and slots there is a small radius relief that allows the glue to roll into the joint. That is a real cool addition to make sure everything is totally secured.

Yep, that's one of the two drawings that come with the kit. The drawing are excellent and included both a fuse left and right side drawing, greatly lessens the possibility of making two of the same side....

Another nice feature is that each drawing has a important note at the top that gives the real overall dimension of the fuse side length witch I believe is 83". This is done because even though the drawing are printed on a plotter by a professional drafting print house, there can be some minor differences between drawing just because the paper can shrink or stretch a bit. So before you start the build, measure the fuse sides on the drawing and make sure it's 83", they all should be, but just check to make sure.

We are not building today, Ron is helping our friend who owns a local hobby shop. Tomorrow we will have a shorten day as one of our flying buddies, Ken, is moving to Florida and we are attending a good by lunch.

Tom
tom wheeler is offline Find More Posts by tom wheeler
Last edited by tom wheeler; 11-25-2017 at 10:15 PM.
Reply With Quote Quick reply to this message
Old 11-15-2017, 12:32 PM
Keith Cannon is offline
Find More Posts by Keith Cannon
Only Amateurs Measure First
Keith Cannon's Avatar
United States, CO, Parker
Joined Apr 2016
1,389 Posts
Quote:
Originally Posted by tom wheeler View Post
Steve,

We will use a mix of Titebond II and Zpoxy for the motor box. The firewall, landing gear plate along with the 1/2" x 1/2" oak reinforcement rails will be all glued in place with Zpoxy. All of the rest of the motor box will be glued in place with Titebond II. We will apply the glue in the joints as we assemble, once everything is in place and clamped were needed we use "acid" brushes to clean up the joints. If you look at this close up photo you can see at each of the four corners of the tab and slots there is a small radius relief that allows the glue to roll into the joint. That is a real cool addition to make sure everything is totally secured.

Yep, that's one of the two drawings that come with the kit. The drawing are excellent and included both a fuse left and right side drawing, greatly lessens the possibility of making two of the same side....

Another nice feature is that each drawing has a important note at the top that gives the real overall dimension of the fuse side length witch I believe is 93". This is done because even though the drawing are printed on a plotter by a professional drafting print house, there can be some minor differences between drawing just because the paper can shrink or stretch a bit. So before you start the build, measure the fuse sides on the drawing and make sure it's 93", they all should be, but just check to make sure.

We are not building today, Ron is helping our friend who owns a local hobby shop. Tomorrow we will have a shorten day as one of our flying buddies, Ken, is moving to Florida and we are attending a good by lunch.

Tom
I am not sure I totally agree with the relief cutouts as a feature and more of a necessary evil if you use a router. With those I almost think I would go for some form of epoxy rather than titebond to fill that gap.

I would still bet that the joints will fail long after the wood itself fails so probably a mute point.
Keith Cannon is offline Find More Posts by Keith Cannon
Reply With Quote Quick reply to this message
Old 11-15-2017, 07:12 PM
tom wheeler is offline
Find More Posts by tom wheeler
Registered User
tom wheeler's Avatar
United States, MI, Auburn Hills
Joined Apr 2006
1,708 Posts
Quote:
Originally Posted by Keith Cannon View Post
I am not sure I totally agree with the relief cutouts as a feature and more of a necessary evil if you use a router. With those I almost think I would go for some form of epoxy rather than titebond to fill that gap.

I would still bet that the joints will fail long after the wood itself fails so probably a mute point.
Keith,

You are right about the relief cutouts being necessary because of using the round bit of an CNC router vs. laser cut. The last 25 or more kits I have been were laser cut, square corners, it's been a while since building a router cut kit.

In terms of Titebond II vs. epoxy, everything I have been able find about comparing the two, Titebond II has a tinsel strength about 3700 psi, and that's higher than most epoxy's south of the expensive true aviation and marine like West System and Aeropoxy where their tinsel strength runs in the 10 to 12,000 psi. range.

We are still not totally set as to witch adhesive we will use, but you are right again, ether will provide a very strong airframe and the joints will outlast the wood....

Tom
tom wheeler is offline Find More Posts by tom wheeler
Reply With Quote Quick reply to this message


Quick Reply
Message:


Currently Active Users Viewing This Thread: 1 (0 members and 1 guests)
 
Thread Tools