|
|
|
|
|
great build! Thanks for sharing...... i look forward to my 101" in same scheme

|
|
|
|
|
|
|
|
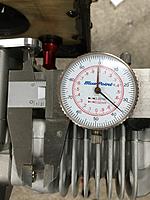
Got some new goodies from Tim and NWRC. I was asking him about stand-off options for the GP76 and this airframe since SW or GP don’t provide any.. After mentioning the blazing star 60 mount will work he shot me an image of some shiny parts he’d just received in for a cheaper option... complete with M6 hardware 1” aluminum stand-off and two delrin spacers, washers and all!! NWRC providith!!
 Tim was kind enough to allow me to be the guinea pig for the new parts. Knowing that my build was in full motion he sent them to me ASAP. After receiving the parts I found out the bolts and spacers were M5... I let Tim know of my conundrum. Turns out China had dropped the ball as they were supposed to be M6. REST ASSURED Tim has already ordered the correct hardware and has started enlarging the stand-off and spacer holes. As for me, I have a drill press for the standoffs, and a tapered razor reamer to enlarge the delrin spacers, and a hardware store to get some M6 x 50mm bolts (50-60mm should work). Ended up using one spacer in front of the firewall and one behind the firewall. This gave me approx 1/16” spinner backplate to cowl gap. Simply perfection. Special thanks goes to Tim with providing another great option, and should be live on the website very soon.
|
|
|
|
|
|
It is, I have about 30 flights on mine. A friend has the ARS with the GP-76 and it is very smooth as is.
I bond the Blazing Star mount to the firewall with E-120 with screws finger tight, let it setup, then mount the engine. This keeps the mount flat, and the screws stay tight with minimal vibration. |
|
|
||
|
|
Quote:
|
|
|
|
|
|
|
I need to do more research on the available products offered. I saw in the Dussia's build video with Extreme Flight that they use the 9642 and not E-120HD. The 9462 has more of a flexible finish blended with rubber particles which would help with shock absorption. I'm sure either are great. I've used the tube paste 615 and loved it. Hysol is just a great product.
|
|
|
|
|
|
Skywing provides these cool little EC3 connector mounting brackets. It’s a sandwich of ply material that is glued together and retains the connector which is screwed to the airframe.
I opted to use XT60 connectors, like I did with my 91” ARS. Here’s a bunch of photos how I did it. In short, you need to enlarge the backing/wires holes, remove the index notch, and widen the longer inner sides. Pretty easy really. Just takes a bit of time. Used CA to glue all the pieces together along with the connector itself. When I screwed the assembly to the airframe I put a little silicone underneath. Fun Fact, the EC3 plugs into the XT60 receptacles
|
|
|
|
|
|
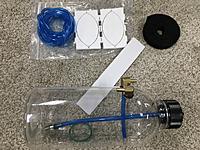
Prepping the fuel tank. Skywing supplies a round plastic fuel tank. You also get some poly fuel line, Velcro, and some foam pieces. My preinstalled clunk hits the bottom of the tank, not a big deal because I’ll be putting Viton in there instead and re-plumb so it's about 1/8-1/4" above the bump in the tank.
The poly line provided is a little thinner walled than some of the stuff I've received in the past, so it may kink easier. FYI The foam pieces you put together with glue and there are clever notches in the foam that link into the laminate frame. Pretty neat. I decided to add a bit more material to keep it from flexing using craft foam. I’ll dub it the Oreo stack lol!!! Once the foam pieces are glued in place, put velcro on the center line of the floor and stick the fuel tank to it. Now your fuel tank will not rotate. I'll add velcro around the tank to the frame once I get my Viton fuel tubing in and plumb the tank with it along with the rest of the plumbing.
|
|
|
|
|
|
That creology foam comes in handy!

|
|
|
|
|
|
Super handy!
I used this but in 4mm EVA Foam Sheets Handicraft Sheets for Cosplay Kids Craft Square 9.8"×9.8" 3-10mm Thick Black (2mm Thick) https://www.amazon.com/dp/B07SSYT82H..._ySuDFbA82W3V2 |
|
|
|
|
|
I bought a sheet of 5mm thick foam for $1.95 at Hobby Lobby.
|
|
|
|
|
|
I use craft foam for just about everything! Super handy.
In this case I used it as an extra cushion for my Tech Aero. Used welders glue to bond it to the unit and the a bit on the other side to soak into the foam, tack up, then slapped the Velcro on it. |
|
|
|
|
|
Ignition mount placement and security. Sorry for not completing everything and just sending partial installments. Takes time to plan wire routing and strategic component placement. It’s a DITR... Diamond in the Rough!
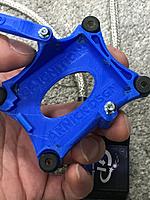
Using my 3DP designed Ignition Mount, I made wood blocks with 3mm bolts and blind nuts. Epoxied that to the lower floor. I put the ignition module here because it would be less succumbed to heat and it fit here clear of fuel tubing, and made easy routing of all the wiring and ignition leads. Note the GP ignition module power lead has a JST connector, Tech Aero has a FUT JR connector. I decided to crimp my own JST connector to the Tech Aero instead of using a supplied FUT to JST lead. I didn’t need the length and sure didn’t care for the extra connections. When installing my ignition module into my 3DP mount, PLA is pretty hard, the mount kinda snaps in place and the strap holds it down. Even so, fretting will occur. I simply add a tiny dab of silicone to the corners/side and under the strap ends. I also elected to put some silicone where the leads come since GP doesn’t integrate any sort of rubber in the area...
|
|
|
|
|
|
Not sure why this is a roadblock for me. But I can’t seem to find sweet blissfully geometry with the aileron linkages. Anyone with THIS 89” Airframe care to comment? Currently using 1.5” arms middle or lower control horn hole and top or bottom rod end attachment. For some reason I like the lower control hole and the rod end facing The wing side of the servo arm. Just seems weird. Maybe it’s the servo arm or the rod end flange that’s throwing me off. Just want to see what everyone else did. TIA
Edit: Ended up using the 1.5" arm on the outer hole with the linkage on top (away from the surface), and the middle control horn hole. |
«
Previous Thread
|
Next Thread
»
| Currently Active Users Viewing This Thread: 1 (0 members and 1 guests) | |
| Thread Tools | |


